
Stackery Quickstart
With Stackery, you can get up and running and deploy your first serverless stack in just a few minutes.
This guide will walk you through the steps of creating and deploying an AWS Serverless Application Model (SAM) service that fetches a static HTML portfolio page.
By the end of the tutorial, you will have:
- Created a Stackery account
- Integrated your Stackery account with your AWS and Git accounts.
- Written a simple Lambda function to serve a static HTML page to an API endpoint
- Added a customizable portfolio page template
- Created and deployed a serverless stack
If you're completely new to serverless architecture, read our Introduction to Stackery first.
Tutorial Updates
As we continue to develop Stackery, there may be improvements made to the design of the application. You may notice some differences between current versions and versions used to record our video guides. Rest assured, the overall functionality of Stackery remains the same.
For the most up-to-date visuals and instructions, please refer to the written version of the tutorial.
Quickstart Video (9 minutes)
The video contains the same information as the written tutorial below.
What We're Building
At the end of the tutorial, you will have built a functional and customizable portfolio page that you can access from an API endpoint:
The following are descriptions of the Stackery resources we'll be working with:
Function : The Lambda function (written in Node 8) that will serve our static HTML page.
Rest API : The API endpoint where we can view our portfolio page online.
1. Create a Stackery Account
Head over to the Stackery Sign Up Page and create an account. (If you already have a Stackery account, skip to the next step).
If you were invited by a team member, follow the link in your email to create an account.
Once your account is created, you will be automatically signed in and redirected to the Stackery Setup.
Complete the in-app setup
The Stackery Setup guides you through the steps you'll need to complete in order to create and deploy a serverless application. All of the steps are optional, but you won't be able to complete the Quickstart and deploy an application without completing them, either during setup or later in the app.
Integrate Stackery with your Git account(s)
Stackery helps you create infrastructure-as-code templates in your framework of choice, and your code is always stored in a Git repository in your Git provider account.
You can still clone or PR the repo and edit code locally in your preferred IDE. Stackery detects remote changes in your repository and allows you to refresh or create a new branch in the visual editor.
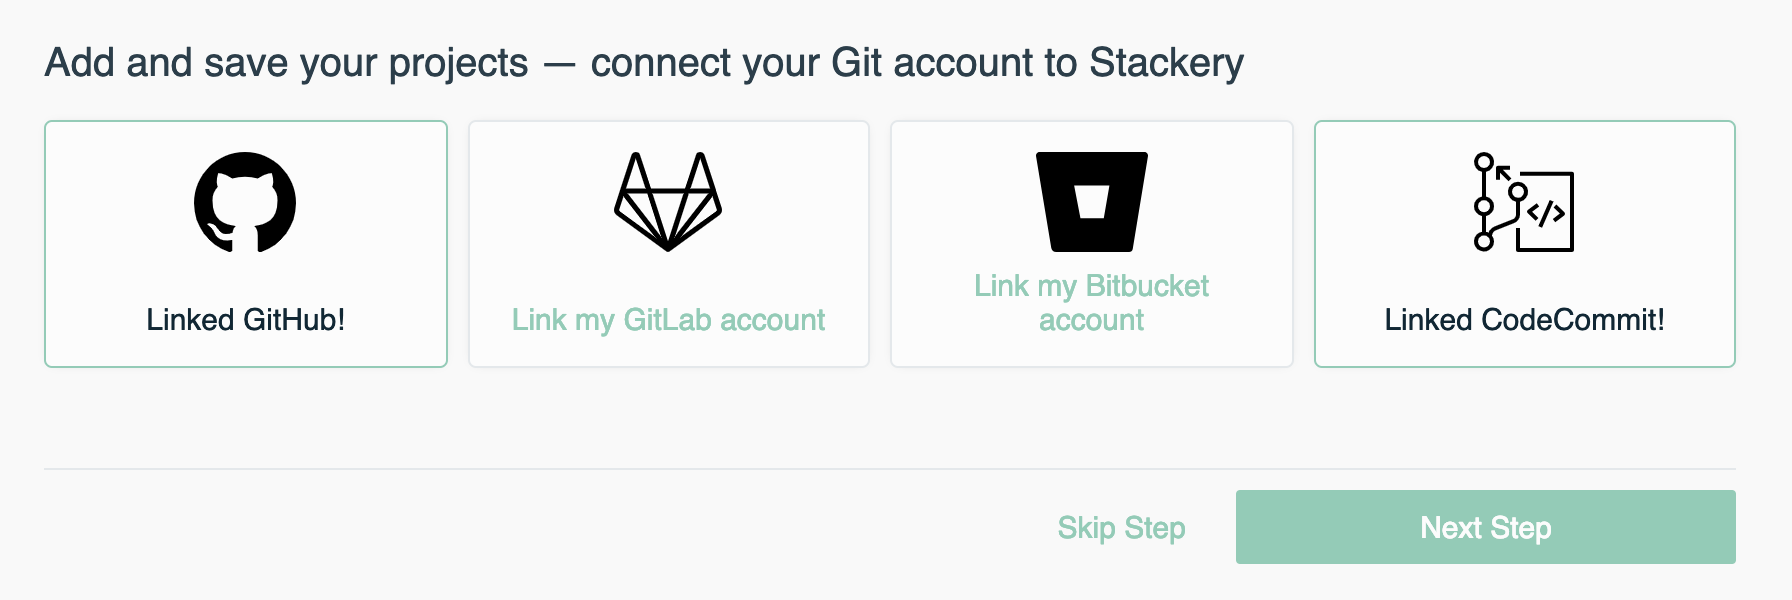
If your Git provider is GitHub, GitLab, or Bitbucket, click the appropriate button and you will be guided through an authentication process within your provider's site. If your Git provider is AWS CodeCommit, skip ahead to the next step, as connecting your AWS account will automatically connect your CodeCommit account.
If you skip this step during setup, you will also be able to link your provider the first time you add a stack.
Integrate Stackery with your AWS account(s)
Next, you will be prompted to link your AWS account to Stackery in the AWS Console.
Your AWS credentials are never transmitted to Stackery.
They are transmitted to AWS and used to create a role for serverless deployment automation. This role is configured with the absolute minimal permissions set required to carry out the task and specifically cannot execute infrastructure changes within your account.
Setting up your AWS account with Stackery will require you to log in to the AWS account you would like to use for your first deployment (you can add additional AWS accounts later).
Once you're logged into your AWS Console, click the Link my AWS account button:
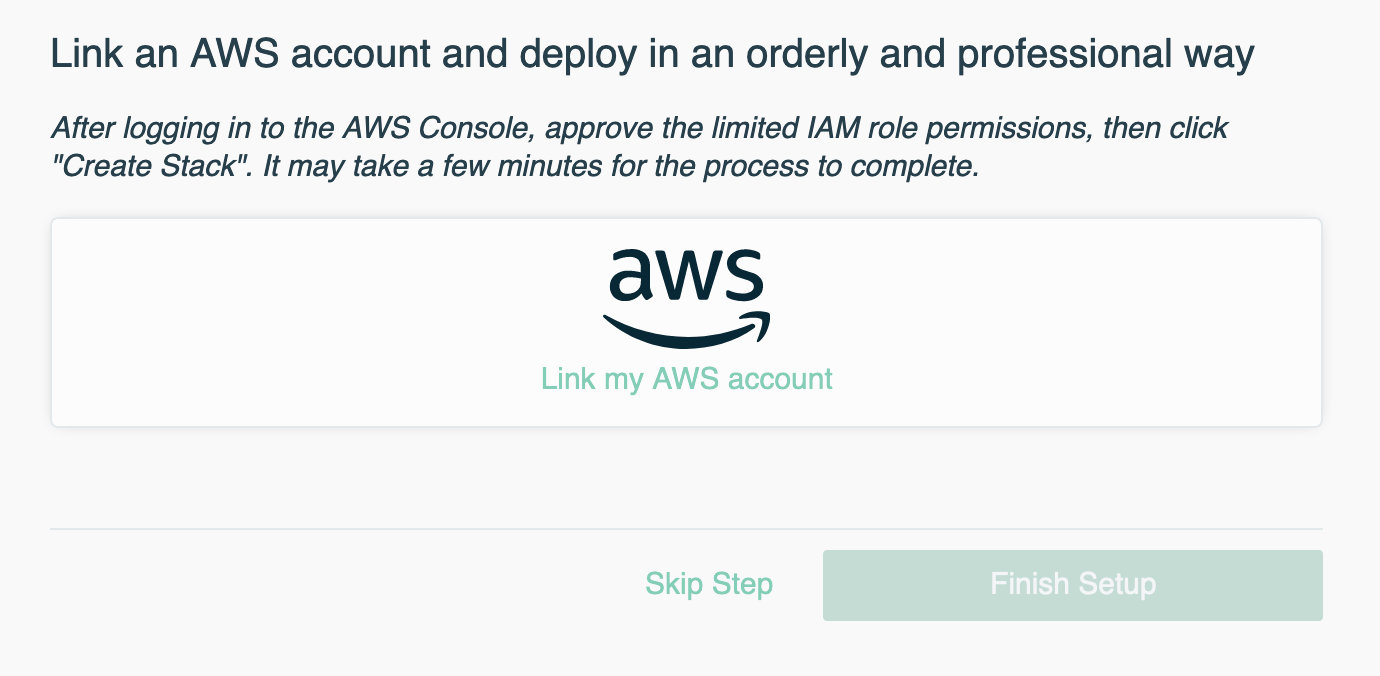
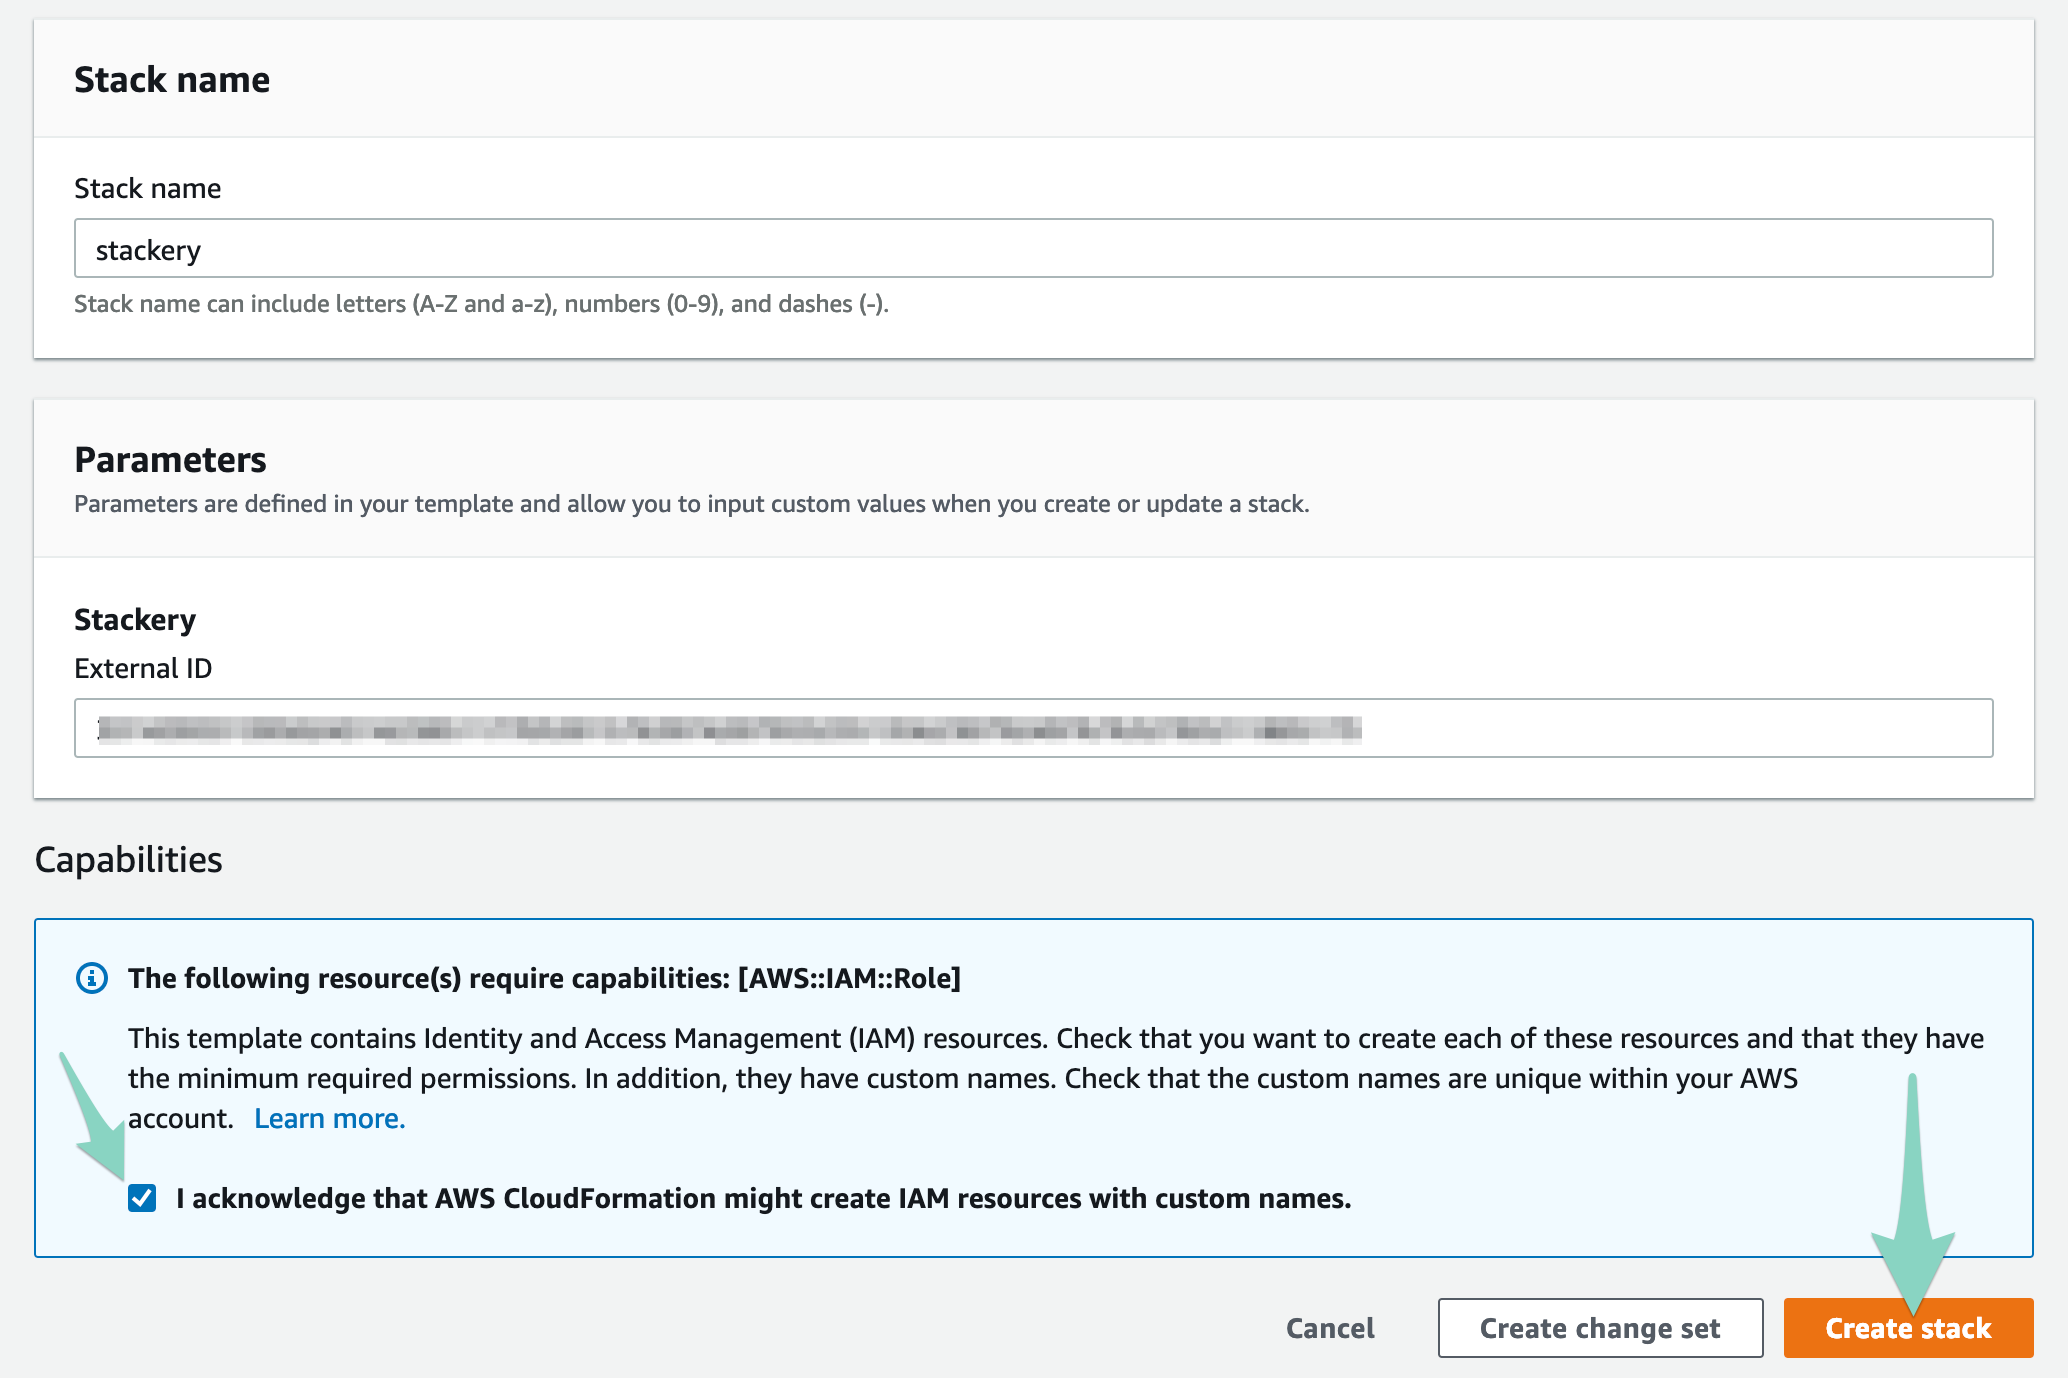
This will open up the CloudFormation console with pre-populated parameters. In order to proceed, click the checkmark saying you acknowledge the creation of IAM resources, then click the Create stack button. This process will take a few minutes as CloudFormation creates the appropriate roles.
If AWS IoT Core is not supported in the region in which you are trying to link Stackery, the linking process will fail.
IoT Core is currently not supported in the following regions:
- us-west-1
- eu-west-3
- eu-north-1
- ap-east-1
- ap-northeast-3
- cn-northwest-1
- central (Canada)
- sa-east-1
Check the AWS docs for the most up-to-date support information.
If you skip this step during setup, you will also be able to link your AWS account the first time you deploy a stack.
Read more about security permissions and controls in Stackery.
2. Create a Lambda Function and an API Endpoint
Now you're ready to create and deploy your serverless website!
Create a stack using the Stackery Dashboard
Go to Stacks in the Stackery Dashboard.

When you create a new stack, the code for your functions as well as your
template.yamlconfiguration file will be stored in a Git repository. You will be prompted to choose between GitHub, GitLab, or AWS's CodeCommit. If you choose GitHub or GitLab, you will be prompted to authorize Stackery to commit to your account - this will only happen the first time you link your accounts.
Create a new stack
- Navigate to Stacks
- Select Add a Stack in the top right corner
- Select your Git Hosting Provider (follow the prompts to link your accounts if needed)
- Enter
stackery-portfolio(or whatever name you choose) for Stack Name - Select Create New Repo for the Repo Source
- If using GitHub, for Organization, select the account you want this repository in
- Keep the Repo Name the same as Stack Name
- Select Public for your repository's visibility (Private repositories require a paid GitHub account)
- For Stack Blueprint choose 'Blank'
- Click Add Stack to create your empty stack
This will start you off with a blank template so we have something to build on.
Configure a Lambda and API Gateway to serve your website
When you create a new stack, you are taken to the Edit view. This section of the Stackery Dashboard allows your to add, edit and delete resources and commit changes.
Next we'll demonstrate how to integrate a Lambda function with an API Gateway which provides an HTTPS endpoint. This stack will use two cloud resource nodes: a Rest API endpoint and a Function.
Let's add our API resource first:
- Click Add Resource in the top-right corner of your Dashboard. When clicked, a panel opens, showing all of the cloud resource types currently supported by Stackery
- Choose Rest Api from the list, and click or drag and drop it anywhere onto your editor canvas
- Double-click on the resource node you just dragged in, and a new panel with options will open up
- In the editor panel, you can name your API and choose the methods you will use. In our case, it will only be the
GETmethod - Save your API resource
Next let's add our Function:
- Click Add Resource again
- Click or drag and drop the Function resource
- Click the the circle on the right side of the
GET /resource node and drag the wire to the left side of your Function resource
An Event Subscription Wire is a solid line shown in the Edit or View tabs that represents an event subscription or integration between Cloud Resources.
You have just linked your function to your API endpoint.
Configure your Function:
- Double-click on the Function node you just added
- In the editor panel, give the function a name such as
getWelcomePage - Select a runtime (we will use nodejs8.10 for our example code)
- Change the Source Path to
src/getWelcomePage(this designates where your function code lives in your Git repository) - Leave the other options as they are for now (for a full reference, see the Function documentation)
- Click the
Savebutton to save your Function resource
Now you're ready to commit your changes into Git. Click the Commit button, which will push your changes into your chosen Git account.
Once the commit is ready, click the Git SHA link below Version in the sidebar (see screenshot below). This will take you to your newly-created stack in the repository you chose.

Write a Lambda function to serve a static HTML page to an API endpoint
Clone the repo to your machine, then use your favorite editor or IDE to open src/getWelcomePage/index.js. The sample function only logs a console message, but we want ours to do something more useful. Replace it with the code below, which is a simple Node.js function that serves an HTML page when triggered:
const fs = require('fs');
exports.handler = async event => {
  // Log http request
  console.log(event);

  const responseBody = fs.readFileSync('./welcome.html', 'utf8');
  // Build an HTTP response.
  const response = {
    statusCode: 200,
    headers: {
      'Content-Type': 'text/html'
    },
    body: responseBody
  };

  return response;
};
Now, we need one more piece for our application to work: an HTML page to return.
Below is a template for a simple portfolio website where you can show off your serverless projects. You can copy the code below or get the latest version directly from the GitHub file.
In your src/getWelcomePage/ directory, create a new file called welcome.html and paste in the following:
<!DOCTYPE html>
<html lang="en">
  <head>
    <meta charset="utf-8">
    <meta name="viewport" content="width=device-width, initial-scale=1, shrink-to-fit=no">
    <meta name="description" content="">
    <meta name="author" content="">
    <link rel="icon" href="https://raw.githubusercontent.com/stackery/stackery-quickstart/master/src/getWelcomePage/favicon.ico">

    <title>Hello, Stackery | Serverless Development for Teams</title>

    <!-- Bootstrap core CSS -->
    <link rel="stylesheet" href="https://unpkg.com/bootstrap-material-design@4.1.1/dist/css/bootstrap-material-design.min.css" integrity="sha384-wXznGJNEXNG1NFsbm0ugrLFMQPWswR3lds2VeinahP8N0zJw9VWSopbjv2x7WCvX" crossorigin="anonymous">
    <link href="https://fonts.googleapis.com/css?family=Open+Sans:400,700" rel="stylesheet">
    <link rel="stylesheet" href="https://use.fontawesome.com/releases/v5.3.1/css/all.css" integrity="sha384-mzrmE5qonljUremFsqc01SB46JvROS7bZs3IO2EmfFsd15uHvIt+Y8vEf7N7fWAU" crossorigin="anonymous">

    <!-- Custom styles for this template -->
    <link rel="stylesheet" type="text/css" href="https://cdn.jsdelivr.net/gh/stackery/stackery-quickstart@43499a6e1d7444dfbf20a99e554cec63af3636ce/src/getWelcomePage/welcome.css"/>
  </head>

  <body data-spy="scroll" data-target="#top-nav" data-offset="0">
    <nav class="navbar fixed-top navbar-expand-lg navbar-dark" id="top-nav">
      <!-- Replace this with your name or company -->
      <a class="navbar-brand abs" href="#">Serverless Portfolio Template</a>
      <!-- Mobile view button -->
      <button class="navbar-toggler" type="button" data-toggle="collapse" data-target="#navbarSupportedContent" aria-controls="navbarSupportedContent" aria-expanded="false" aria-label="Toggle navigation">
        <span class="navbar-toggler-icon"></span>
      </button>
      <!-- Navigation menu -->
      <div class="collapse navbar-collapse" id="navbarSupportedContent">
        <ul class="navbar-nav ml-auto">
          <li class="nav-item">
            <a data-scroll class="nav-link active" href="#">Home</a>
          </li>
          <li class="nav-item">
            <a data-scroll class="nav-link" href="#portfolio">Portfolio</a>
          </li>
          <li class="nav-item">
            <a data-scroll class="nav-link" href="#contact">Contact</a>
          </li>
        </ul>
      </div>
    </nav>

    <main>
      <!-- Home container -->
      <section id="home">
        <div class="container text-center">
          <!-- Replace this image with your picture or logo -->
          <img width="300px" src="https://raw.githubusercontent.com/stackery/stackery-quickstart/master/src/getWelcomePage/logo.png" class="rounded-circle" alt="Profile picture">
          <!-- Replace this with your name and headline -->
          <h1 class="cover-heading">Hello, Serverless Developer</h1>
          <hr/>
          <p class="lead">Serverless developer - DevOps - Software engineer</p>
          <p class="lead">
            <a href="#portfolio" class="btn btn-lg btn-secondary">Learn more</a>
          </p>
        </div>
      </section>

      <!-- Portfolio section -->
      <section id="portfolio">
        <div class="container">
          <h1 class="text-center">My Portfolio</h1>
          <div class="row">
            <div class="col-md-4 text-center">
              <div class="card mb-4 box-shadow">
                <div class="card-image-placeholder"></div>
                <div class="card-body">
                  <h2>My Project</h2>
                  <p class="card-text">Read all about it</p>
                  <div class="btn-group">
                    <button type="button" class="btn btn-sm btn-outline-secondary">Website</button>
                    <button type="button" class="btn btn-sm btn-outline-secondary">GitHub</button>
                  </div>
                </div>
              </div>
            </div>
            <div class="col-md-4 text-center">
              <div class="card mb-4 box-shadow">
                <div class="card-image-placeholder"></div>
                <div class="card-body">
                  <h2>Another Project</h2>
                  <p class="card-text">Read all about it</p>
                  <div class="btn-group">
                    <button type="button" class="btn btn-sm btn-outline-secondary">Website</button>
                    <button type="button" class="btn btn-sm btn-outline-secondary">GitHub</button>
                  </div>
                </div>
              </div>
            </div>
            <div class="col-md-4 text-center">
              <div class="card mb-4 box-shadow">
                <div class="card-image-placeholder"></div>
                <div class="card-body">
                  <h2>A Third Project</h2>
                  <p class="card-text">Read all about it</p>
                  <div class="btn-group">
                    <button type="button" class="btn btn-sm btn-outline-secondary">Website</button>
                    <button type="button" class="btn btn-sm btn-outline-secondary">GitHub</button>
                  </div>
                </div>
              </div>
            </div>
          </div>
          <h1 class="text-center"><a data-scroll href="#contact"><i class="fas fa-chevron-circle-down"></i></a></h1>
        </div>
      </section>

      <!-- Contact form section -->
      <section id="contact">
        <div class="container">
          <h1 class="text-center">Contact Me</h1>
          <form>
            <div class="form-row">
              <div class="form-group col-md-6">
                <label for="name"></label>
                <input type="text" class="form-control" id="name" placeholder="Your Name">
              </div>
              <div class="form-group col-md-6">
                <label for="email"></label>
                <input type="email" class="form-control" id="email" placeholder="email@example.com">
              </div>
            </div>
            <div class="form-group">
              <label for="message"></label>
              <textarea class="form-control" id="message" rows="3" placeholder="Write your message here"></textarea>
            </div>
            <div class="float-right"><button type="submit" class="btn btn-lg btn-outline-secondary">Send</button></div>
          </form>
          <div class="alert alert-secondary" role="alert">
            Your contact form doesn't do anything yet, but this would be a good place to incorporate a serverless contact form. You can create one with Stackery following our <a href="https://docs.stackery.io/docs/tutorials/serverless-form-tutorial/" target="_blank">serverless contact form tutorial</a>!
          </div>
        </div>
      </section>

      <!-- Main footer -->
      <section id="footer">
        <div class="container">
          <div class="row">
            <div class="col-md-6">
              <h4 class="text-uppercase mb-4">About</h4>
              <!-- Add a short bio here -->
              <p class="mb-0">The Serverless Portfolio Template is a free to use template created by
                <a href="https://stackery.io" target="_blank">Stackery</a> as part of the <a href="https://docs.stackery.io/docs/tutorials/quickstart/" target="_blank">Quickstart Tutorial</a>.</p>
            </div>
            <div class="col-md-2"></div>
            <div class="col-md-4 mb-5 mb-lg-0">
              <h4 class="text-uppercase">Social Links</h4>
              <!-- Add your own links here -->
              <ul class="list-inline mb-0">
                <li class="list-inline-item">
                  <a class="btn-social" href="#">
                    <i class="fab fa-github-square fa-2x"></i>
                  </a>
                </li>
                <li class="list-inline-item">
                  <a class="btn-social" href="#">
                    <i class="fab fa-twitter fa-2x"></i>
                  </a>
                </li>
                <li class="list-inline-item">
                  <a class="btn-social" href="#">
                    <i class="fab fa-linkedin fa-2x"></i>
                  </a>
                </li>
                <li class="list-inline-item">
                  <a class="btn-social" href="#">
                    <i class="fab fa-facebook fa-2x"></i></i>
                  </a>
                </li>
              </ul>
            </div>
          </div>
        </div>
      </section>

      <!-- Copyright footer -->
      <footer>
        <div class="container">
          <p>Copyright information here. <a data-scroll href="#home">Back to top.</a></p>
        </div>
      </footer>
    </main>

    <!-- Bootstrap core JavaScript -->
    <!-- Placed at the end of the document so the pages load faster -->
    <script src="https://code.jquery.com/jquery-3.3.1.slim.min.js" integrity="sha384-q8i/X+965DzO0rT7abK41JStQIAqVgRVzpbzo5smXKp4YfRvH+8abtTE1Pi6jizo" crossorigin="anonymous"></script>
    <script src="https://unpkg.com/popper.js@1.12.6/dist/umd/popper.js" integrity="sha384-fA23ZRQ3G/J53mElWqVJEGJzU0sTs+SvzG8fXVWP+kJQ1lwFAOkcUOysnlKJC33U" crossorigin="anonymous"></script>
    <script src="https://unpkg.com/bootstrap-material-design@4.1.1/dist/js/bootstrap-material-design.js" integrity="sha384-CauSuKpEqAFajSpkdjv3z9t8E7RlpJ1UP0lKM/+NdtSarroVKu069AlsRPKkFBz9" crossorigin="anonymous"></script>
    <script src="https://cdn.jsdelivr.net/gh/cferdinandi/smooth-scroll/dist/smooth-scroll.polyfills.min.js"></script>

    <script type="text/javascript">
      $('body').scrollspy({ target: '#top-nav'})
      var scroll = new SmoothScroll('a[href*="#"]');
    </script>
  </body>
</html>
Once you've added and saved your function and HTML code in your text editor, add, commit and push the changes to your Git repository.
When you return to your Dashboard, you will see a message to refresh the page as changes have been detected.

Refresh and your Dashboard should now look like this:

In the next step, we'll deploy the app to see it in action.
3. Deploy your serverless website
You can deploy stacks via your Stackery dashboard or your Stackery CLI.
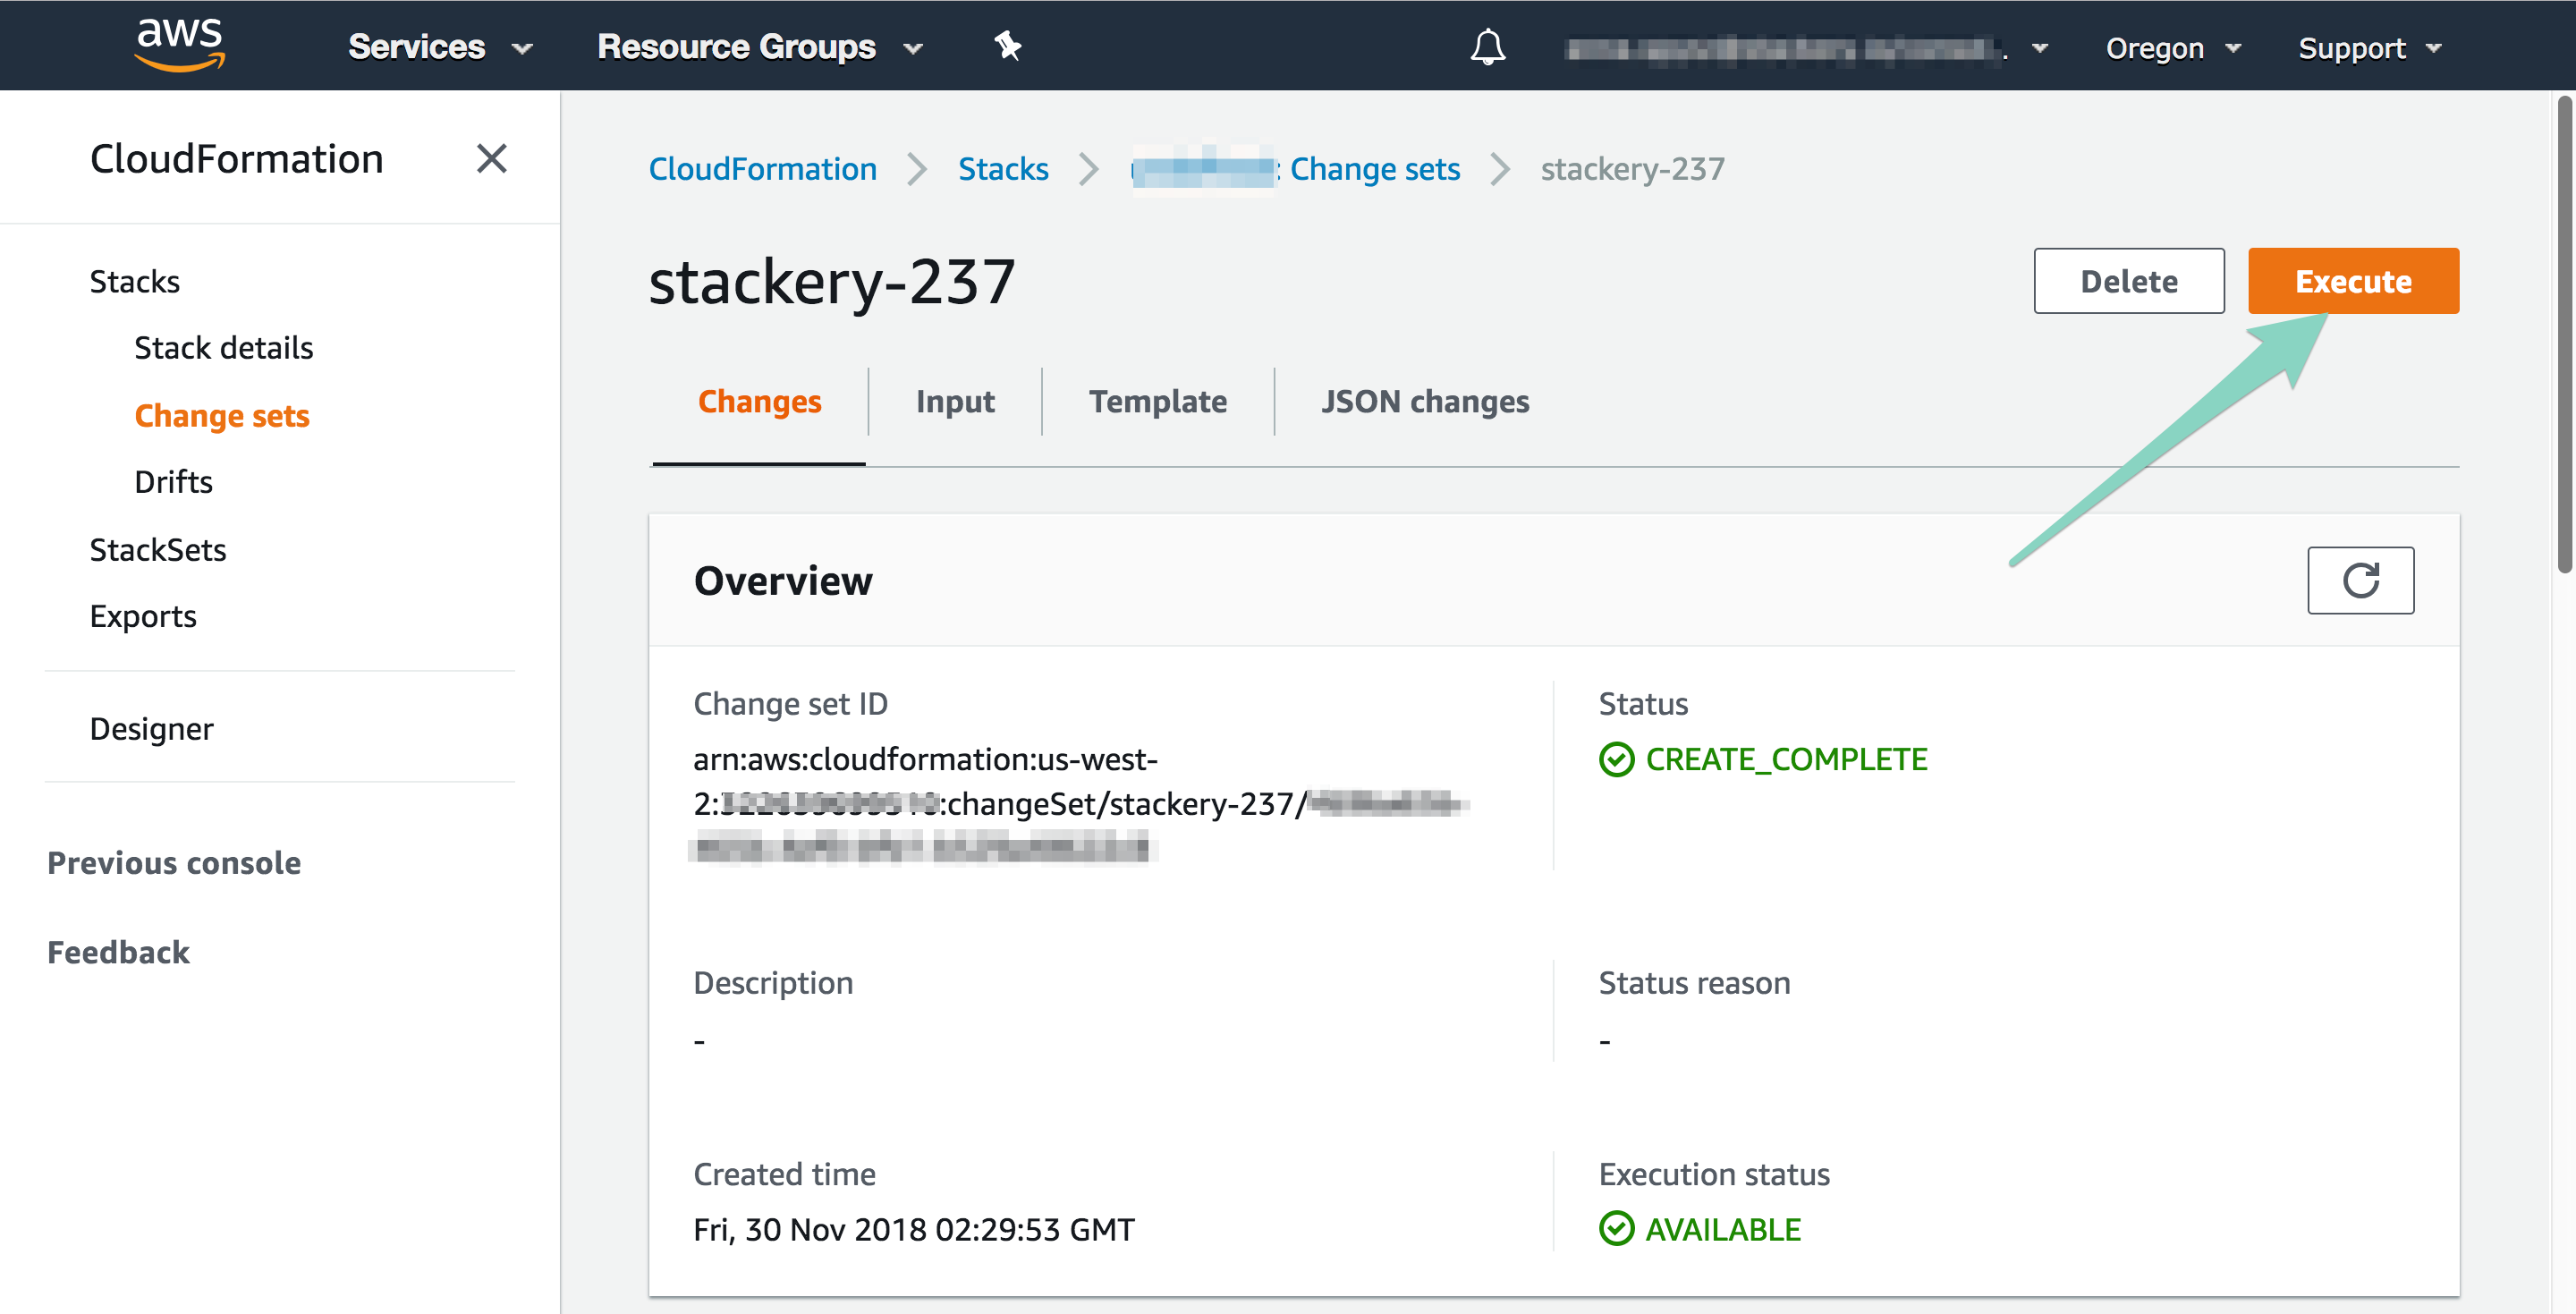
Your newly created stack is now ready to be deployed with AWS Cloudformation. Navigate to the Deploy tab, and click Prepare new deployment, followed by Prepare Deployment (this will take a minute or two). Once the deployment is ready, hit Deploy.

You will be redirected to your AWS Console, where you can review your stack and click Execute when you're ready (if you are not logged in, first log into your AWS account and then click Deploy).
Why does this have to be done in the AWS Console and not in the Stackery app? Because Stackery is built for teams, only those developers with the appropriate permissions set can deploy a stack. This keeps apps secure and prevents accidental deployments into production accounts.
Return to the Stackery Dashboard.
In a few minutes, you will receive a notification that your stack is deployed, at which point you can click over to your View tab to see your newly deployed stack in action.

Success! You've deployed a serverless app!
If a stack has been deployed, you will automatically be taken to the View tab when you click on the stack in the Stacks view. To edit your deployed stack, click the Edit tab to go back to the Stack Editor view.
Your app is now live and running. To see the HTML page you just created, double-click on your API resource node, find the STAGE LOCATION property in the properties table, and click the link. If everything went right, you will see your new serverless portfolio page at the link location.
Project Repositories
All of the code for this sample stack is available in the following repository:
Next Steps
Now that you've got the basics down, unlock the real power of Stackery by setting up your cloudlocal development environment so you can test your function code against actual cloud resources.