DynamoDB to SES Tutorial
AWS's DynamoDB is a NoSQL database that is a popular choice amongst serverless developers for good reason - it scales automatically and can be configured to be truly serverless when its billing mode is set to PAY_PER_REQUEST. But just having some data in a database isn't very useful if you can't do anything with it. That's where services such as AWS's Simple Email Service come in handy.
This tutorial will show you how to populate a DynamoDB Table with links to images, then randomly select one of those images to send in a daily email.
By the end of the tutorial, you will have deployed into your AWS account:
- One AWS Lambda Function that writes links to images in a table from a public API
- A DynamoDB Table that stores image data
- Another AWS Lambda Function that sends a daily email using data from the table
- A CloudWatch Event Timer that triggers the sendEmail Lambda
Each step of the tutorial includes:
- A gif showing a preview of what you'll be doing in that step
- Step-by-step written instructions with code examples and screenshots
Tutorial Updates
As we continue to develop Stackery, there may be improvements made to the design of the application. You may notice some differences between current versions, and versions used to record our video guides. Rest assured, the overall functionality of Stackery remains the same.
For the most up-to-date visuals and instructions, please refer to the transcribed versions of the tutorial available below each video guide.
Setup
Project Repositories
The following repositories are referenced throughout this tutorial:
Required Installations
The following software is used in this tutorial:
- Node.js + Node Package Manager (npm)
- The AWS-SDK for Node
- Flickr-SDK, a library for using Flickr's API (requires free Flickr account)
Deploy Sample App
You can deploy the completed example into your own AWS account using these two Stackery CLI commands:
stackery create will initialize a new repo in your GitHub account, initializing it with the contents of the referenced blueprint repository.
stackery create --stack-name 'dynamodb-to-ses' \
--git-provider 'github' \
--blueprint-git-url 'https://github.com/stackery/dynamo-to-ses'
stackery deploy will deploy the newly created stack into your AWS account.
stackery deploy --stack-name 'dynamo-to-ses' \
--env-name 'development' \
--git-ref 'master'
What We're Building
There are numerous use cases for what we're about to build. We will be populating a database using one function, then using another to send an email at a pre-determined interval that includes data from that database. One real-world example would be a database that keeps a record of new user sign-ups to your application. You could then use the sendDailyEmail function to filter sign-ups by those that occurred in the last 24 hours, and send a daily email to your team listing all of the new sign-ups.
In our example, we will be using the free Flickr API to populate our table with images of servers, then sending a daily email reminder that yes, there are still servers in 'serverless' - we just no longer have to think about them 😉.
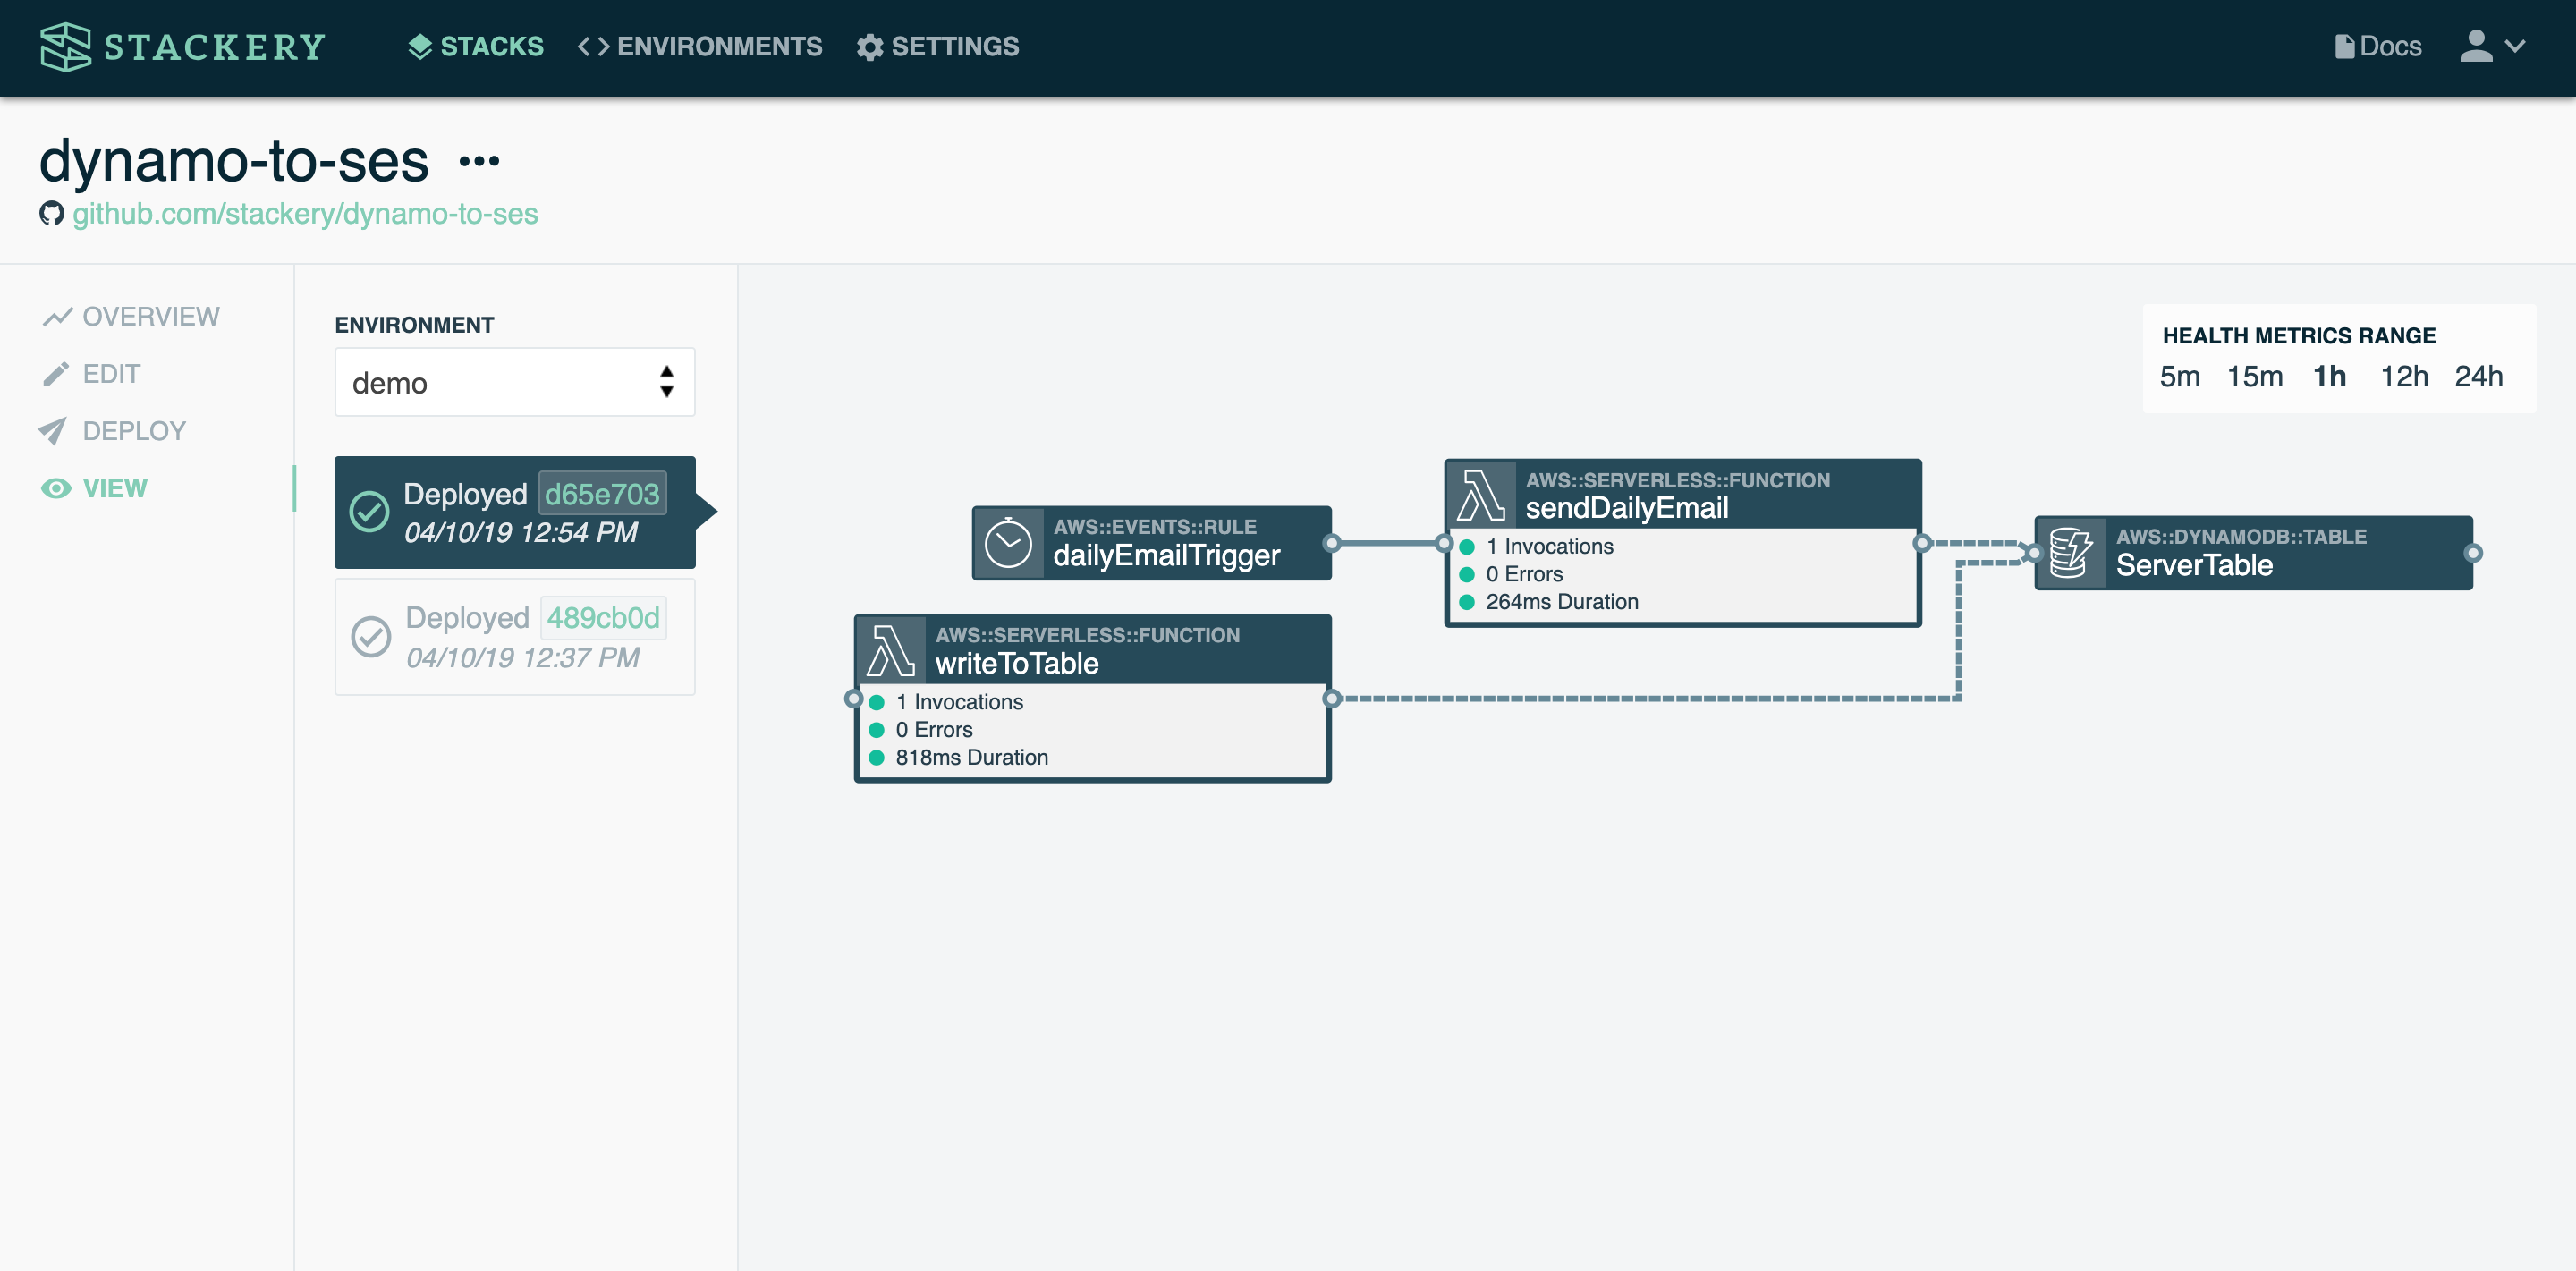
Finished stack
This is an example of the finished stack in the Stackery Editor. Feel free to play around:
Resources used
The following are descriptions of the Stackery resources we'll be working with:
Function : This application will have two Lambda functions: one that writes data to a table, and another that reads data from that table and sends an email.
Table : The DynamoDB Table our functions will be writing to and reading from. Each function will receive the limited permissions it needs to do its task.
Timer : A CloudWatch Event Timer configured to trigger the
sendDailyEmailfunction every day at 9am PST.
We'll get to configuring these resources in later parts, for now, we want to create an empty stack to start with.
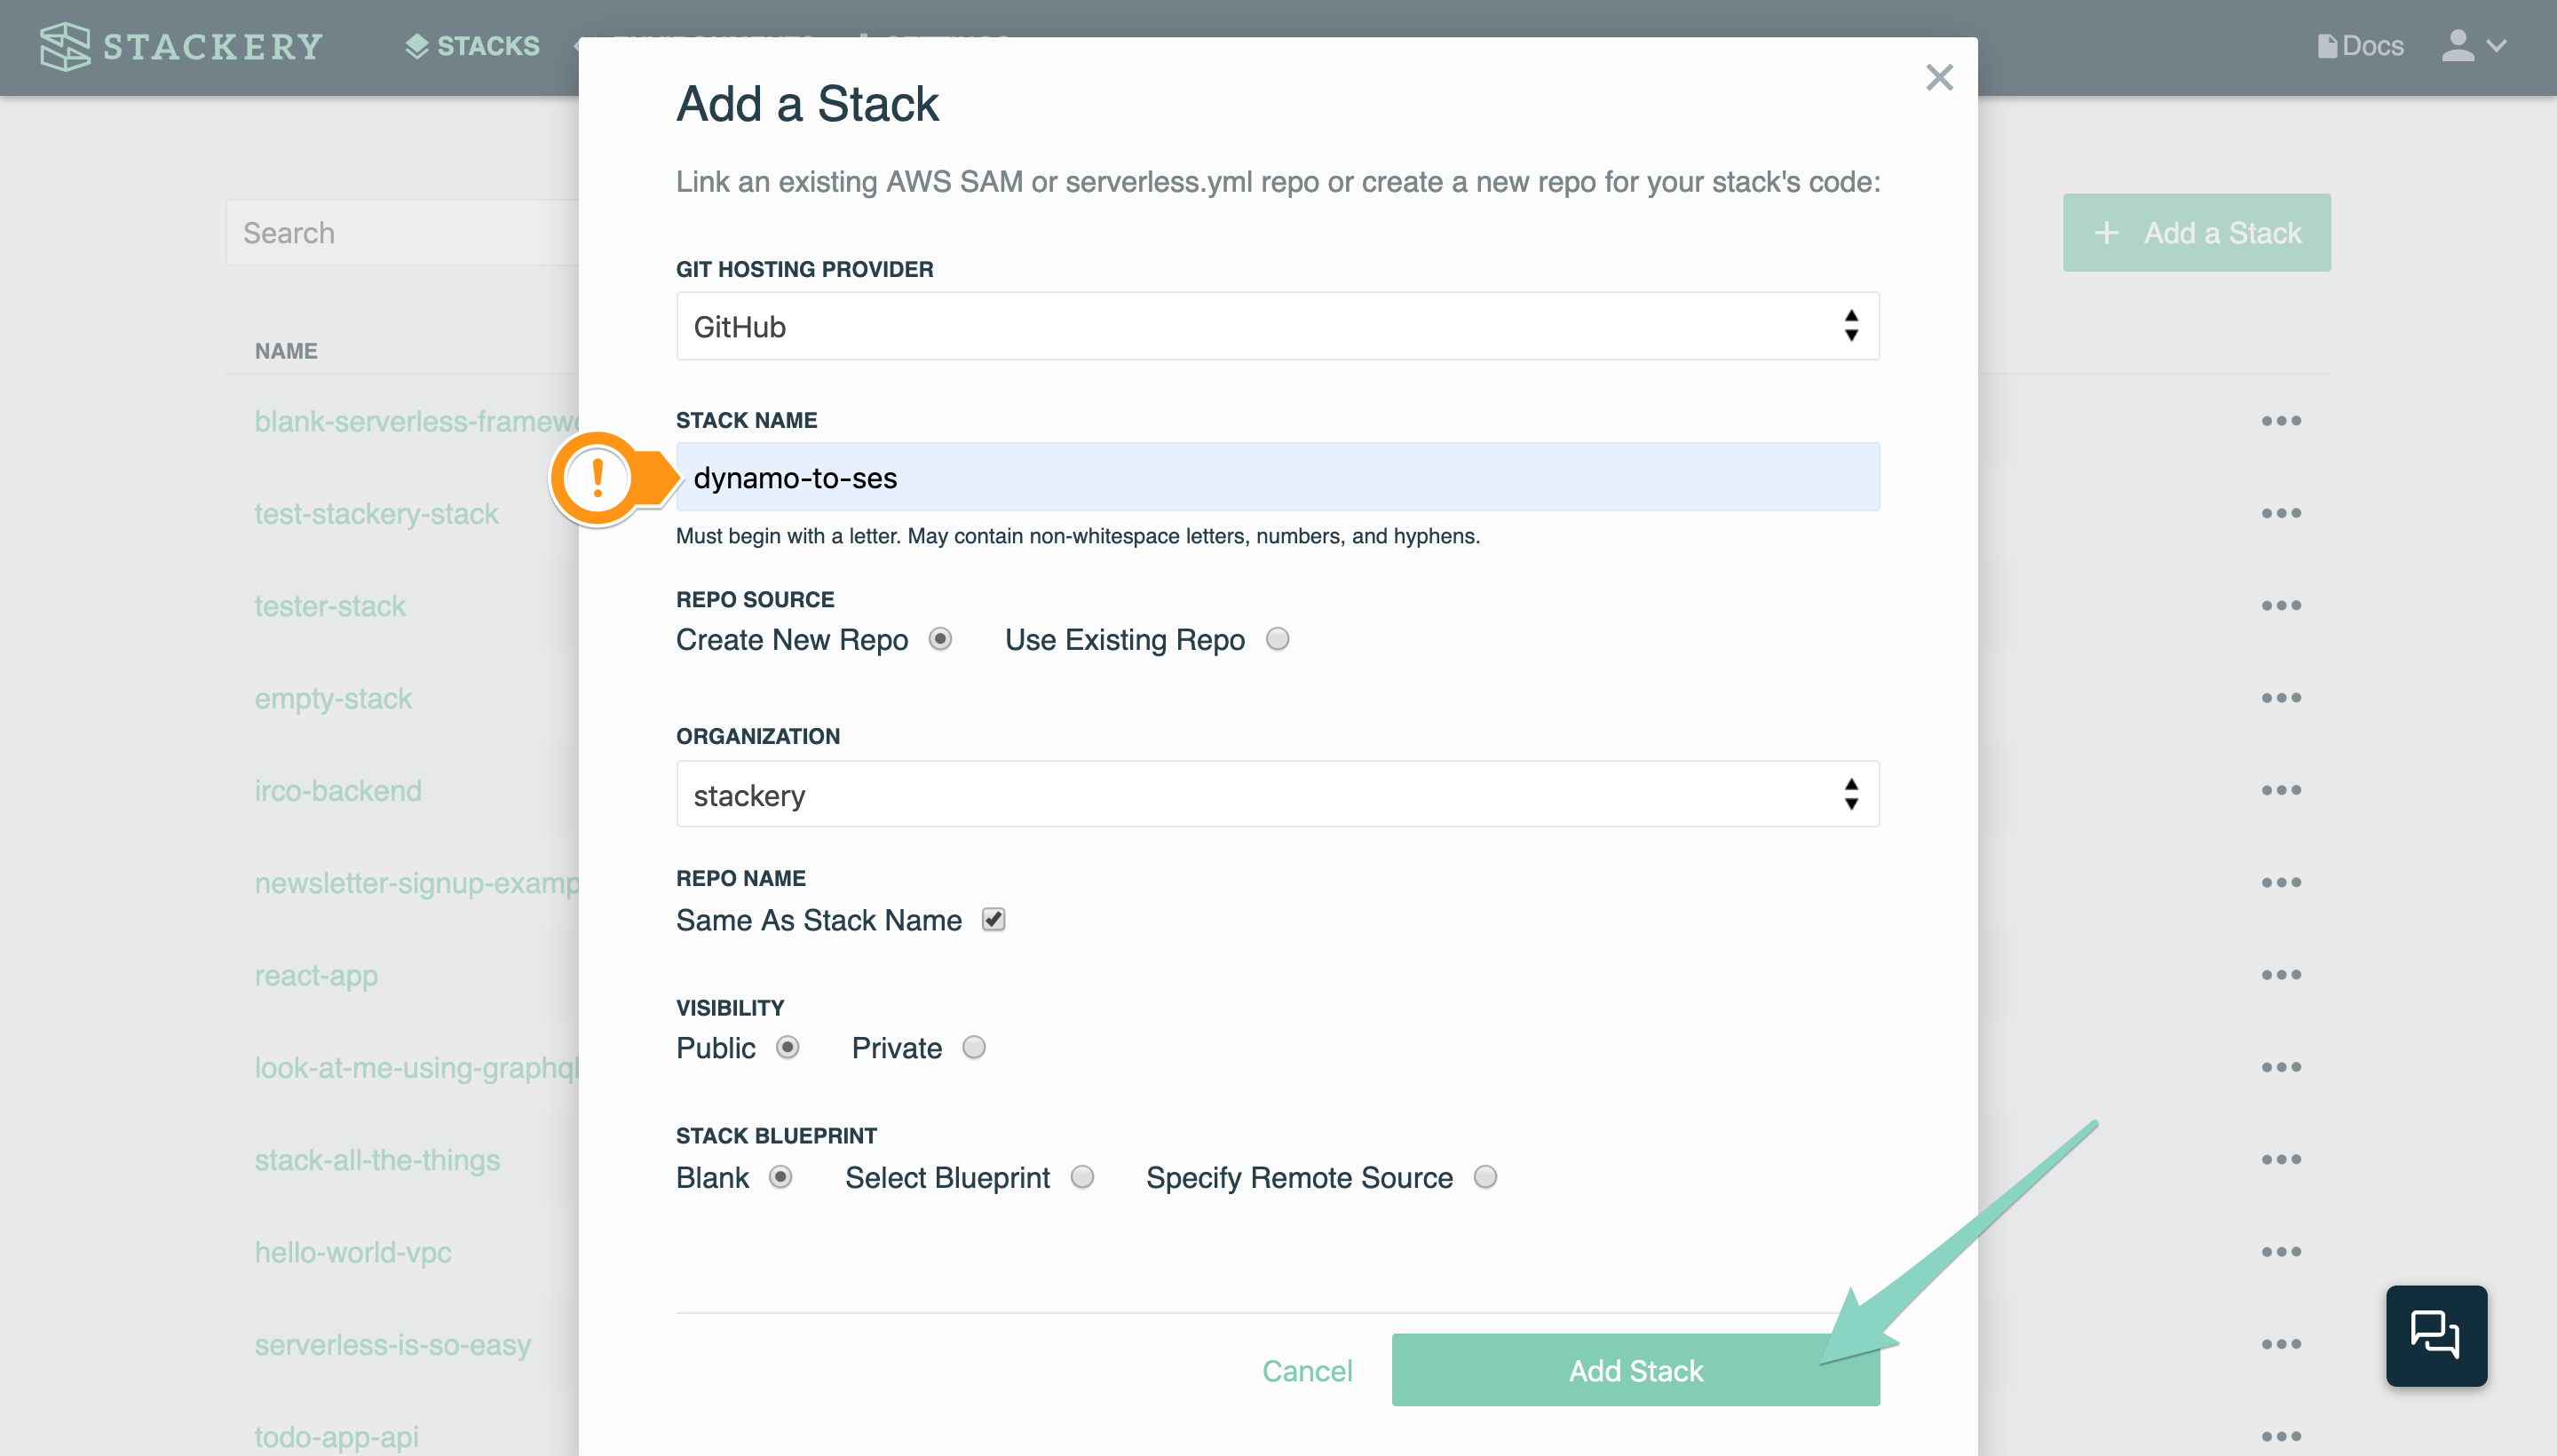
1. Set up Your Stack
Create a new stack
- Navigate to Stacks
- Select With a new repo from the Add a Stack dropdown in the top right corner
- Select your Git Hosting Provider
- Enter
dynamodb-to-sesfor Stack Name - For Organization, select the Git account you want this repository in
- Keep the Repo Name the same as Stack Name
- Click Add Stack to create an empty stack
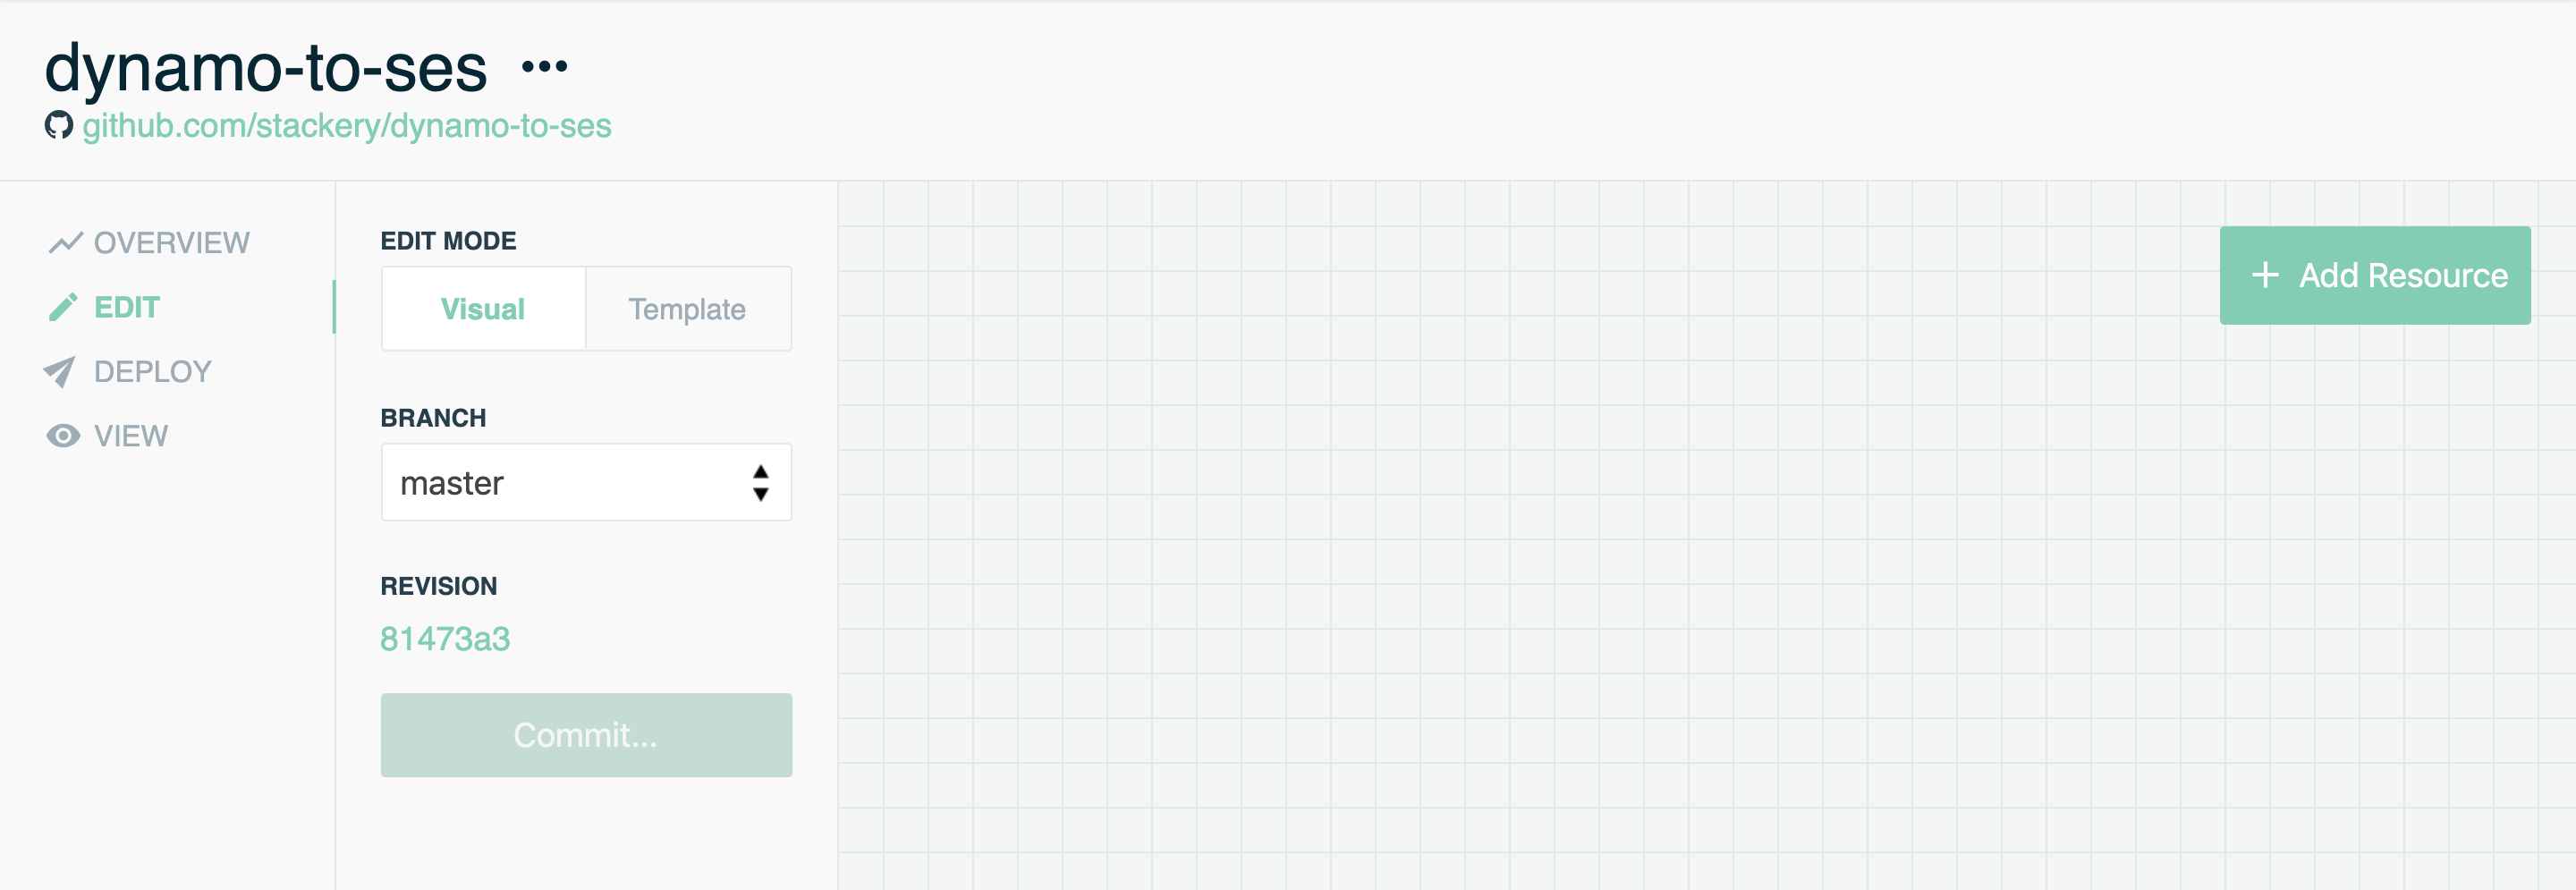
Stackery initializes the following blank stack:
Add two functions
First, our dynamodb-to-ses app needs two Function resources.
- Click the Add Resource button in the top right
- Select Function and click it twice to add two functions to the canvas
- Double-click the first Function to open the editing panel
- Enter
writeToTablefor the function Name - Change the Logical ID to
writeToTable - Change the Source Path to
src/writeToTable - Leave the other values as they are
- Click Save at the bottom to save your function
- Double-click the second Function to open the editing panel
- Enter
sendDailyEmailfor the function Name - Change the Logical ID to
sendDailyEmail - Change the Source Path to
src/sendDailyEmail - Leave the other values as they are
- Click Save at the bottom to save your function
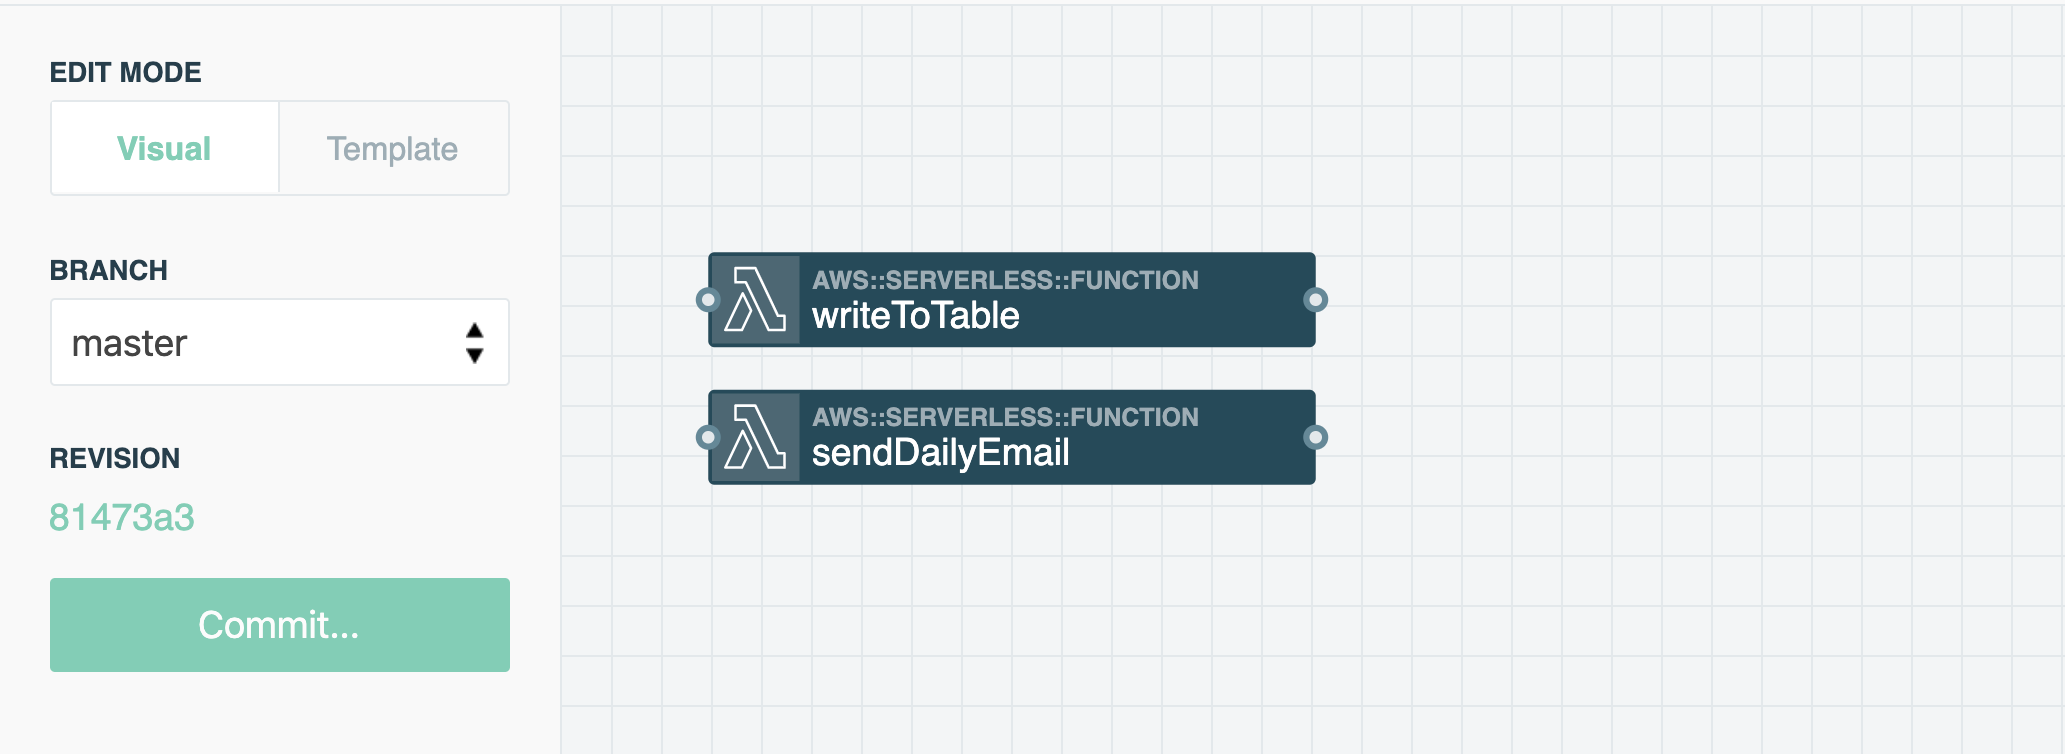
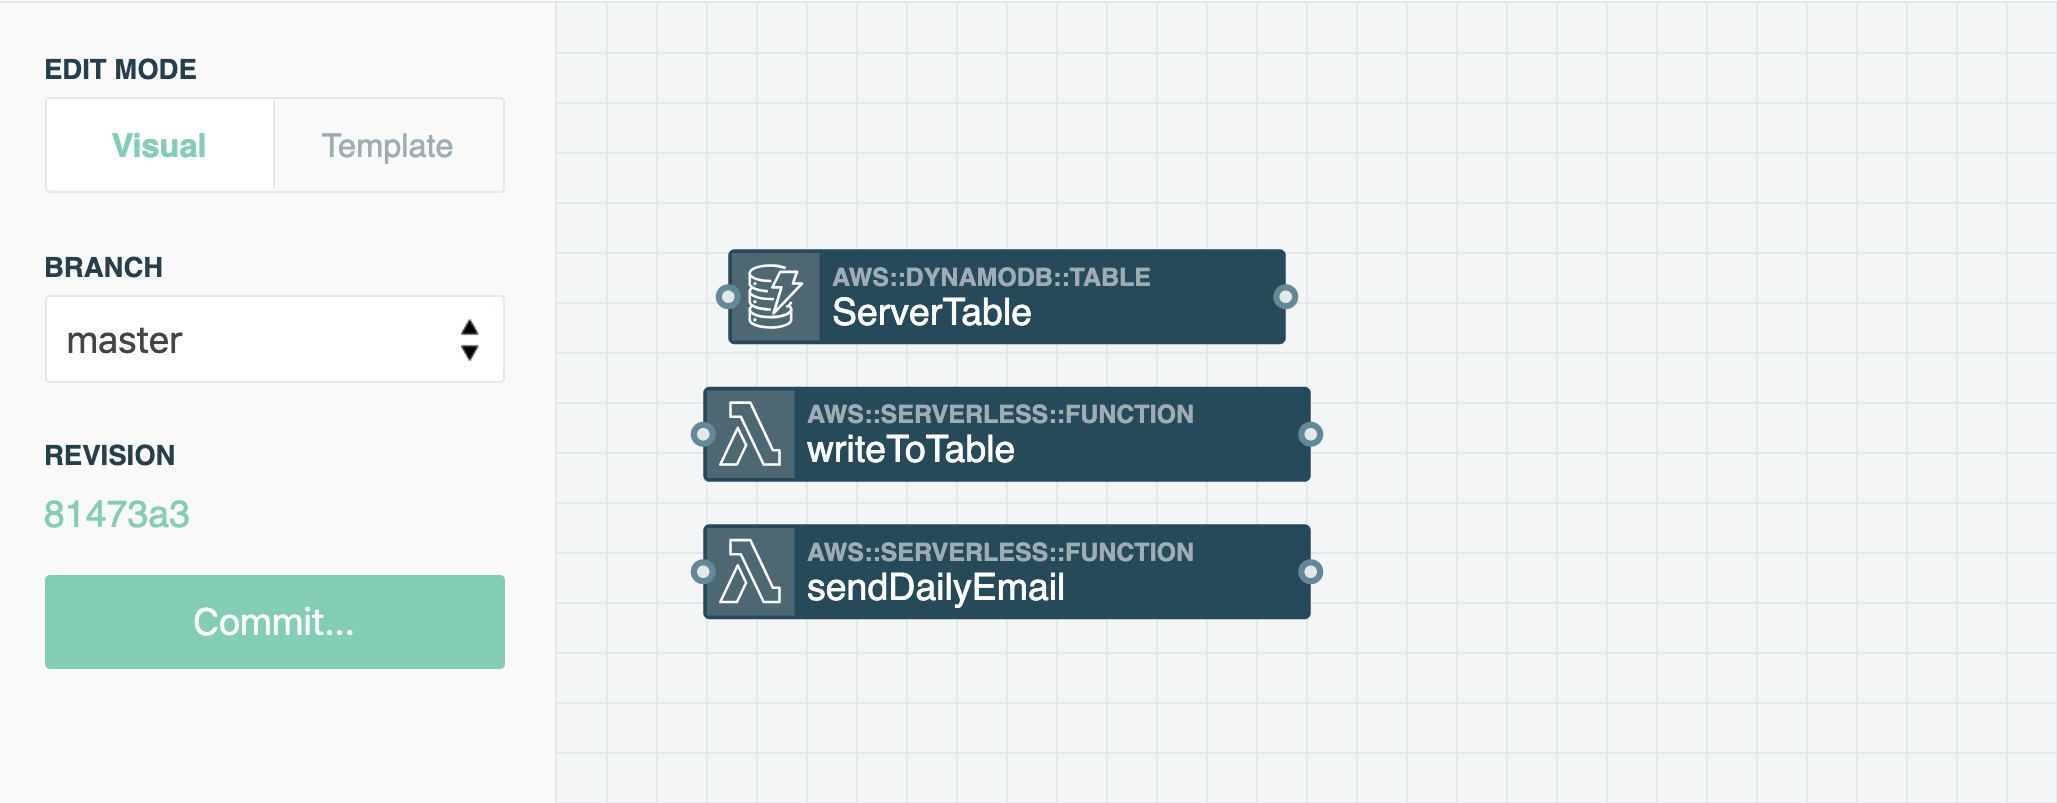
Your Dashboard should now look like this:
Add a table
Next you need to add a table to your stack:
- Click the Add Resource button in the top right
- Select Table and click or drag and drop it onto the canvas
- Double-click the Table to open the editing panel
- Enter
ServerTablefor the table Name - Enter
ServerTablefor the table Logical ID - Leave the other values as they are
- Click Save at the bottom to save your table
Add a timer
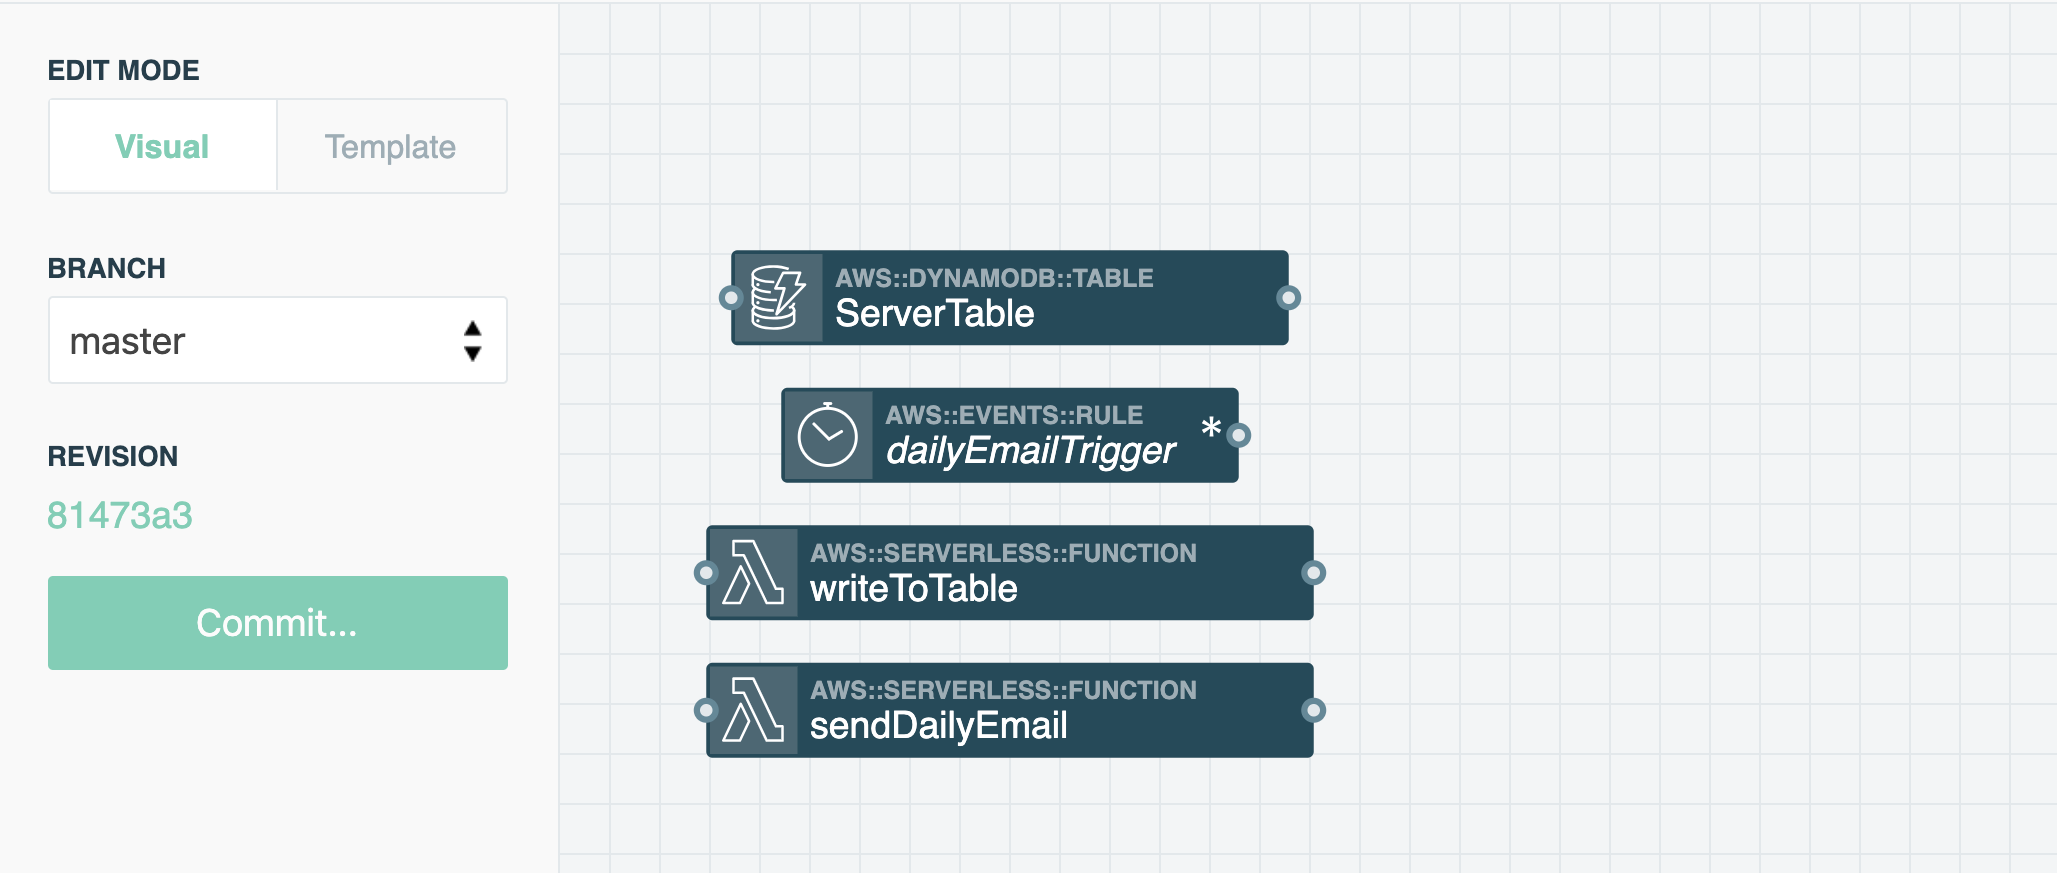
The final resource will be a timer, which triggers the sendDailyEmail function every day at 9 am PST.
- Click the Add Resource button in the top right
- Select Timer and click or drag and drop it onto the canvas
- Double-click the Timer to open the editing panel
- Enter
dailyEmailTriggerfor the Display Name - Select
Cron Expressionfor Type - Enter
0 16 * * ? *for the Cron Expression - Click Save at the bottom to save your timer
Connect and commit your resources
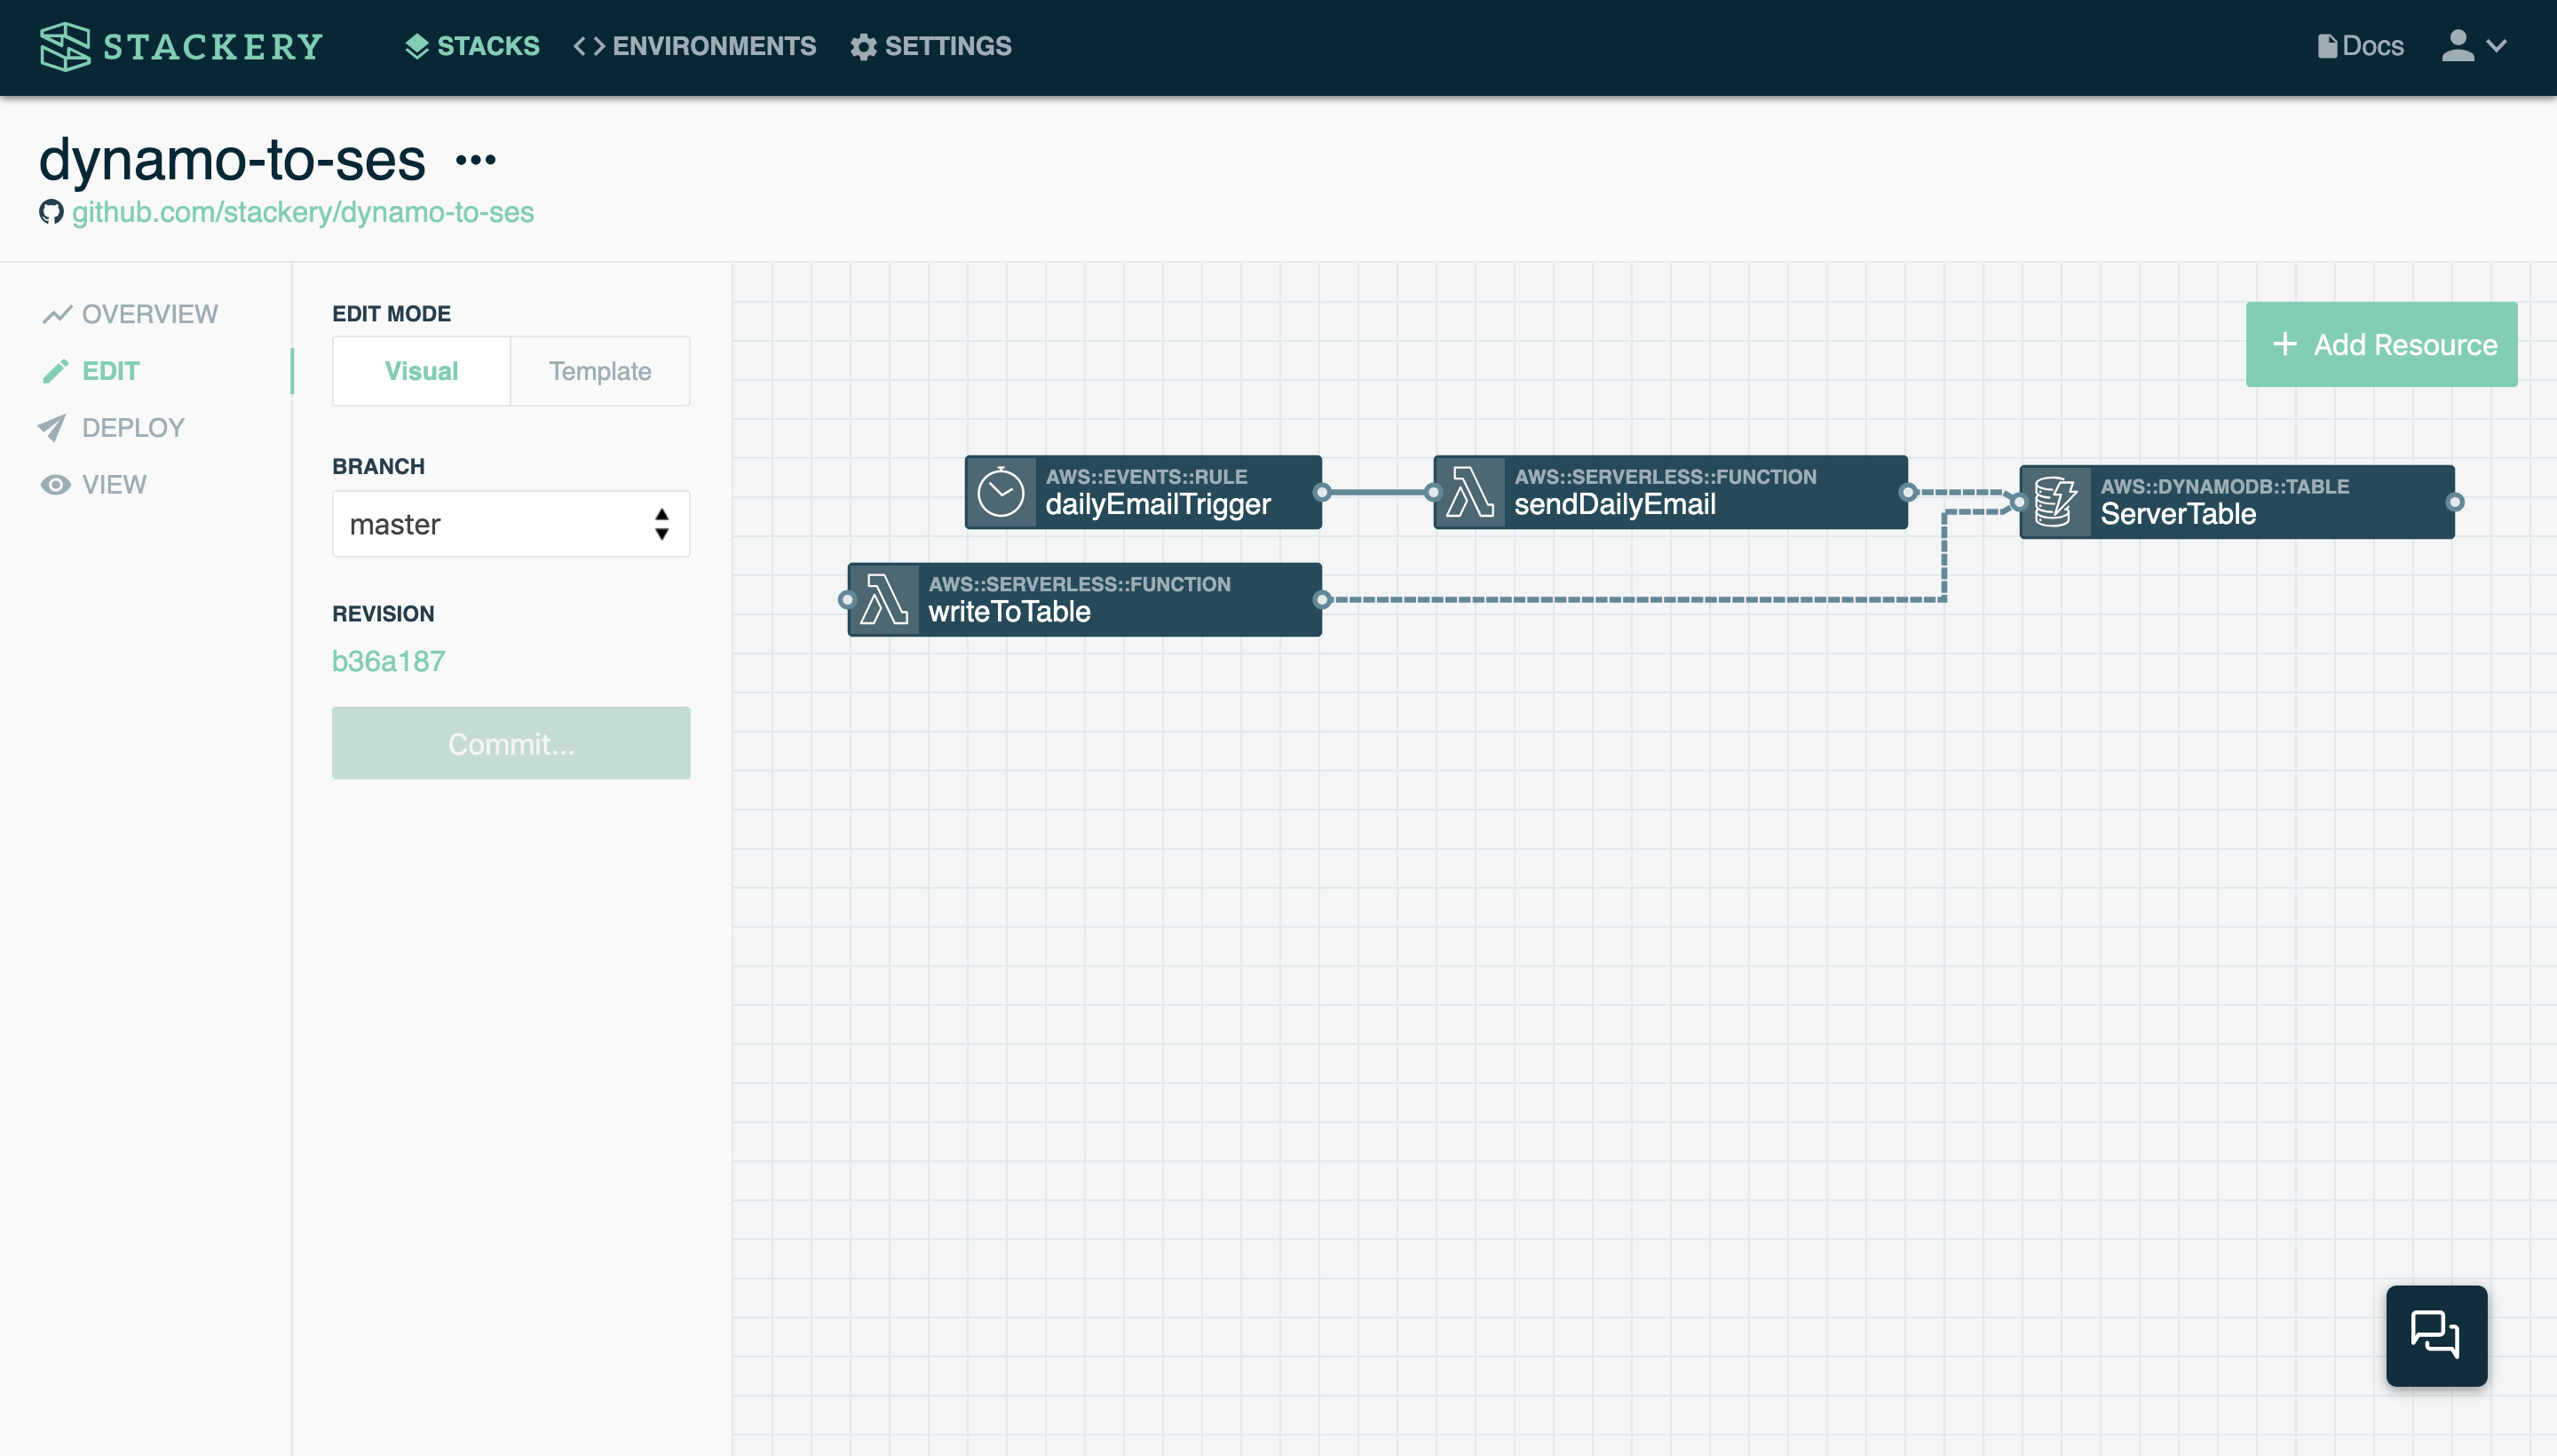
Your stack now has all of the resources you will need. The final step before you edit your code is to connect them and commit your changes:
- Drag a Service Discovery Wire from the endpoint on the right side of the
writeToTablefunction to the endpoint on the left side of theServerTabletable - Drag a Service Discovery Wire from the endpoint on the right side of the
sendDailyEmailfunction to the endpoint on the left side of theServerTabletable - Drag an Integration Wire from the endpoint on the right side of the
dailyEmailTriggertimer to the endpoint on the left side of thesendDailyEmailfunction - Commit your changes by pressing the Commit... button in the sidebar and entering a commit message
- Click Commit and Push to push your changes to your Git repository
Your dynamodb-to-ses stack should now look like this:
UP NEXT: Get your code from your GitHub repository.
2. Get Code from GitHub
Pull down your code from GitHub
In order to configure our webhook function, we need to be able to edit it on our local machine. Luckily, Stackery makes this easy to do so.
- If it's not open already, navigate to
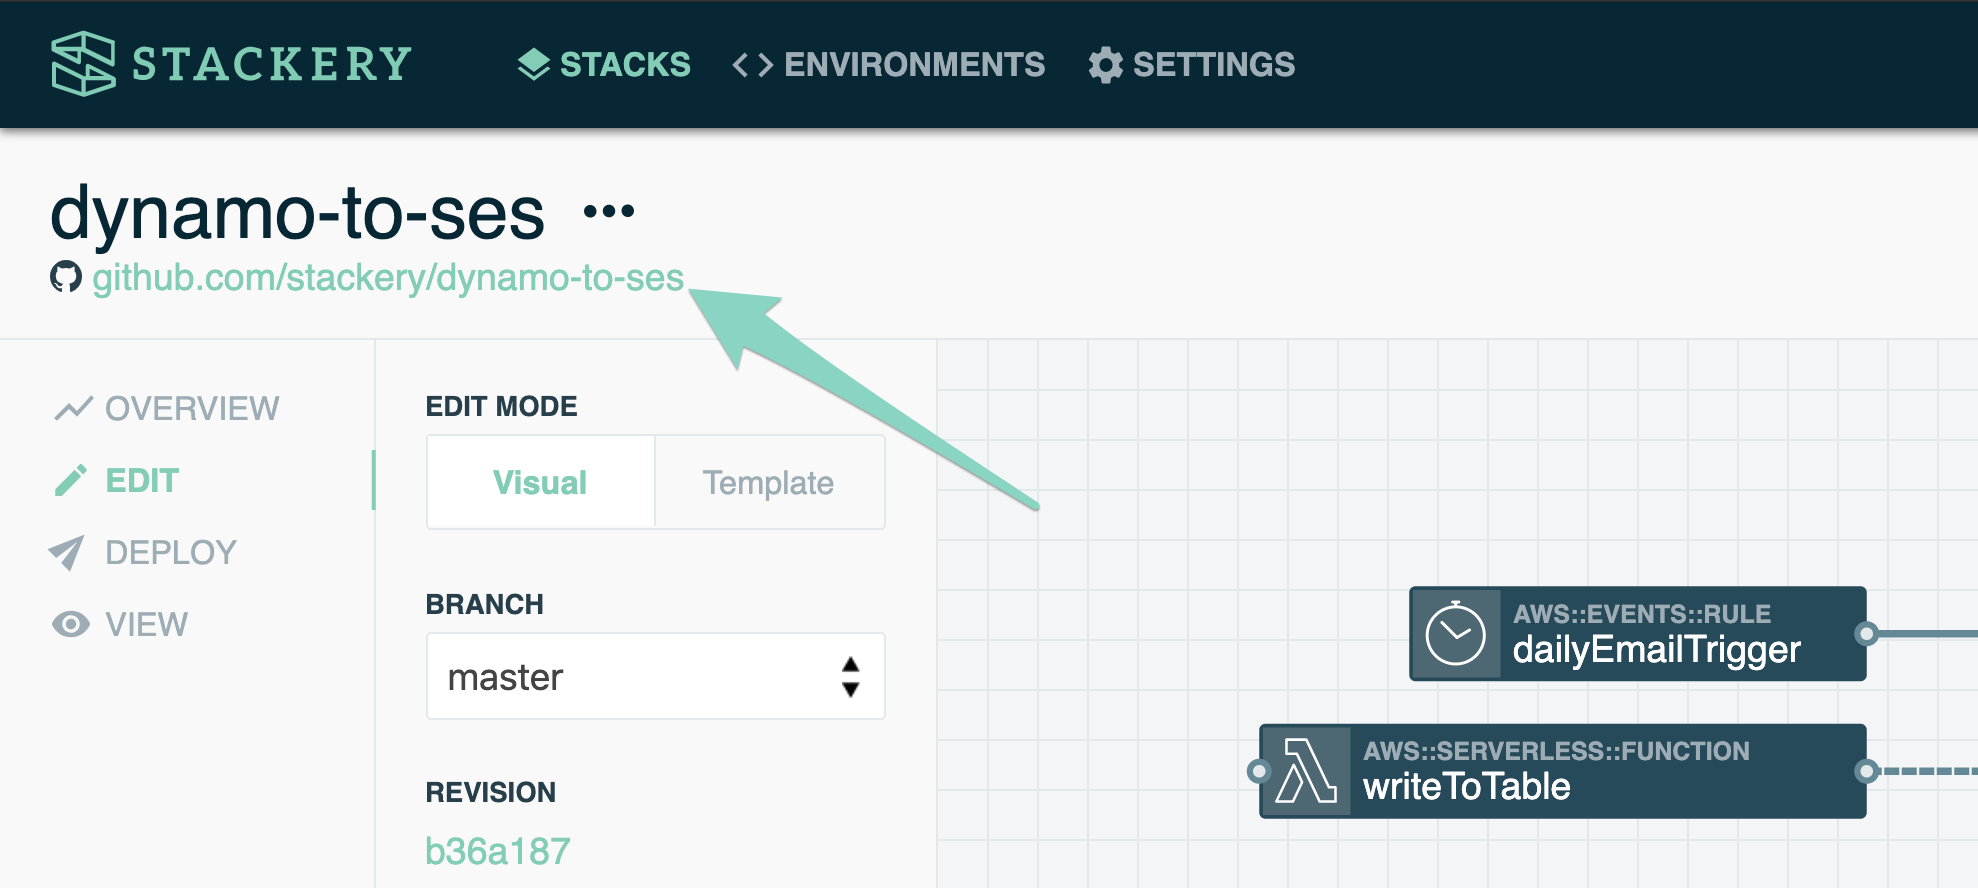
dynamodb-to-sesin Stacks - Click the Git link under the stack name (see screenshot below). This will take you to your Git repository in the browser
- Clone your repository onto your local machine
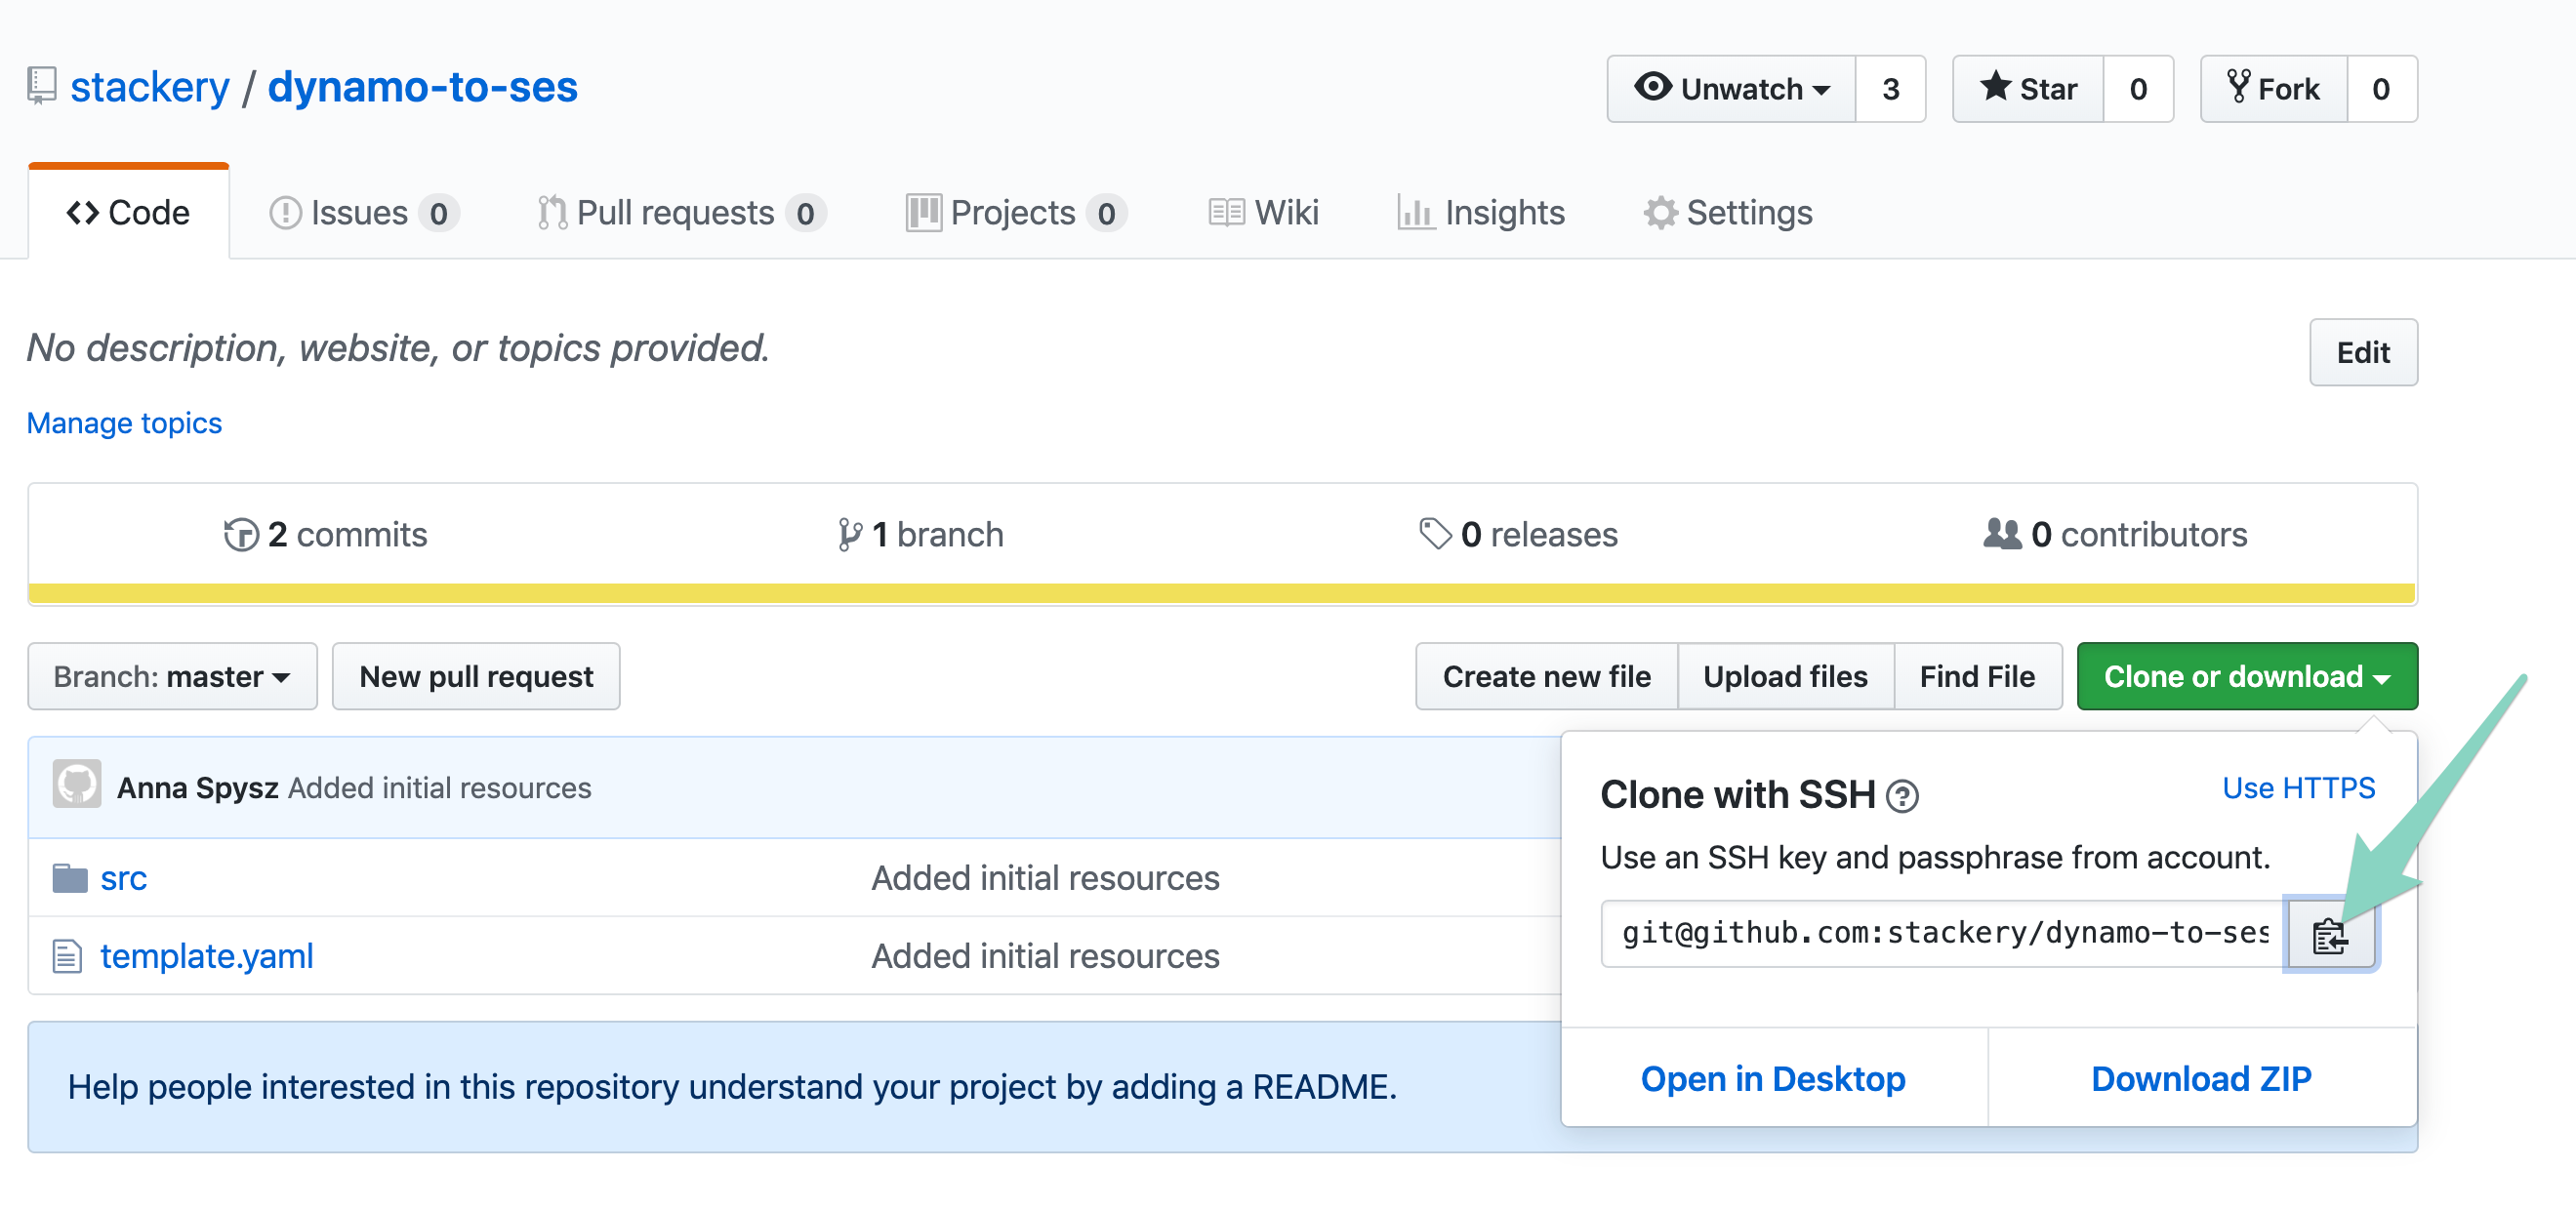
You should now have access to your serverless application in your IDE, and your project files should look similar to this:

UP NEXT: Writing the logic for your functions.
3. Write Your Functions
Add writeToTable function code
The first function we'll set up is writeToTable. It will use the flickr-sdk package to grab images from the Flickr API, then the AWS-SDK to write them to the ServerTable table.
- In your text editor or IDE, open
dynamodb-to-ses/src/writeToTable/index.js - Replace the existing
exports.handlerfunction with the following (see comments for explanations):
const AWS = require('aws-sdk');
const Flickr = require('flickr-sdk');

async function getPhotos () {
  const flickr = new Flickr(process.env.FLICKR_API_KEY);
  // Get photos from the Flickr api
  try {
    // All options: https://www.flickr.com/services/api/flickr.photos.search.html
    const photos = await flickr.photos.search({
      text: 'servers datacenter', // the search text
      sort: 'interestingness-desc', // sort to attempt to reduce spam photos
      content_type: 1, // only photos
      safe_search: 1, // only SFW photos please
      extras: 'url_o', // we want the original image urls
      per_page: 100
    });
    return photos.body.photos.photo;
  }
  catch (error) {
    console.log('Error getting photos');
    console.log(error);
  }
}

exports.handler = async () => {
  // Fetch an array of photo objects
  const photoArray = await getPhotos();
  // Write new items to the ServerTable
  // Duplicate entries will be skipped
  const dynamodb = new AWS.DynamoDB.DocumentClient();
  // We'll be using promises to make sure everything gets written when the Lambda is called
  let promiseArray = [];

  for (let photo of photoArray) {
    const params = {
      TableName: process.env.TABLE_NAME,
      Item: {
        id: photo.id,
        title: photo.title || null,
        url: photo.url_o,
        height: photo.height_o,
        width: photo.width_o
      },
      ConditionExpression: 'attribute_not_exists(id)', // do not overwrite existing entries
      ReturnConsumedCapacity: 'TOTAL'
    };

    const p = dynamodb.put(params)
      .promise()
      .then(() => {
        console.log(`Writing ${photo.id} to table ${process.env.TABLE_NAME}. Sweet!`);
      })
      .catch((error) => {
        console.log(`Error writing ${photo.id} to table ${process.env.TABLE_NAME}. The entry may already exist.`);
        console.log(error.message);
      });
    promiseArray.push(p);
  };

  try {
    await Promise.all(promiseArray);
    console.log('Writing to dynamodb');
  } catch (error) {;
    console.log(error);
  }

  // Return a 200 response if no errors
  const response = {
    statusCode: 200,
    headers: {
      'Content-Type': 'application/json'
    },
    body: 'Success!'
  };

  return response;
};
As we added a dependency to our function, we need to add a package to its package.json file.
- Open
dynamodb-to-ses/src/writeToTable/package.jsonand paste in the following below the"aws-sdk"line (remember the comma):
"flickr-sdk": "^3.8.0"
Your file should look something like this:

- Save both files, and add, commit, and push them to your GitHub repository
Add sendDailyEmail function code
The second function will take a random image from the ServerTable table and send an email with it using AWS's Simple Email Service (SES).
- In your text editor or IDE, open
dynamodb-to-ses/src/sendDailyEmail/index.js - Replace the existing
exports.handlerfunction with the following (see comments for explanations):
const AWS = require('aws-sdk');

exports.handler = async () => {
  // Get server photos from the ServerTable
  const dynamodb = new AWS.DynamoDB.DocumentClient();
  const params = {
    TableName: process.env.TABLE_NAME
  };
  let photos, body, header;
  let allPhotos = [];

  try {
    photos = await dynamodb.scan(params).promise();
    photos.Items.forEach((photo) => allPhotos.push(photo));
    console.log(`Getting data from table ${process.env.TABLE_NAME}. Right on!`);
  } catch (error) {
    console.log(`Error getting data from table ${process.env.TABLE_NAME}. Make sure this function is running in the same environment as the table.`);
    throw new Error(error); // stop execution if data from dynamodb not available
  }

  try {
    // Select a random photo of the day
    const dailyPhoto = await getRandomPhoto(allPhotos);
    // Create the email
    const today = new Date();
    body = await generateEmailBody(dailyPhoto, today);
    header = `Daily Server Email`;
    // Send the email
    console.log(`Sending email to ${process.env.TO_EMAIL}.`);
    await sendEmail(header, body);
    console.log(`Email sent`);
  } catch (error) {
    console.log(`Error sending email`);
    console.log(error);
  }

  // Return a 200 response if no errors
  const response = {
    statusCode: 200,
    body: `Email sent. Body:\n${body}`
  };

  return response;
};

// Select a random photo
function getRandomPhoto (photos) {
  return photos[Math.floor(Math.random()*photos.length)];
};

// Make a pretty email body
function generateEmailBody (photo, today) {
  console.log('Generating pretty email');
  const header = `<h1>✨ An Important Reminder ✨</h1>`;
  const subHeader = `<h2>${getPrettyDate(today)}</h2>`;
  const photoSection = `
    <div>
      <h2>Yes, there are still servers in serverless.</h2>
      <h3>Here is one:</h3>
      <img src='${photo.url}' width='500px' alt='${photo.title}'>
      <p>Now that we've gotten that out of the way, let's go build something awesome with <a href="app.stackery.io">Stackery</a>!</p>
    </div>
  `;

  const style = `
    <style>
      body {
        font-family: sans-serif;
        text-align: center;
      }
    </style>
    `;

  return `
    <html>
      <head>${style}</head>
      <body>
        ${header}
        ${subHeader}
        <br/><hr/><br/>
        <div>
          ${photoSection}
        </div>
      </body>
    </html>
  `;
};

// Use AWS SES to send the email
async function sendEmail (subject, body) {
  let params = {
    Destination: {
      ToAddresses: [
        process.env.TO_EMAIL
      ]
    },
    Message: {
      Body: {
        Html: {
          Charset: 'UTF-8',
          Data: body
        }
      },
      Subject: {
        Charset: 'UTF-8',
        Data: subject
      }
    },
    Source: process.env.FROM_EMAIL
  };

  const ses = new AWS.SES();
  await ses.sendEmail(params).promise();
}

// Format the date for the email
function getPrettyDate (date) {
  const options = {
      weekday: 'long',
      year: 'numeric',
      month: 'short',
      day: 'numeric',
      hour: '2-digit',
      minute: '2-digit'
  };

  return date.toLocaleString('en-us', options);
}
- Save the file, and add, commit, and push it to your GitHub repository
- Back in the Stackery Dashboard, you will see a message to refresh the app as changes from your repo have been detected. Click refresh (If this alert does not show for you, simply refresh your browser to display any changes)

UP NEXT: Configuring the permissions and environment variables your stack will need.
4. Configure Permissions and Environment Variables
Configure your Environment Variables
You may have noticed several environment variables in the code above, such as process.env.TABLE_NAME and process.env.FLICKR_API_KEY. In order for our functions to work, Stackery injects the correct values when packaging your code for CloudFormation. That means that we need to set up these variables in the environment(s) you will be deploying to. We will do this back in the Stackery Dashboard in your browser.
- In the Stackery Dashboard, refresh your stack to make sure you are on your latest commit
- In the top navigation, choose Environments. You will be taken to your list of environments
- Click on the name of the environment you will be deploying into
- In the left sidebar, click the Parameters tab
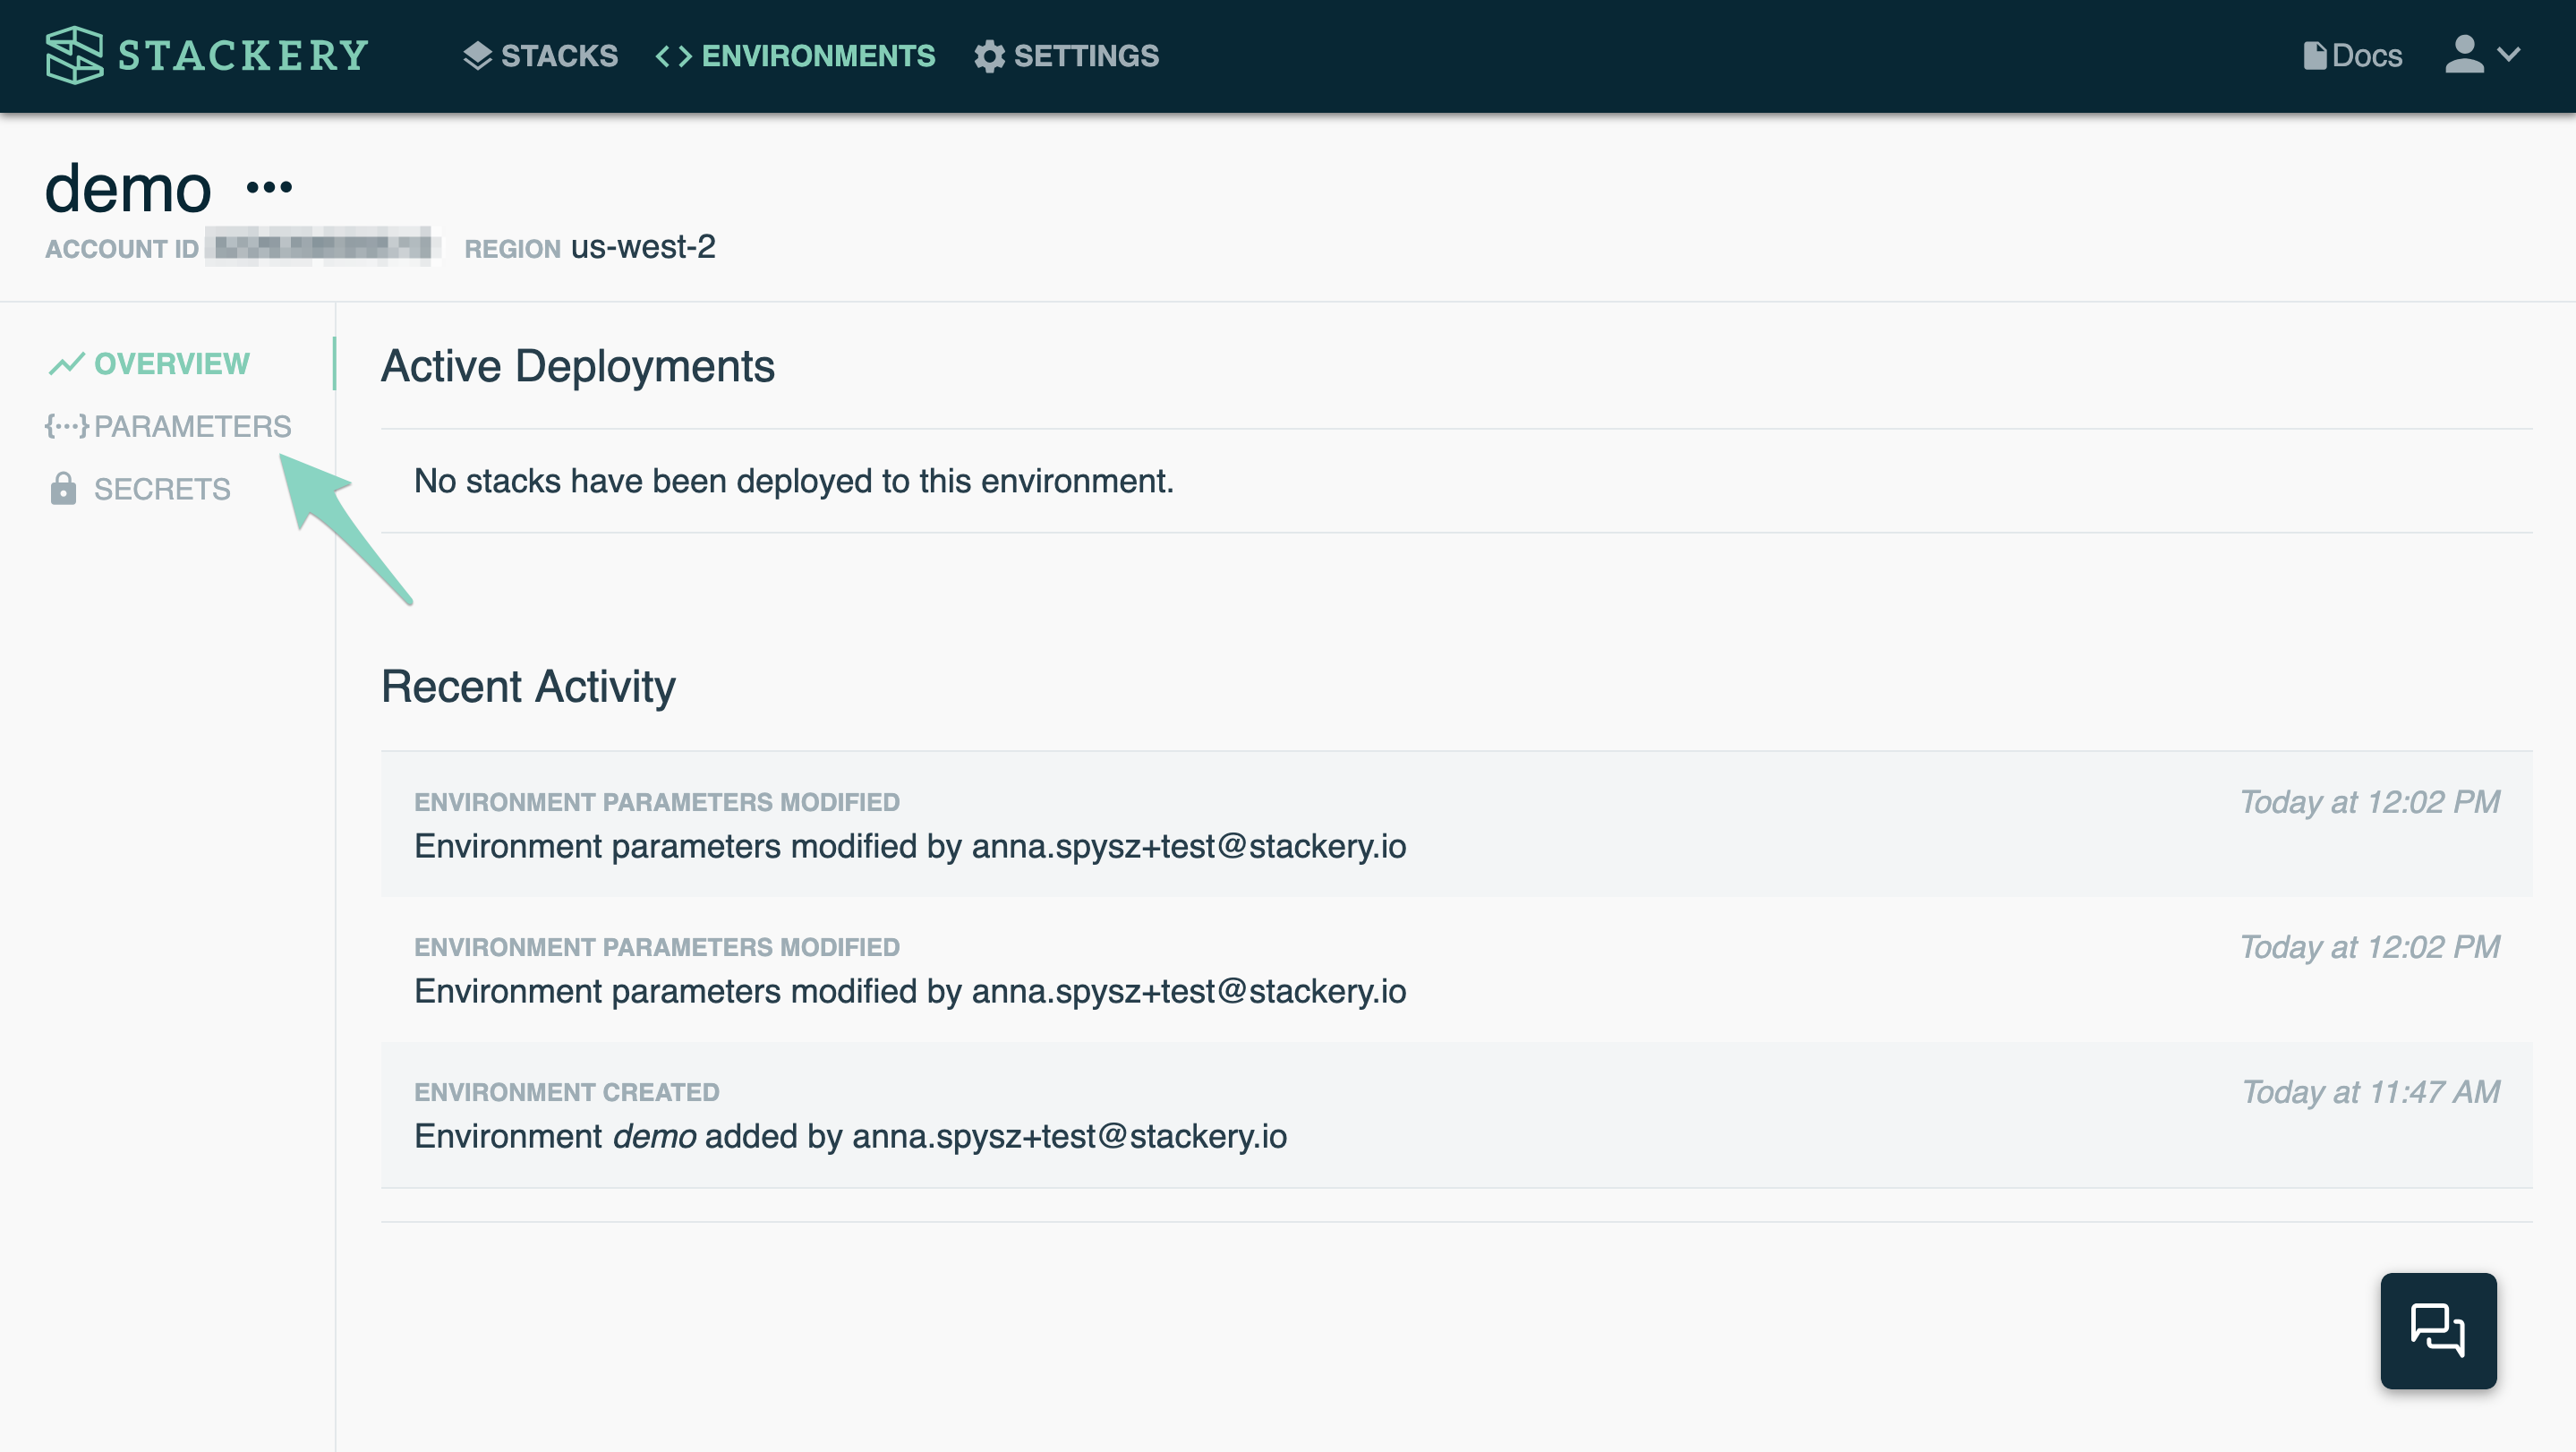
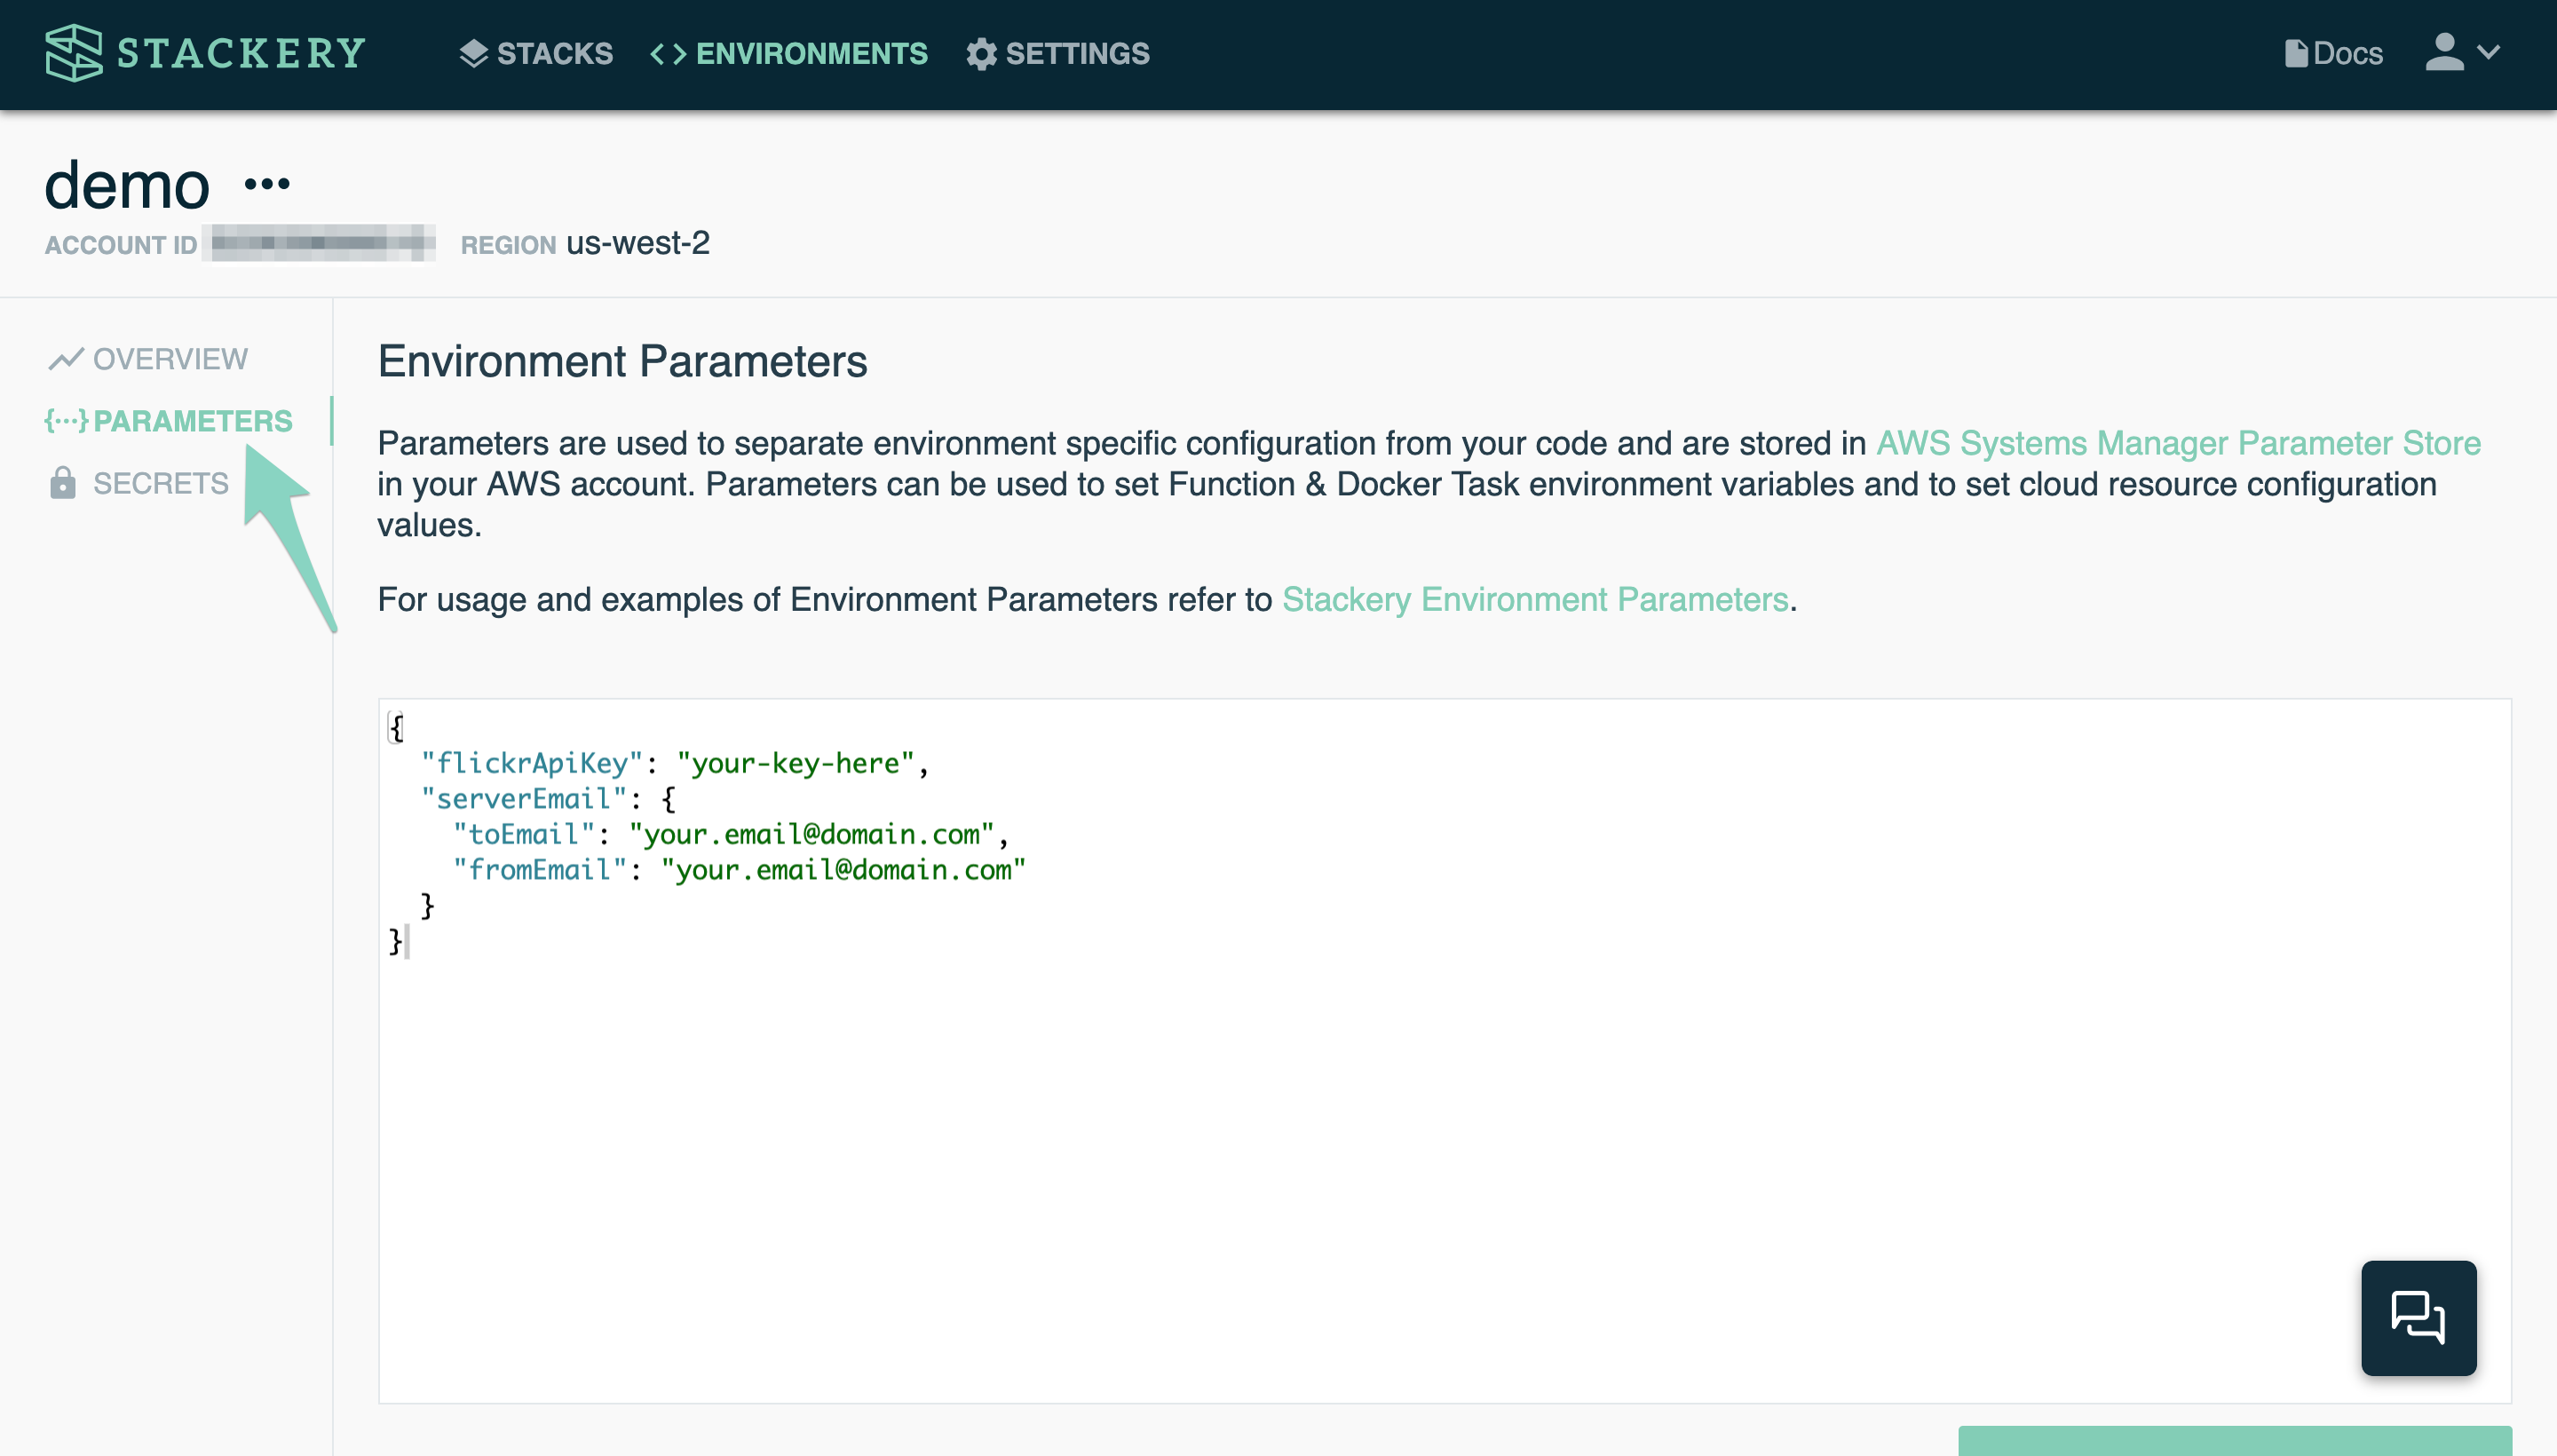
This is where you will configure all of the parameters you will need for your functions - keeping them out of your public repository. They are stored as a JSON config object.
- Paste the following in the editor:
{
  "flickrApiKey": "your-key-here",
  "serverEmail": {
    "toEmail": "your.email@domain.com",
    "fromEmail": "your.email@domain.com"
  }
}
- Replace
"your.email@domain.com"with your real email address. For testing, you should use your own email for both thetoEmailandfromEmailparameters, and you can change those later when your app is ready for production - If you don't already have a Flickr API Key (you don't need a secret key for this app), open the Flickr API site, click the link that says "Apply for your key online now", log in or create an account, choose Apply for a non-commercial key, name your app and write a short description, agree to the TOS, and click Submit. On the next page, copy your application Key and paste it in your environment parameters in Stackery, replacing the
your-key-hereplaceholder - Click Save to save your environment parameters
- Navigate back to Stacks and choose
dynamodb-to-sesfrom your stacks list - Click Edit in the sidebar to get back to editing your stack
- Double-click on the
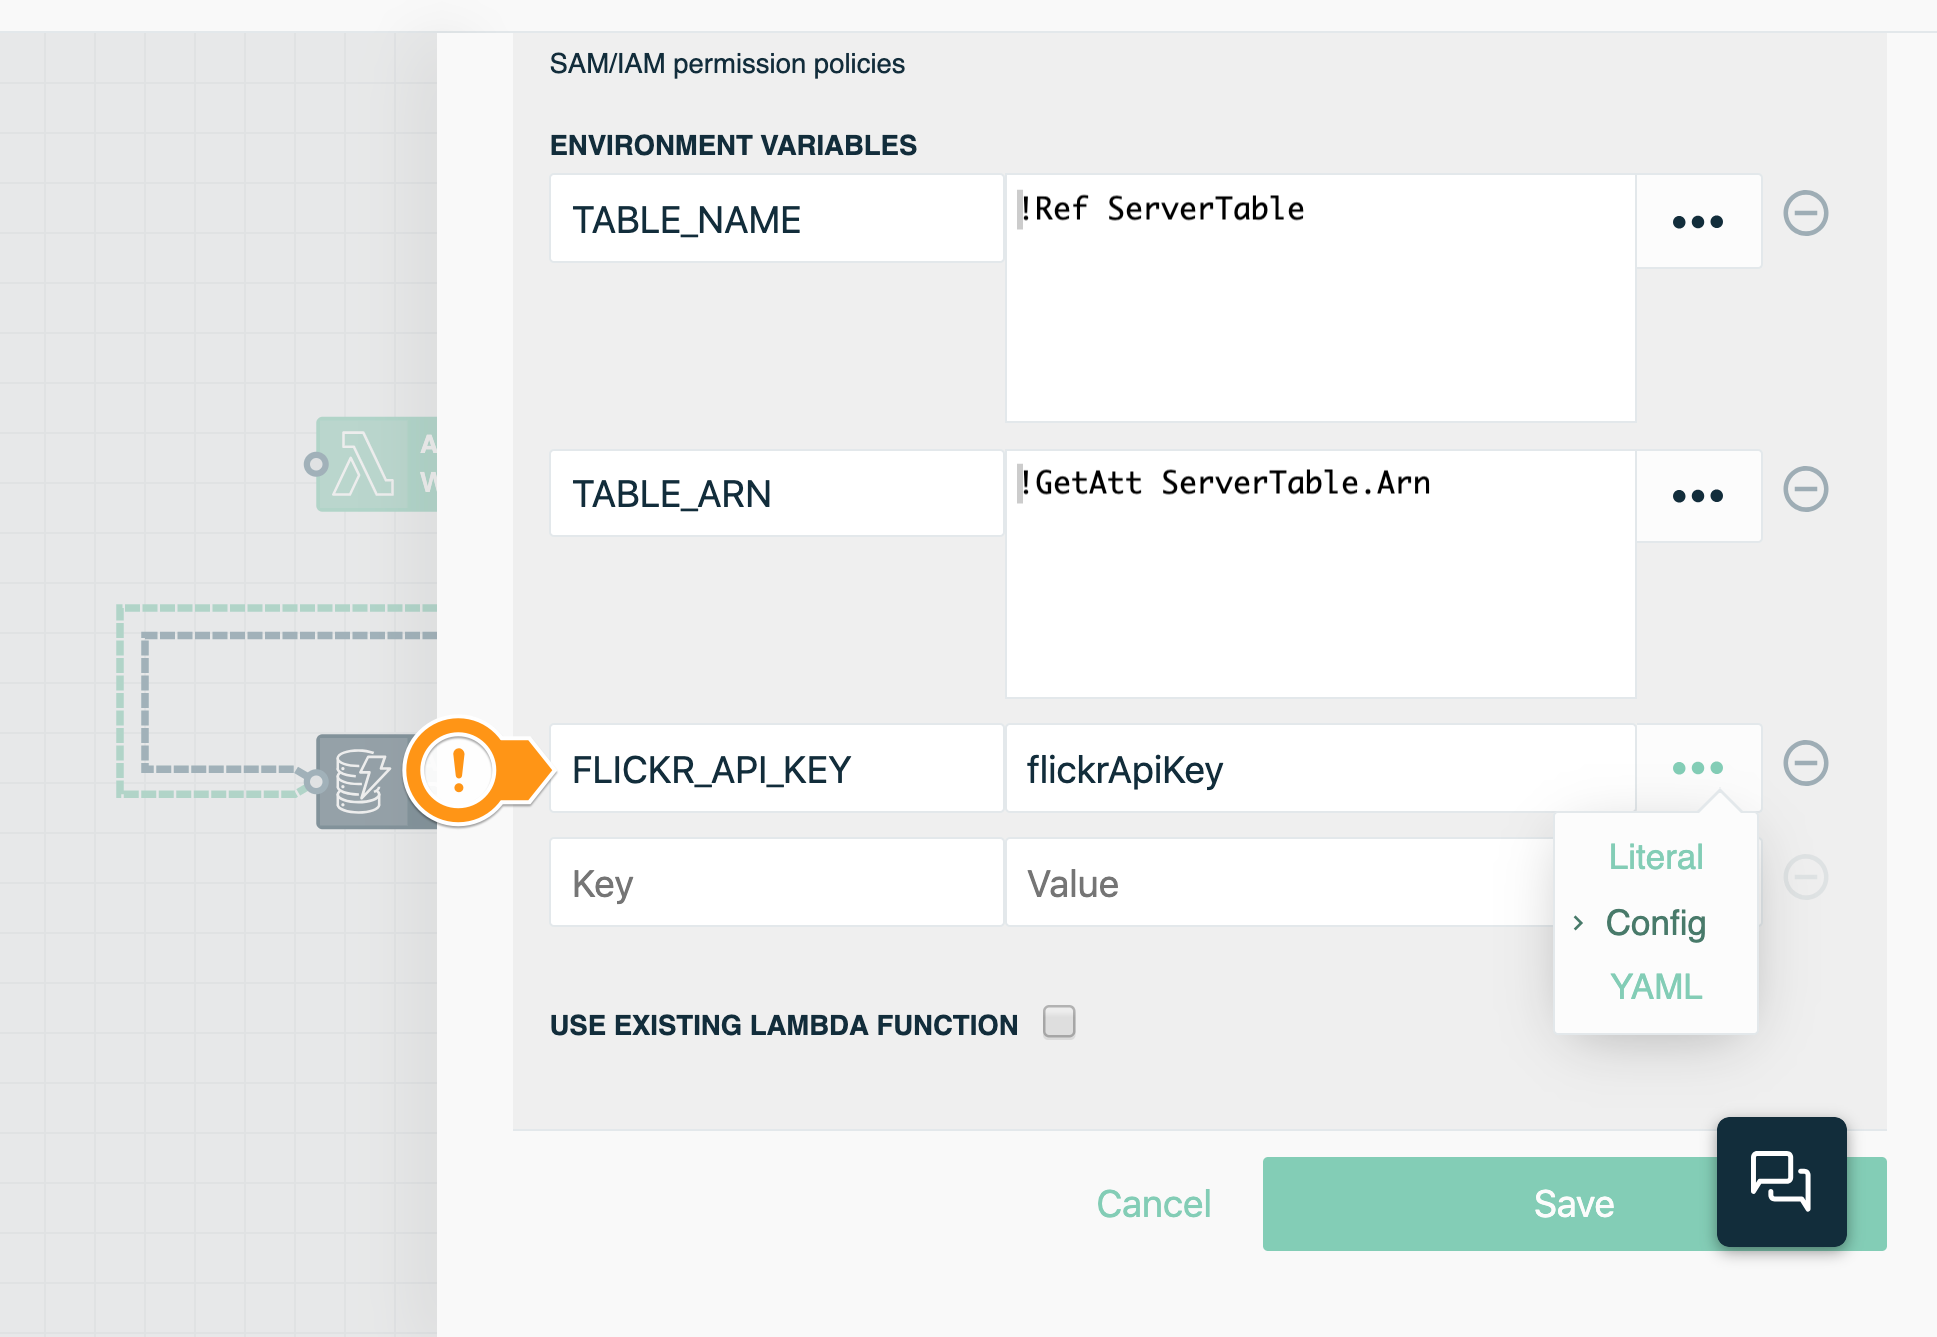
writeToTablefunction to open the editor panel - At the very bottom, under Environment Variables, click the ellipses, and choose
Config - Enter
FLICKR_API_KEYas the Key - Enter
flickrApiKeyas the Value (it should auto-populate from your Environments config) - Click Save at the bottom to save your function
- Double-click on the
sendDailyEmailfunction to open the editor panel - At the very bottom, under Environment Variables, click the ellipses, and choose
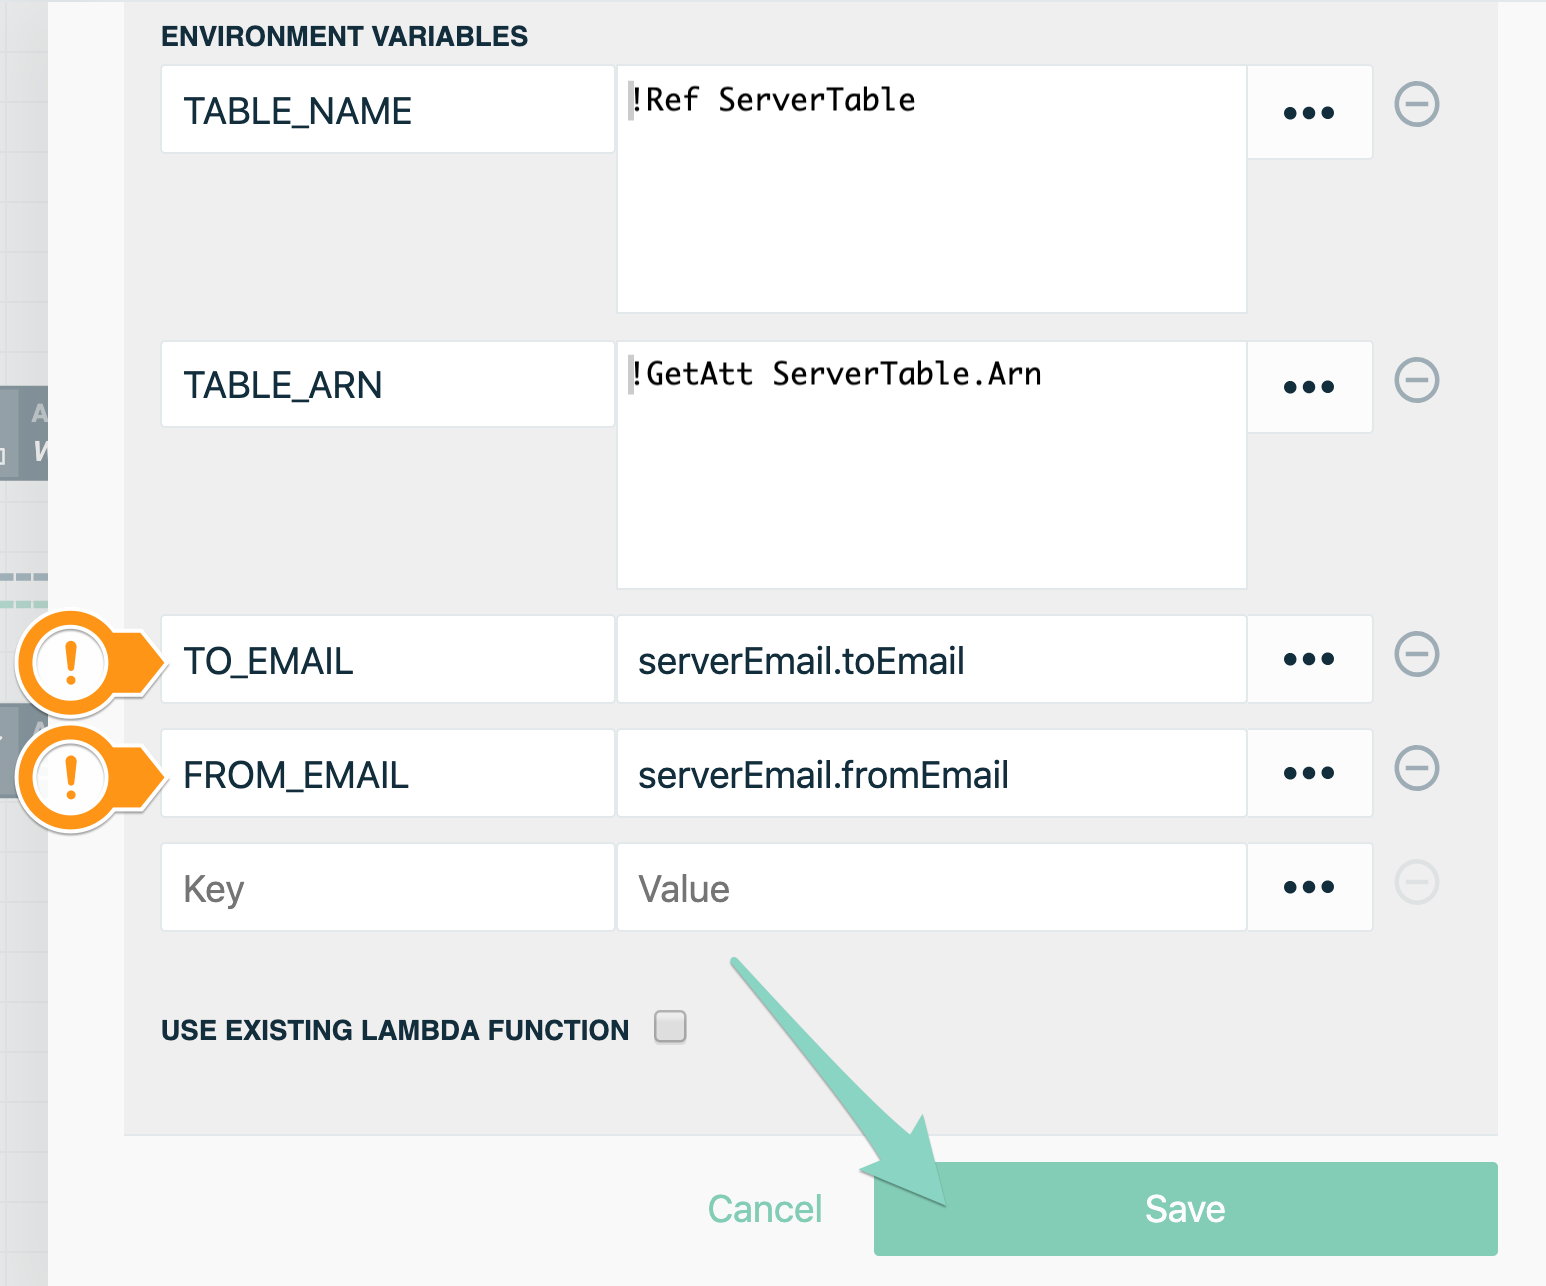
Config - Enter
TO_EMAILas the Key - Enter
serverEmail.toEmailas the Value (it should auto-populate from your Environments config) - In the next field, click the ellipses, and choose
Config - Enter
FROM_EMAILas the Key - Enter
serverEmail.fromEmailas the Value (it should auto-populate from your Environments config) - Click Save at the bottom to save your function
- Click Commit... in the left sidebar, add a message, and click Commit and Push to push your changes to your Git repository
You do not need to manually configure the
TABLE_NAMEenvironment parameter, as Stackery automatically configures it for you when you connect your function to a table with an Integration Wire.
Add SES permissions
In order to be able to send emails using AWS SES, we have to configure and verify the to and from emails you will be using (in the future, you can request permission from AWS to remove this sandboxing restriction, but it will be on by default). We also have to add a new policy in our template.yaml configuration.
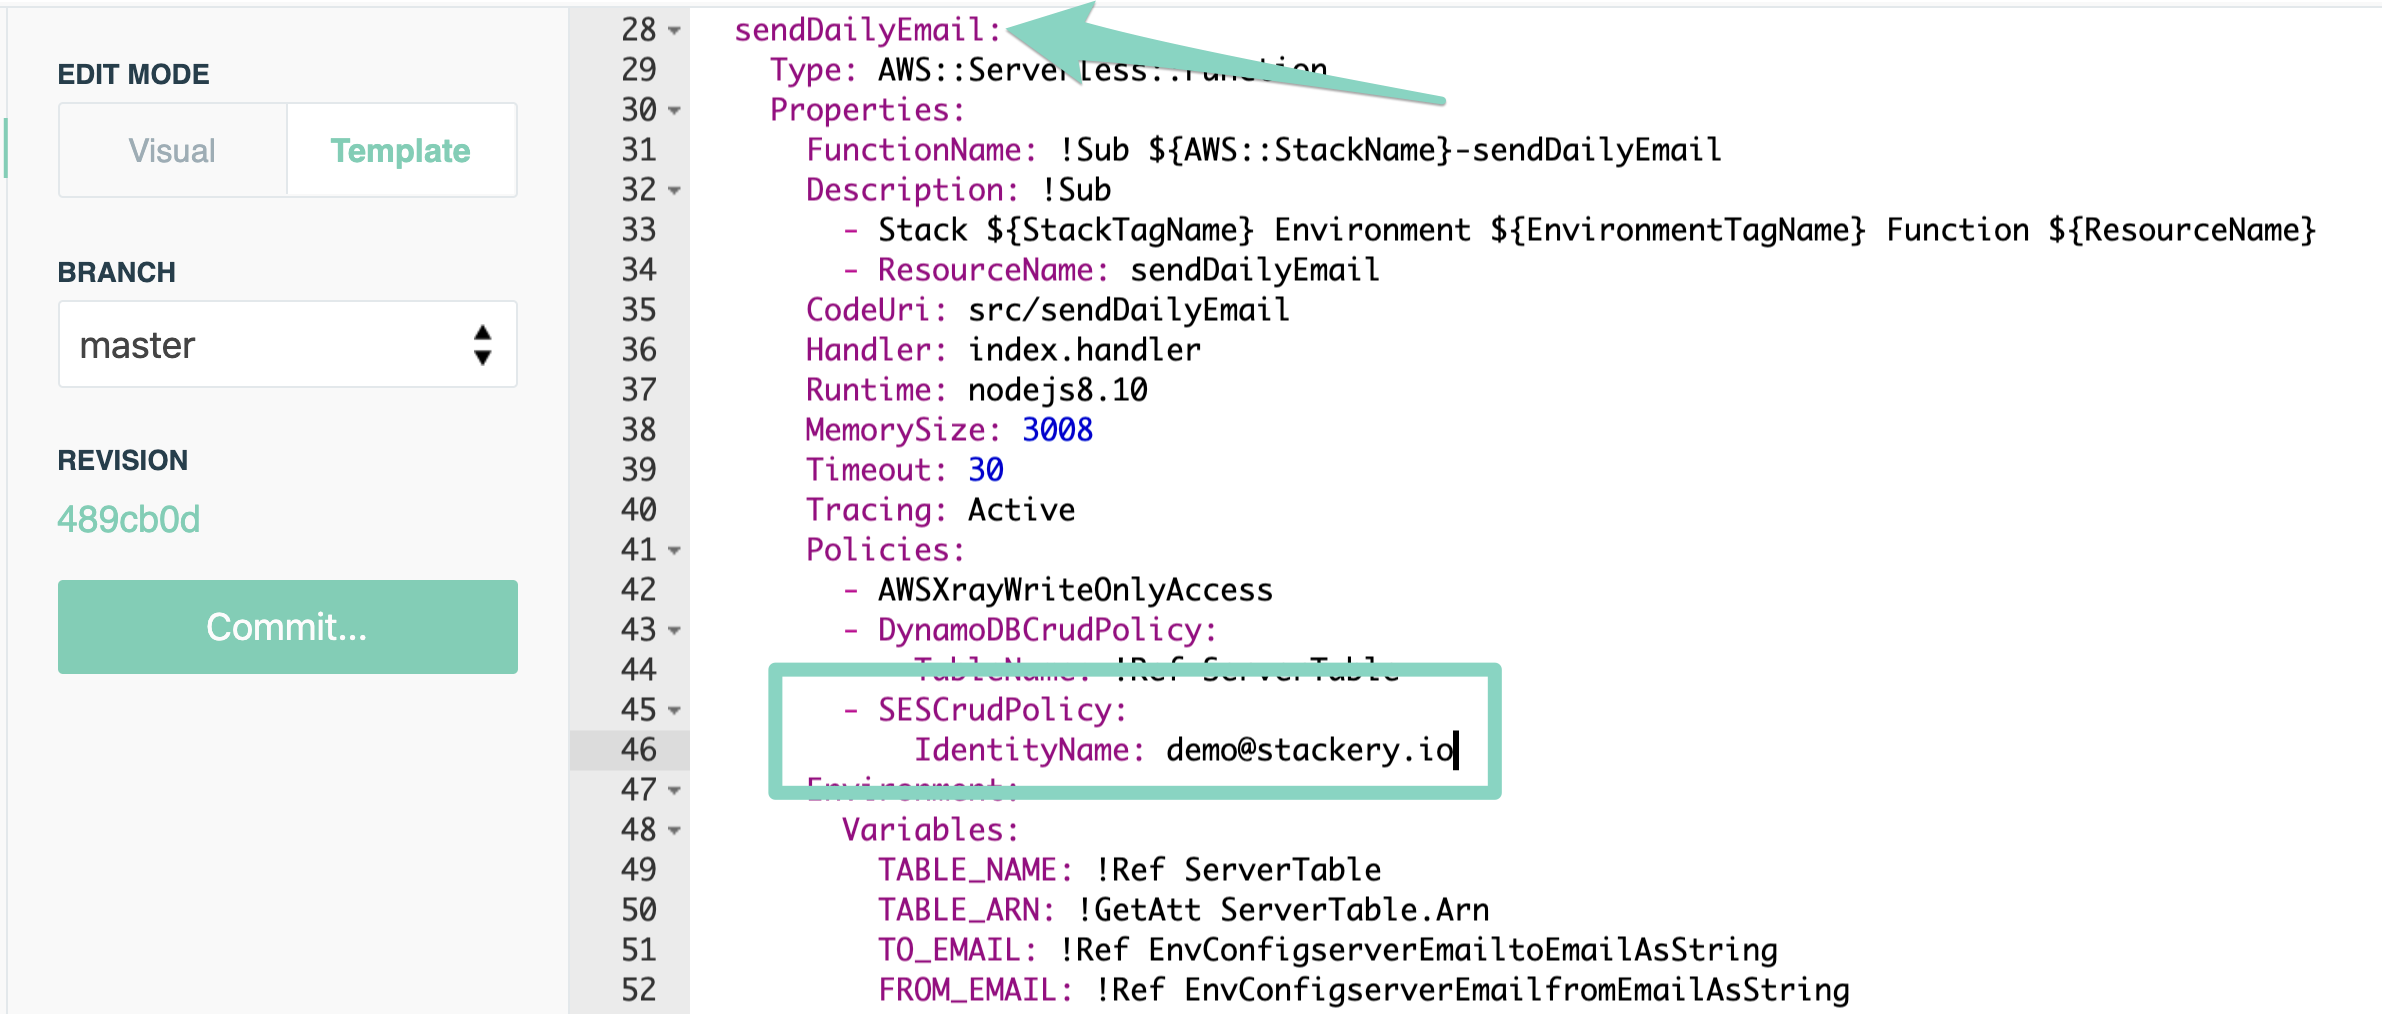
- In your stack edit view, switch the Edit Mode from "Visual" to "Template"

- Scroll down in the YAML file to the
sendDailyEmailfunction configuration - Paste in the following under
Policies(be very mindful of the spacing):
        - SESCrudPolicy:
            IdentityName: your.email@domain.com
- Change
your.email@domain.comto the same email you entered in the environment parameters configuration - Click Commit... in the left sidebar, add a message, and click Commit and Push to push your changes to your Git repository
The next step will need to take place in the AWS Console. Follow the link to get to your console and make sure you are logged into the same account and region as the environment you plan to deploy to.
- In the AWS Console, navigate to the Simple Email Service page
- Click Go to identity management
- In the left sidebar, choose Email Addresses
- Click Verify a New Email Address at the top
- Enter the same email address as you added to your environment parameters, then click Verify This Email Address
- You will receive a verification email. Click the link and you will see that your email is now verified

UP NEXT: Deploying your stack to AWS.
5. Deploy Your Stack
Now we're ready to deploy our stack for testing. Return to your stack view in the Stackery Dashboard.
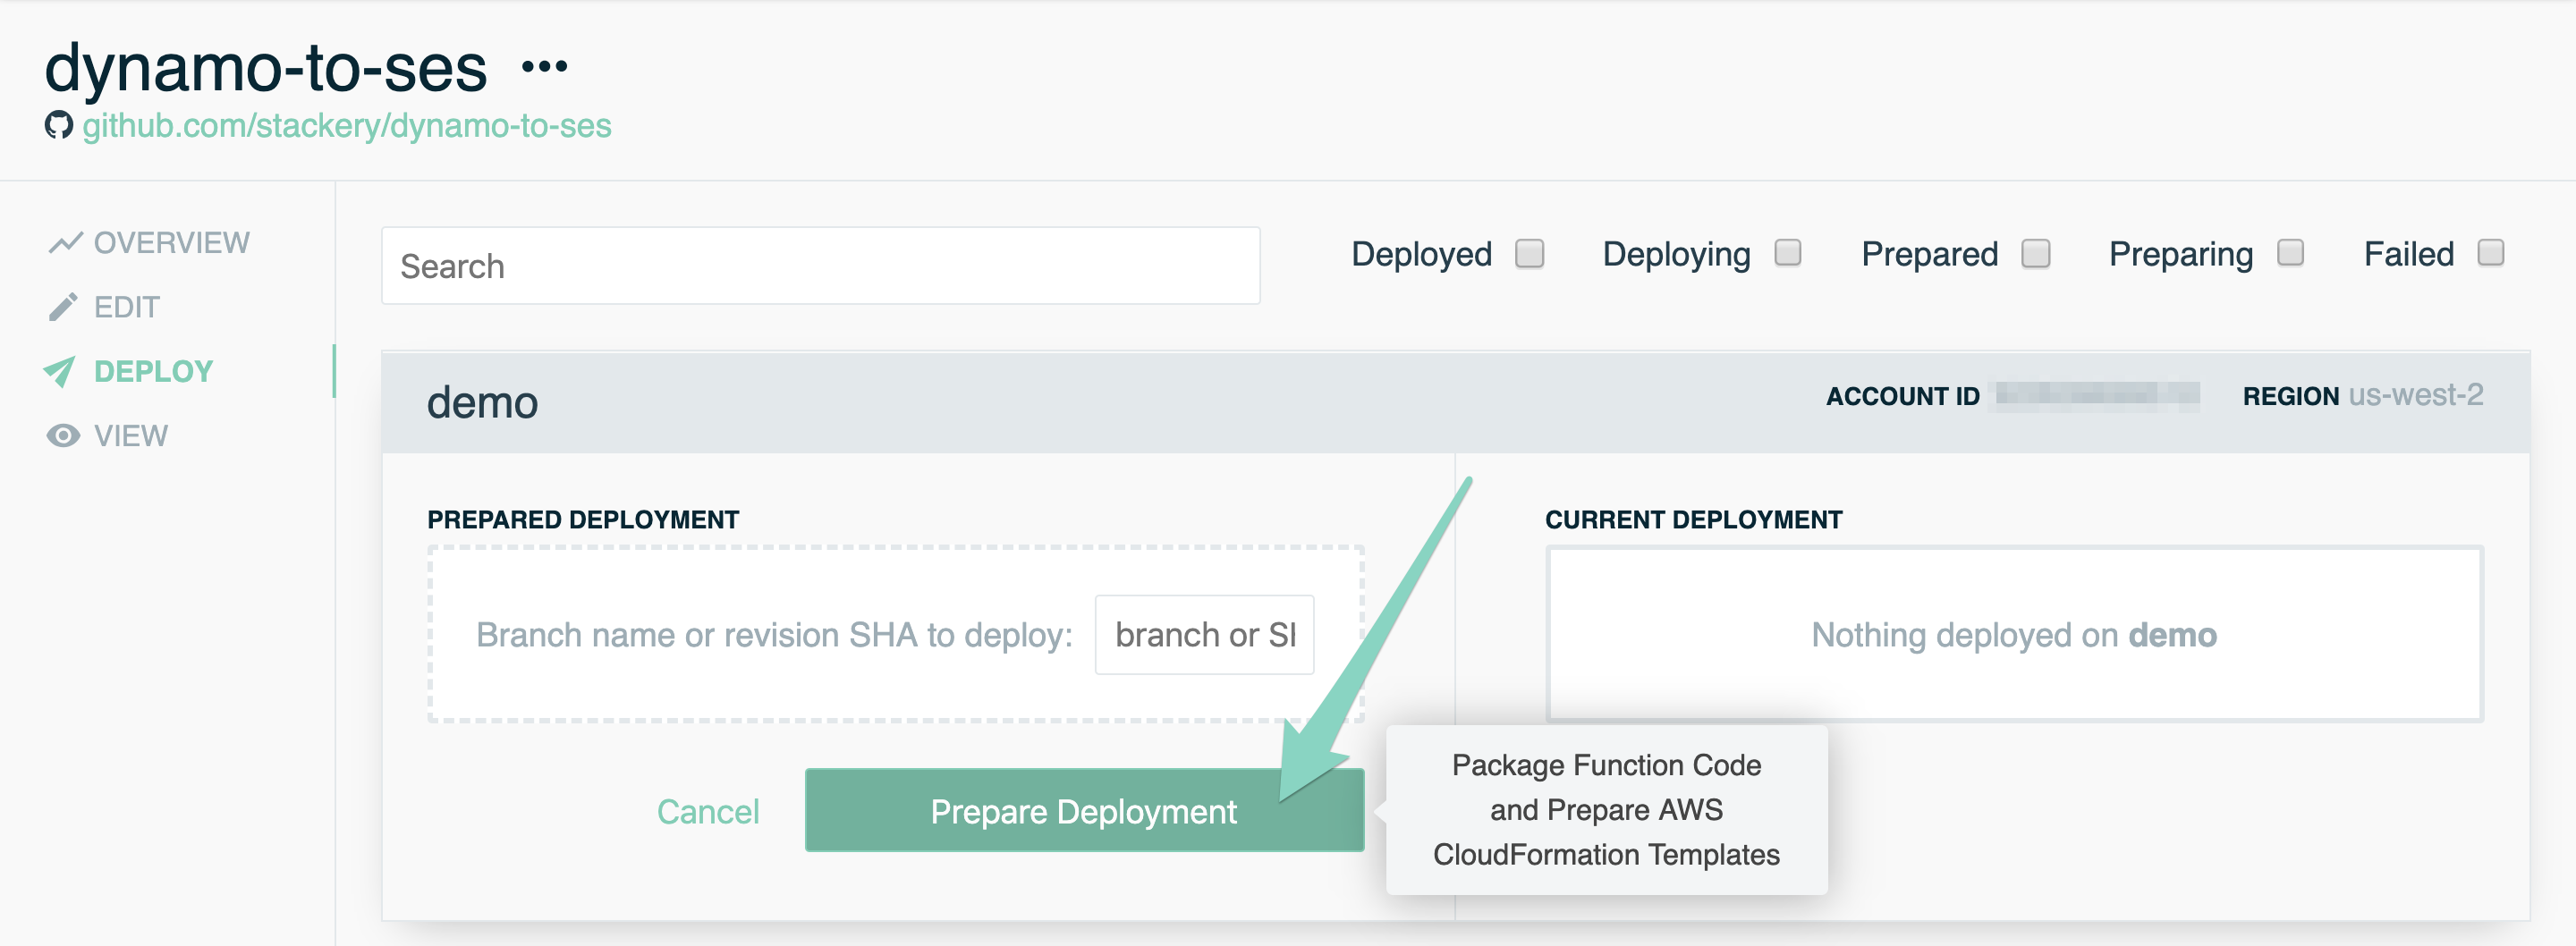
- In the left sidebar, navigate to the Deploy view, and click Prepare new deployment in the same environment in which you stored your environment variables in earlier
- Click Prepare Deployment. This will take about a minute
- Once the deployment is prepared, click Deploy. This will take you to the AWS Console

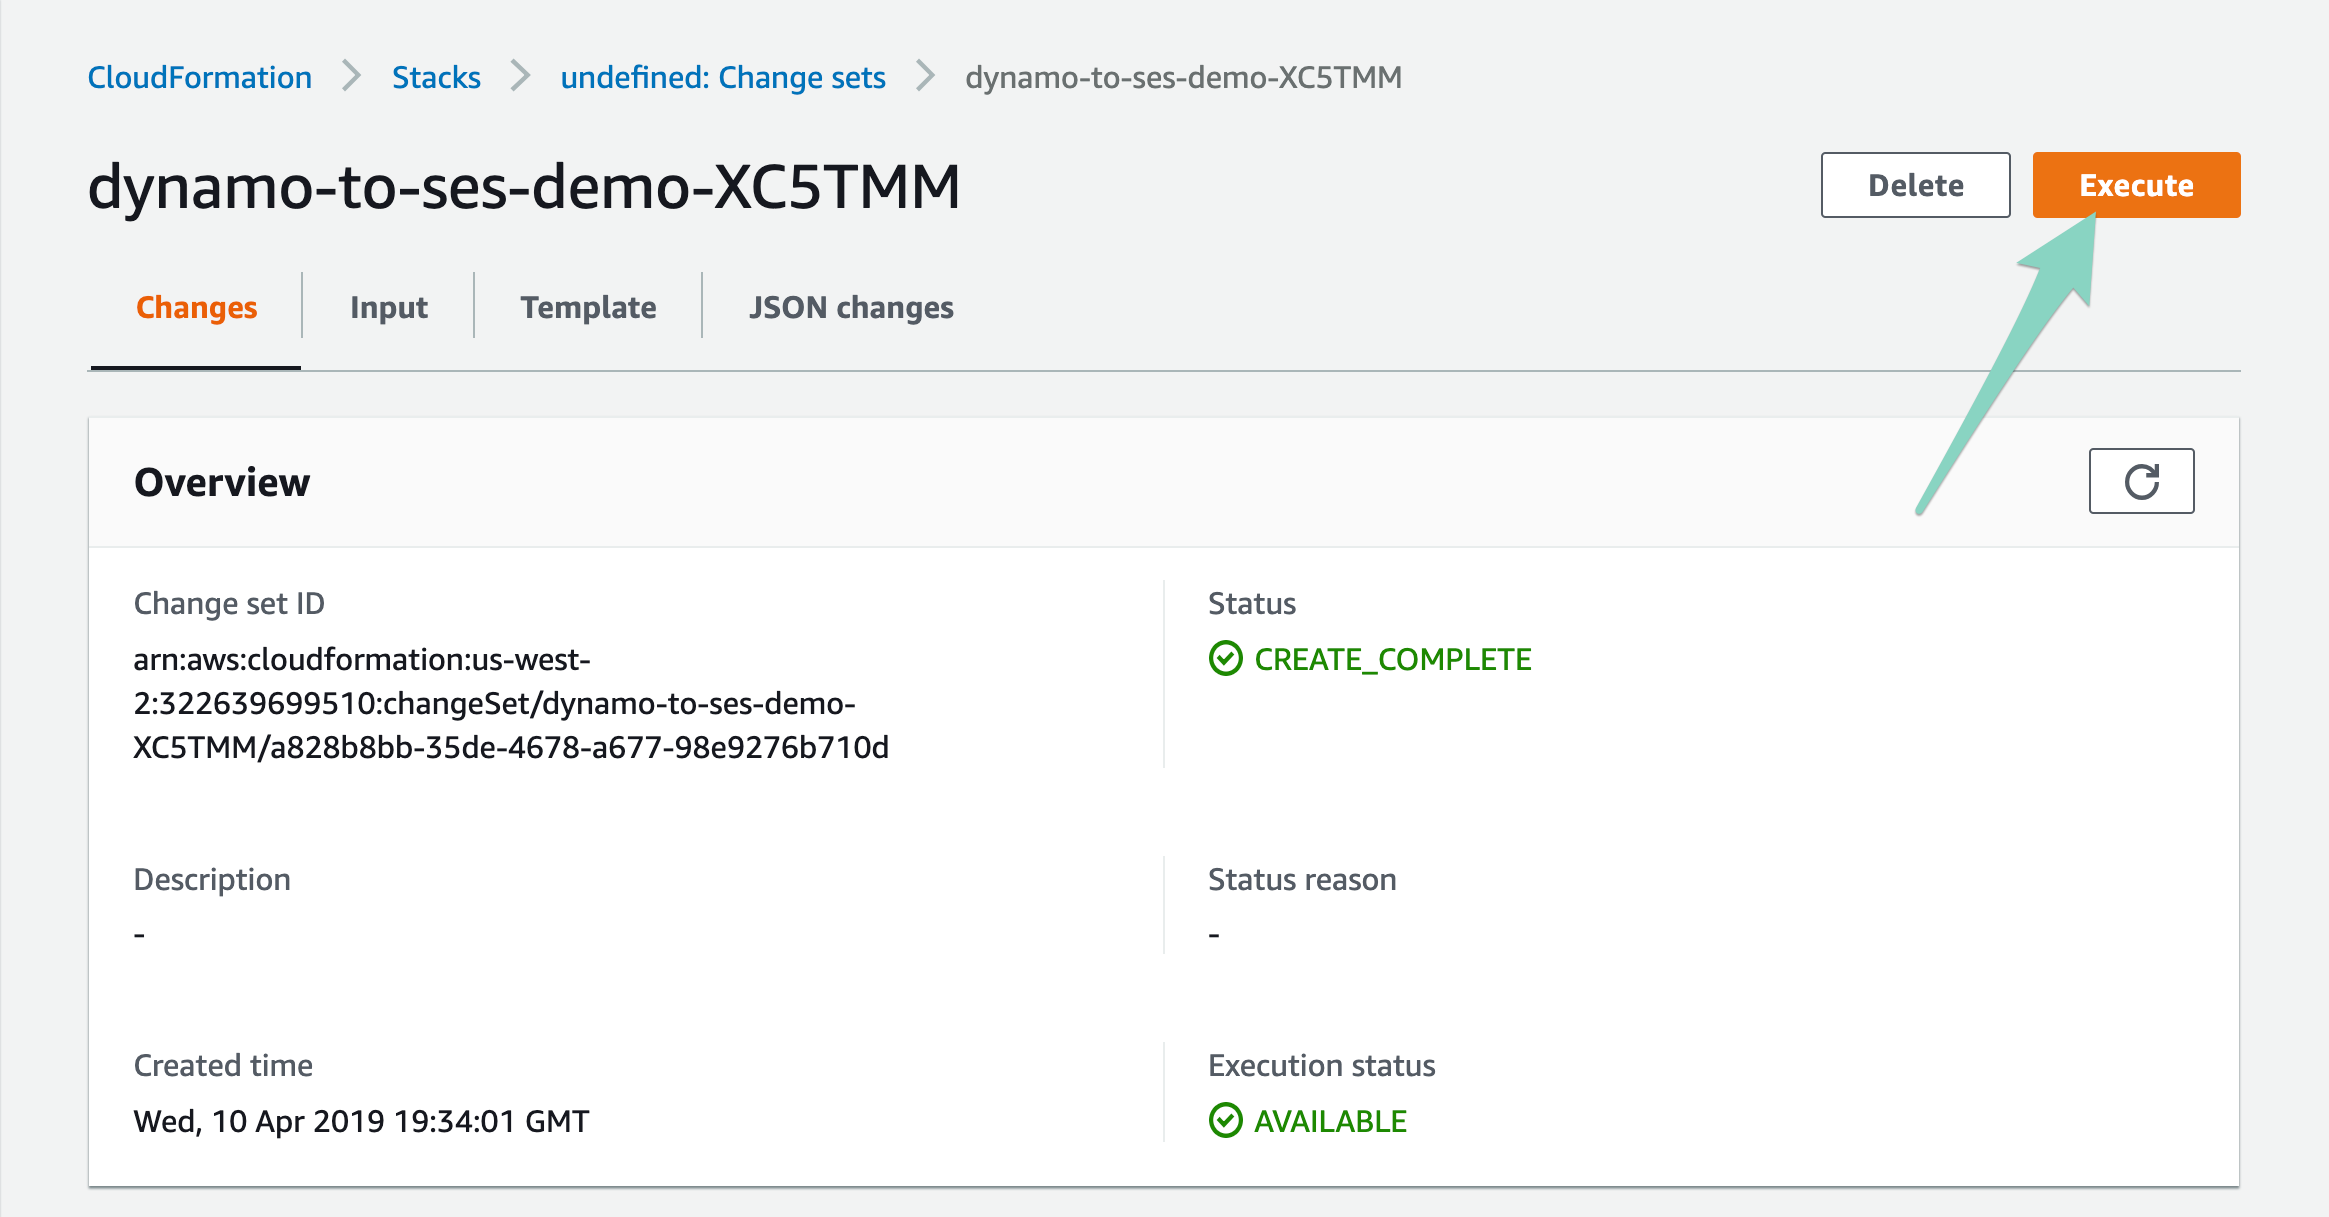
- In the AWS Console, click Execute in the top right. Deploying your stack will take a few minutes. (You can close the AWS Console once the deployment process has started)
- Back in the Stackery Dashboard, you will see a notification when your deployment is ready. Click the View in Dashboard link to see your deployed stack

UP NEXT: Populating the table and sending an email.
6. Test Your Functions
Test the writeToTable function
In this step, we will trigger the writeToTable function to make it populate the ServerTable with images from Flickr.
- In the View page for your stack, double-click the
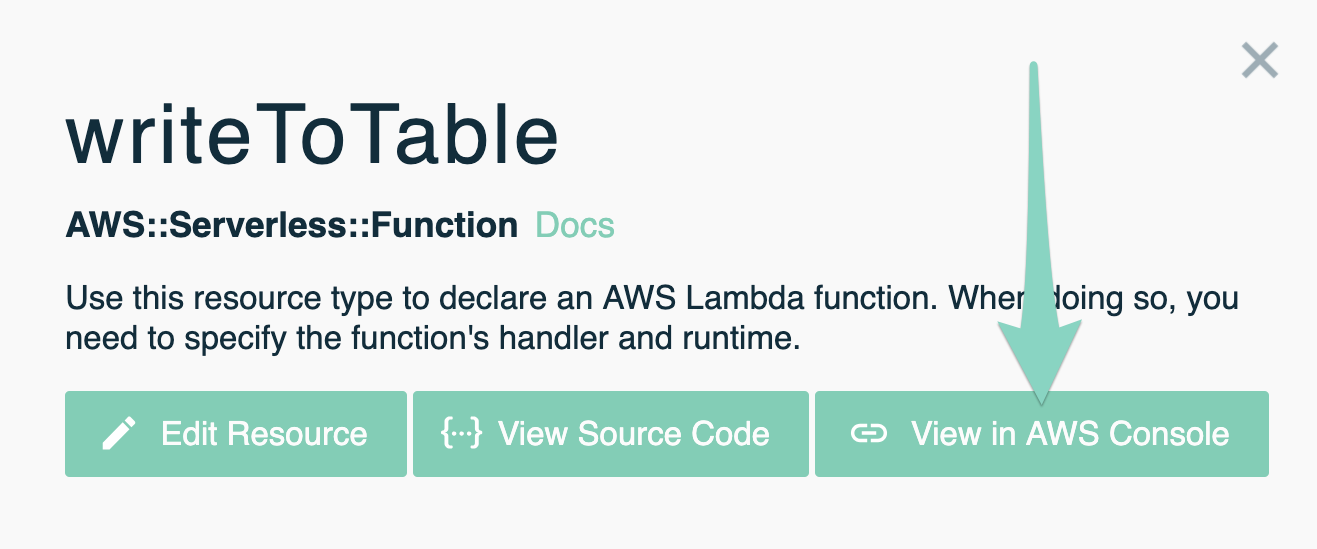
writeToTablefunction - Click the View in AWS Console button near the top. You will be taken to the Lambda page for that function
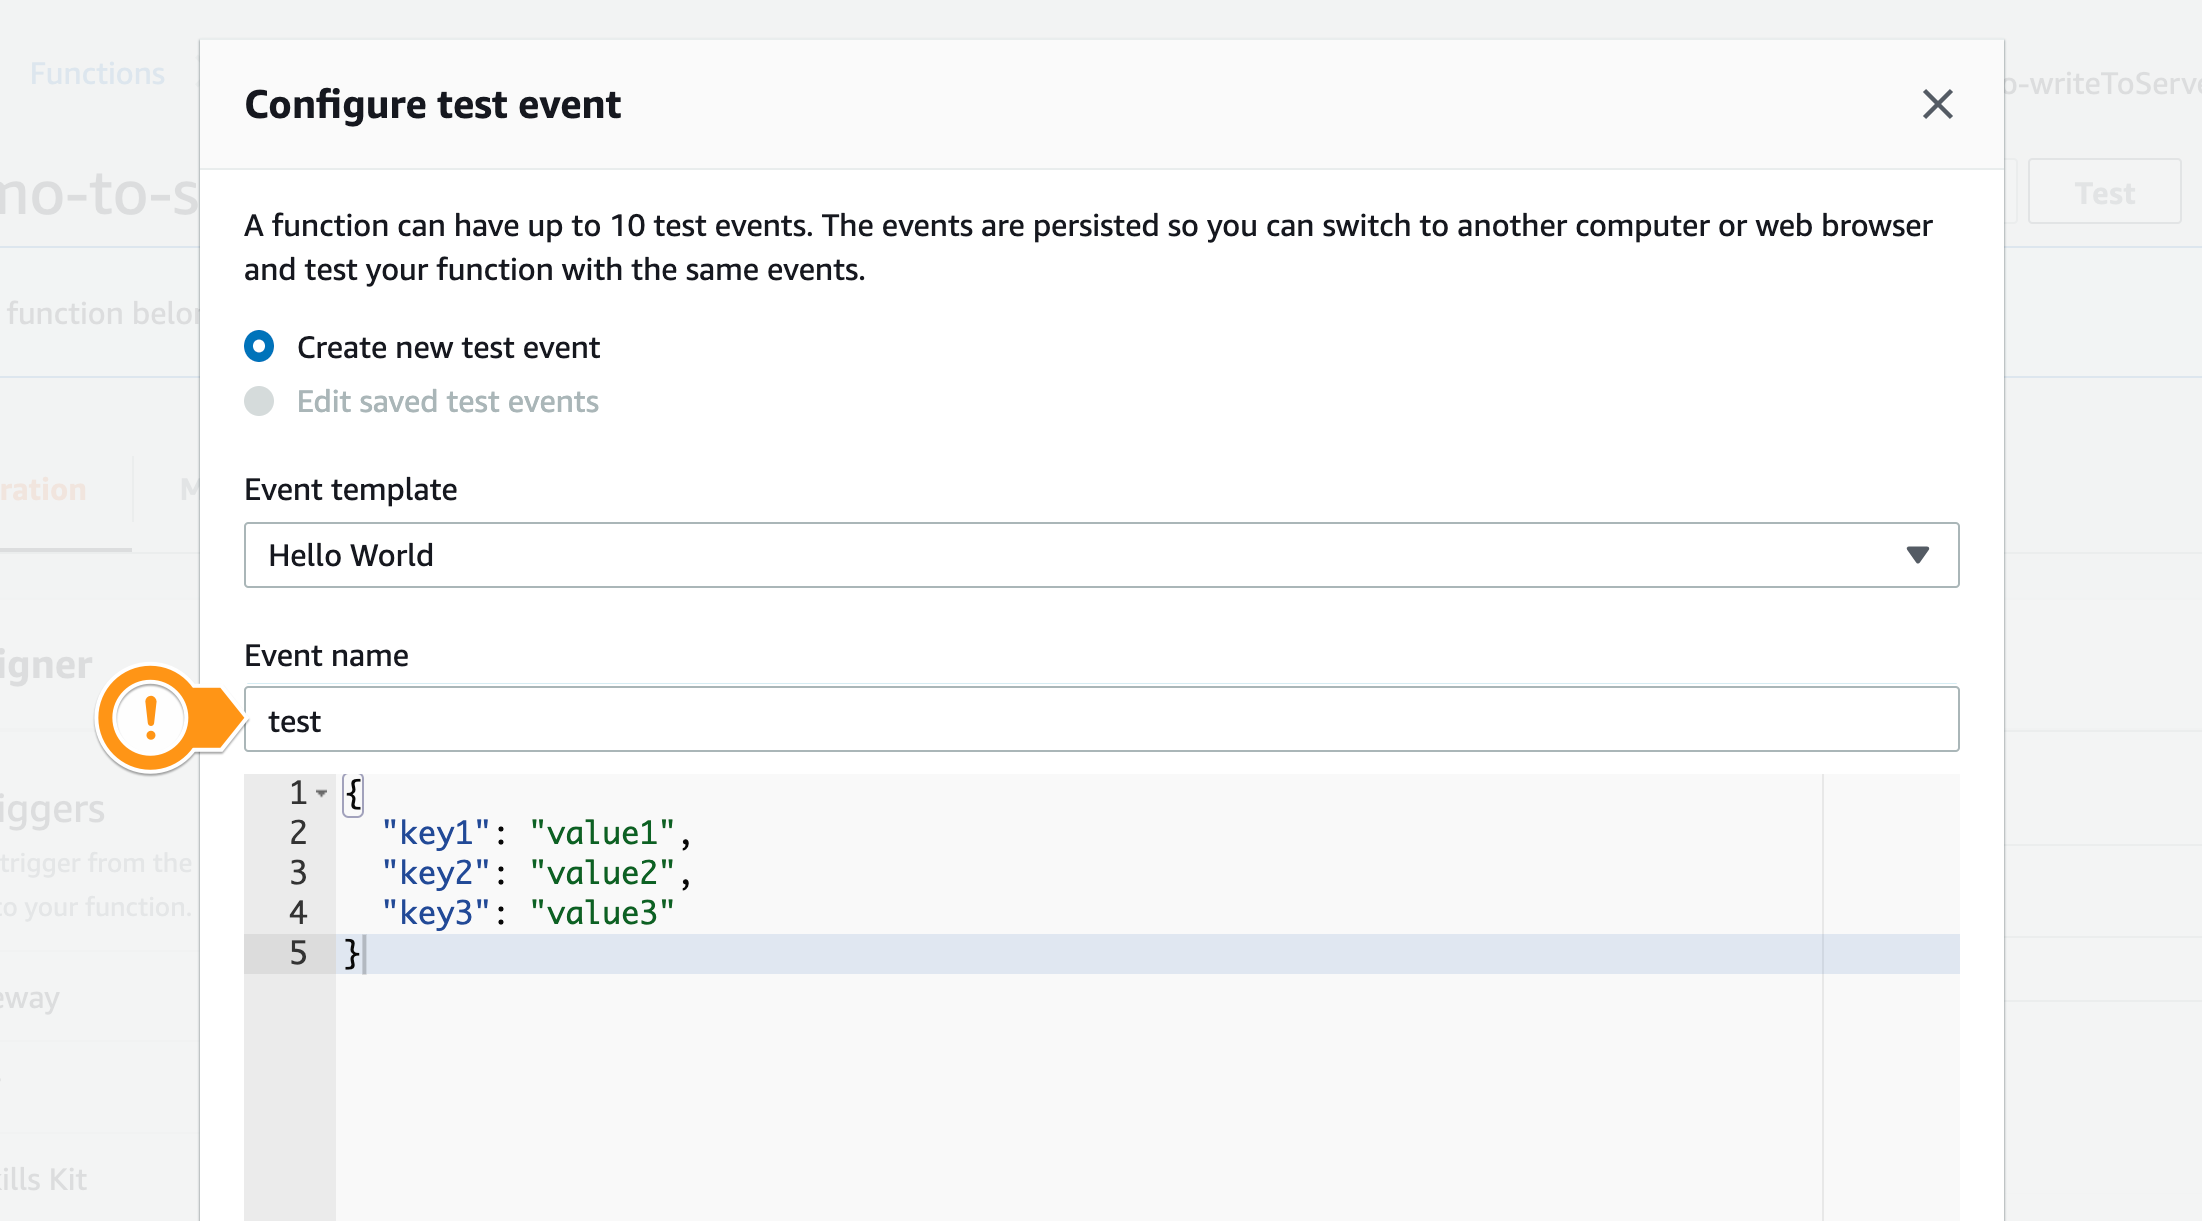
- Click the Test button at the top right. You will be prompted to create a test event.
- In the modal, give the event a name such as
testand leave the values as they are, then scroll down to click Create
- Click the Test button again
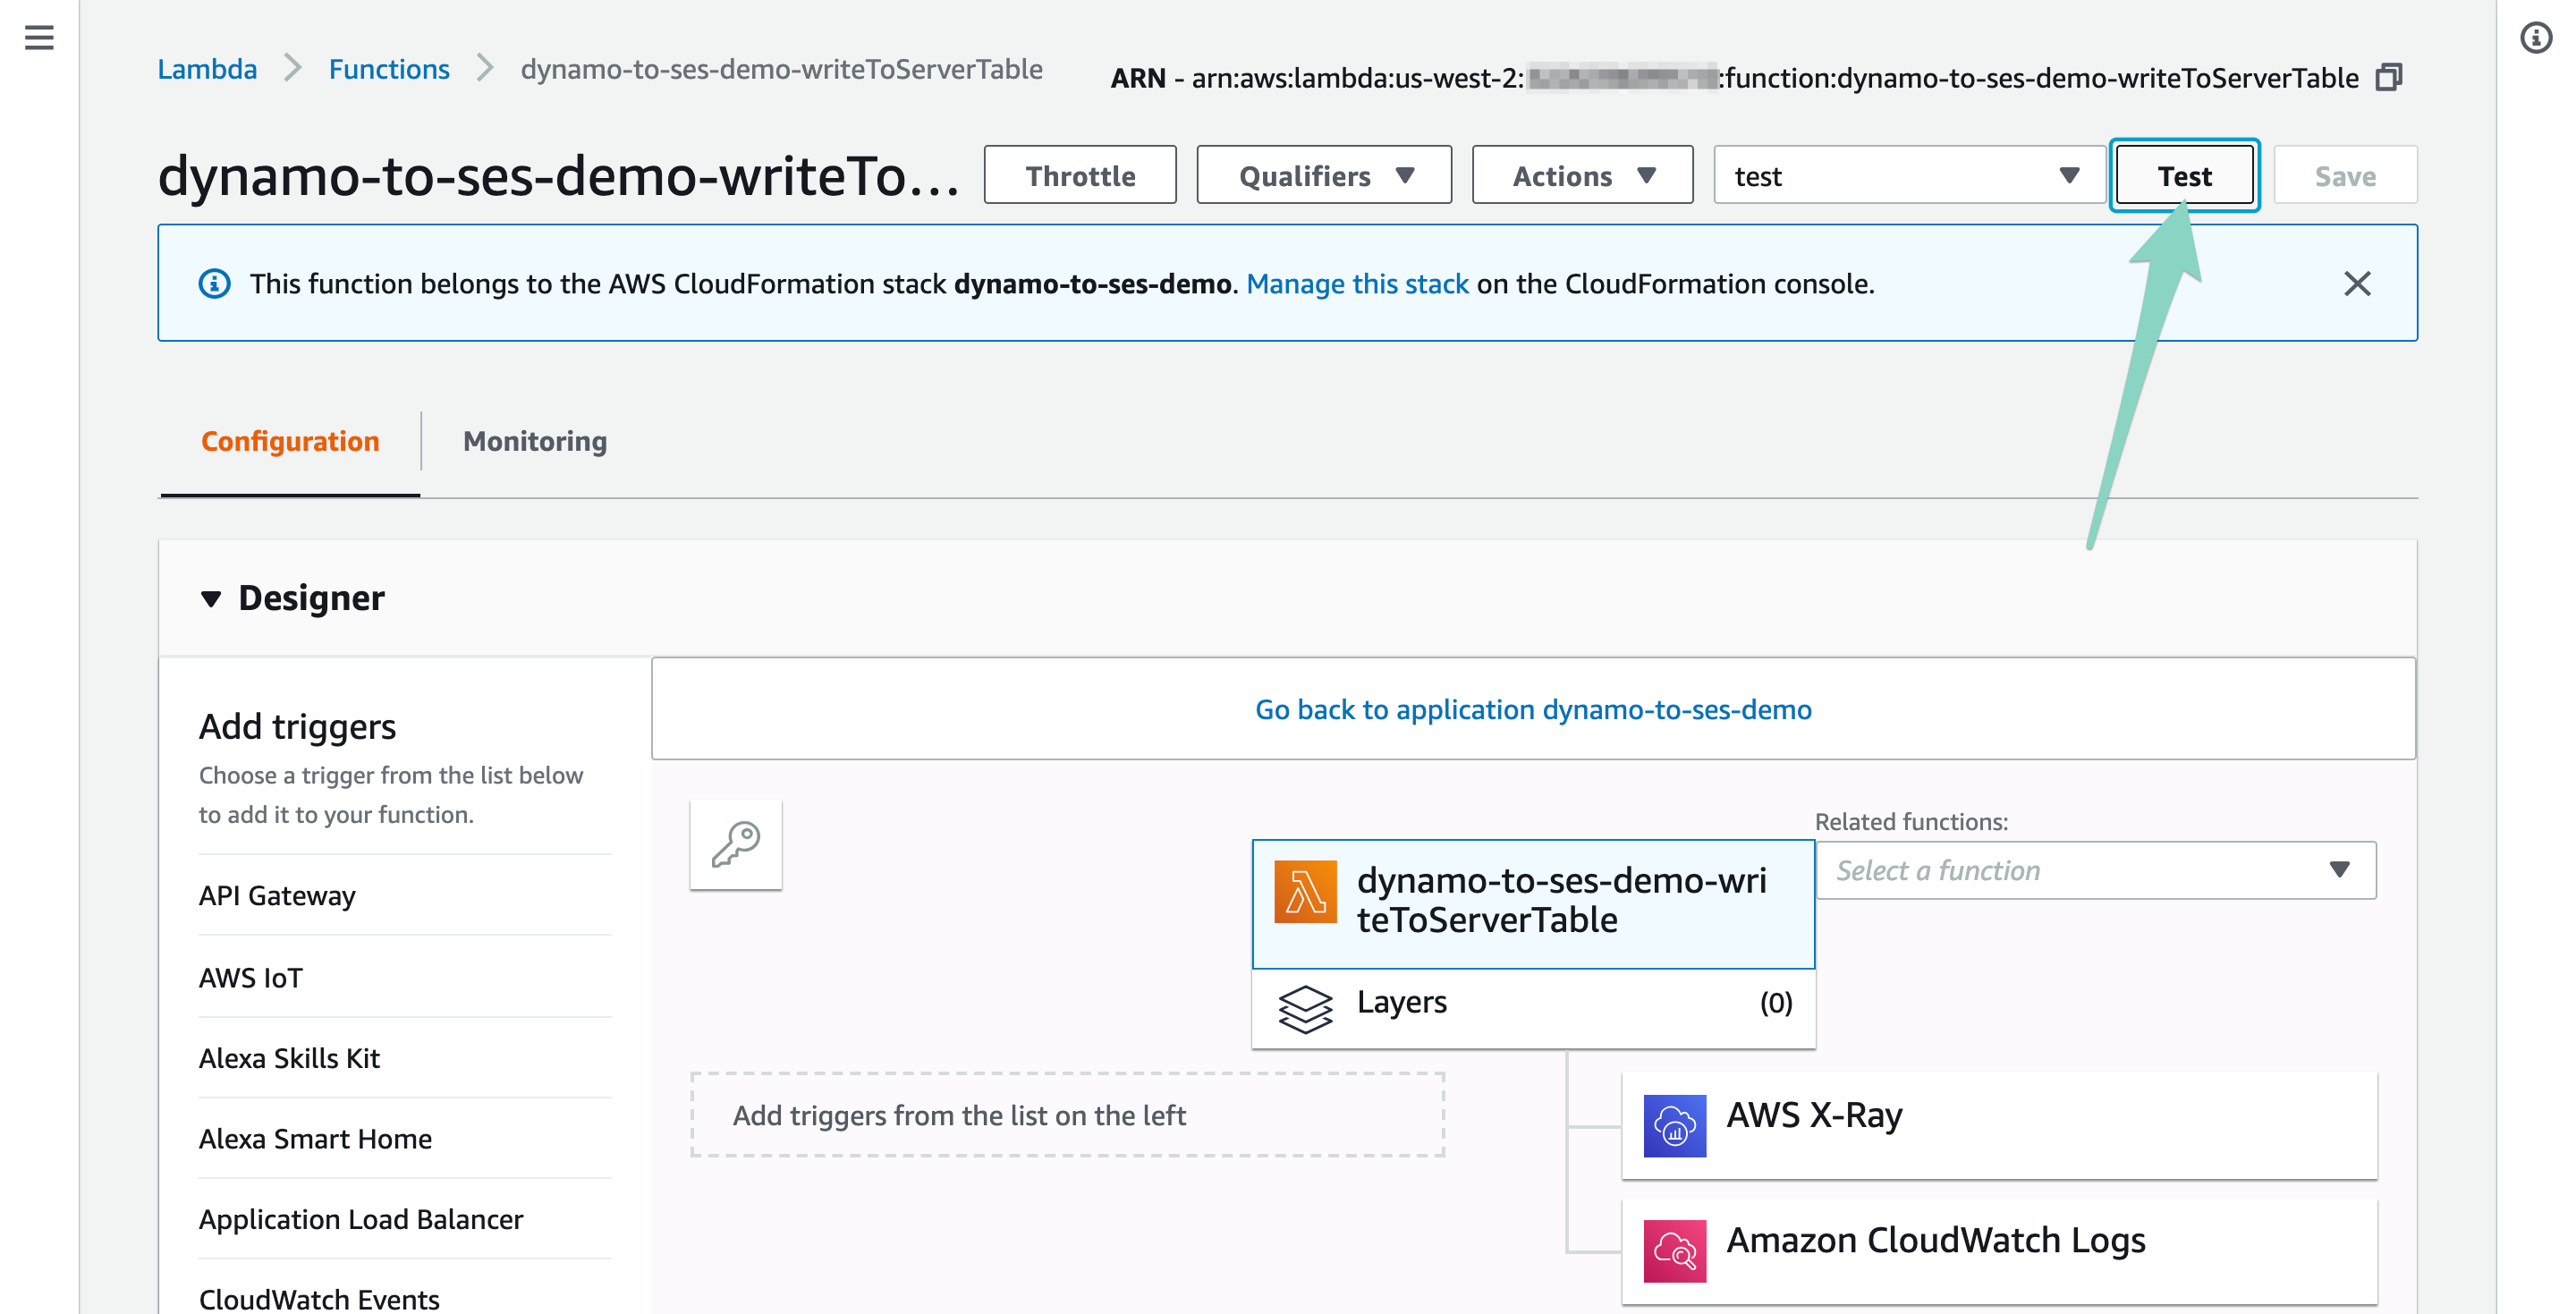
- You should see a message below saying "Execution result: succeeded(logs)". (If this is not the case, see the Troubleshooting section at the end)
- Click the "Details" arrow to see more. It should look like this:

- You can see the log output, which will show all of your events as well as billing and execution details
- Close the AWS Console and return to Stackery
View the ServerTable
When you manually invoked the writeToTable function, it populated the ServerTable table. Now we'd like to take a look at it.
- Close the function detail view if it's open, and double-click on the
ServerTablenode - Click the View in AWS Console button near the top. You will be taken to the DynamoDB page for that table
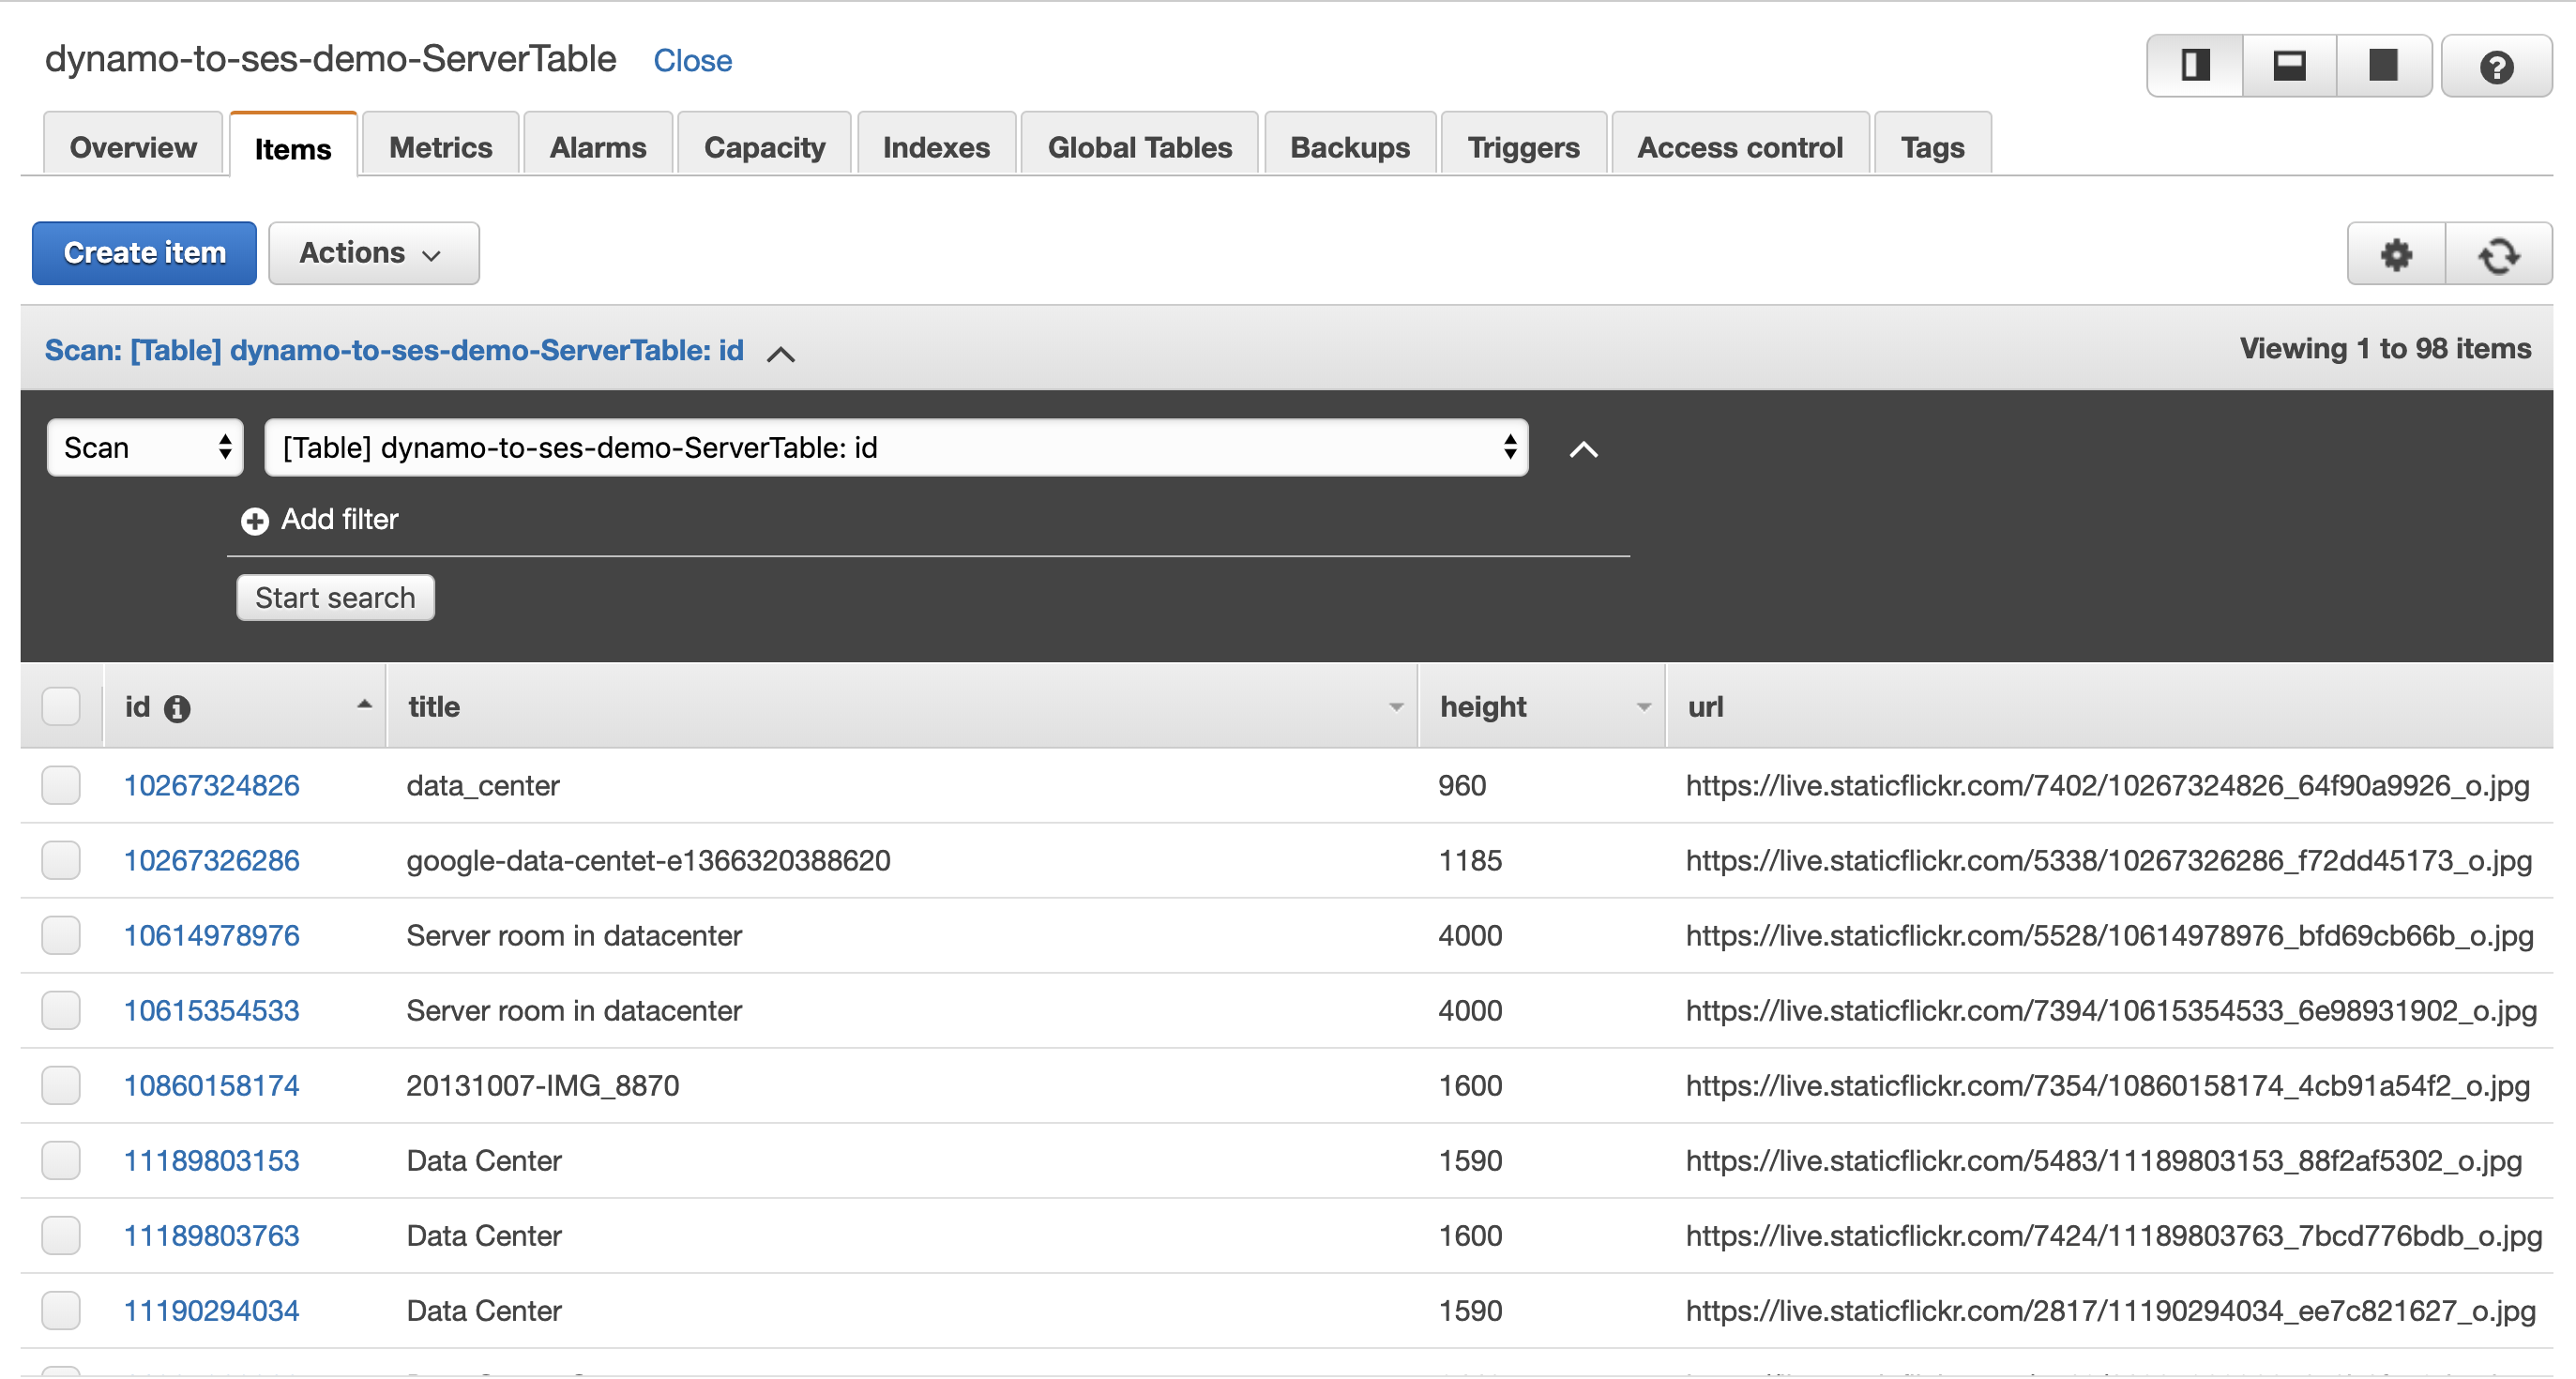
- In the AWS Console, click the Items tab at the top
- You should see a list of 100 items - those are your server images!
Test the sendDailyEmail function
Now that we have a table to choose images from, let's send our test email! Return to Stackery for this step.
- Close the table detail view if it's open, and double-click on the
sendDailyEmailnode - Click the View in AWS Console button near the top. You will be taken to the Lambda page for that function
- Click the Test button at the top right. You will be prompted to create another test event.
- In the modal, give the event a name such as
testand leave the values as they are, then scroll down to click Create - Click the Test button again
- Once again, you should see a message below saying "Execution result: succeeded(logs)". You should also receive an email!
- Check your email. You should have received something like this:
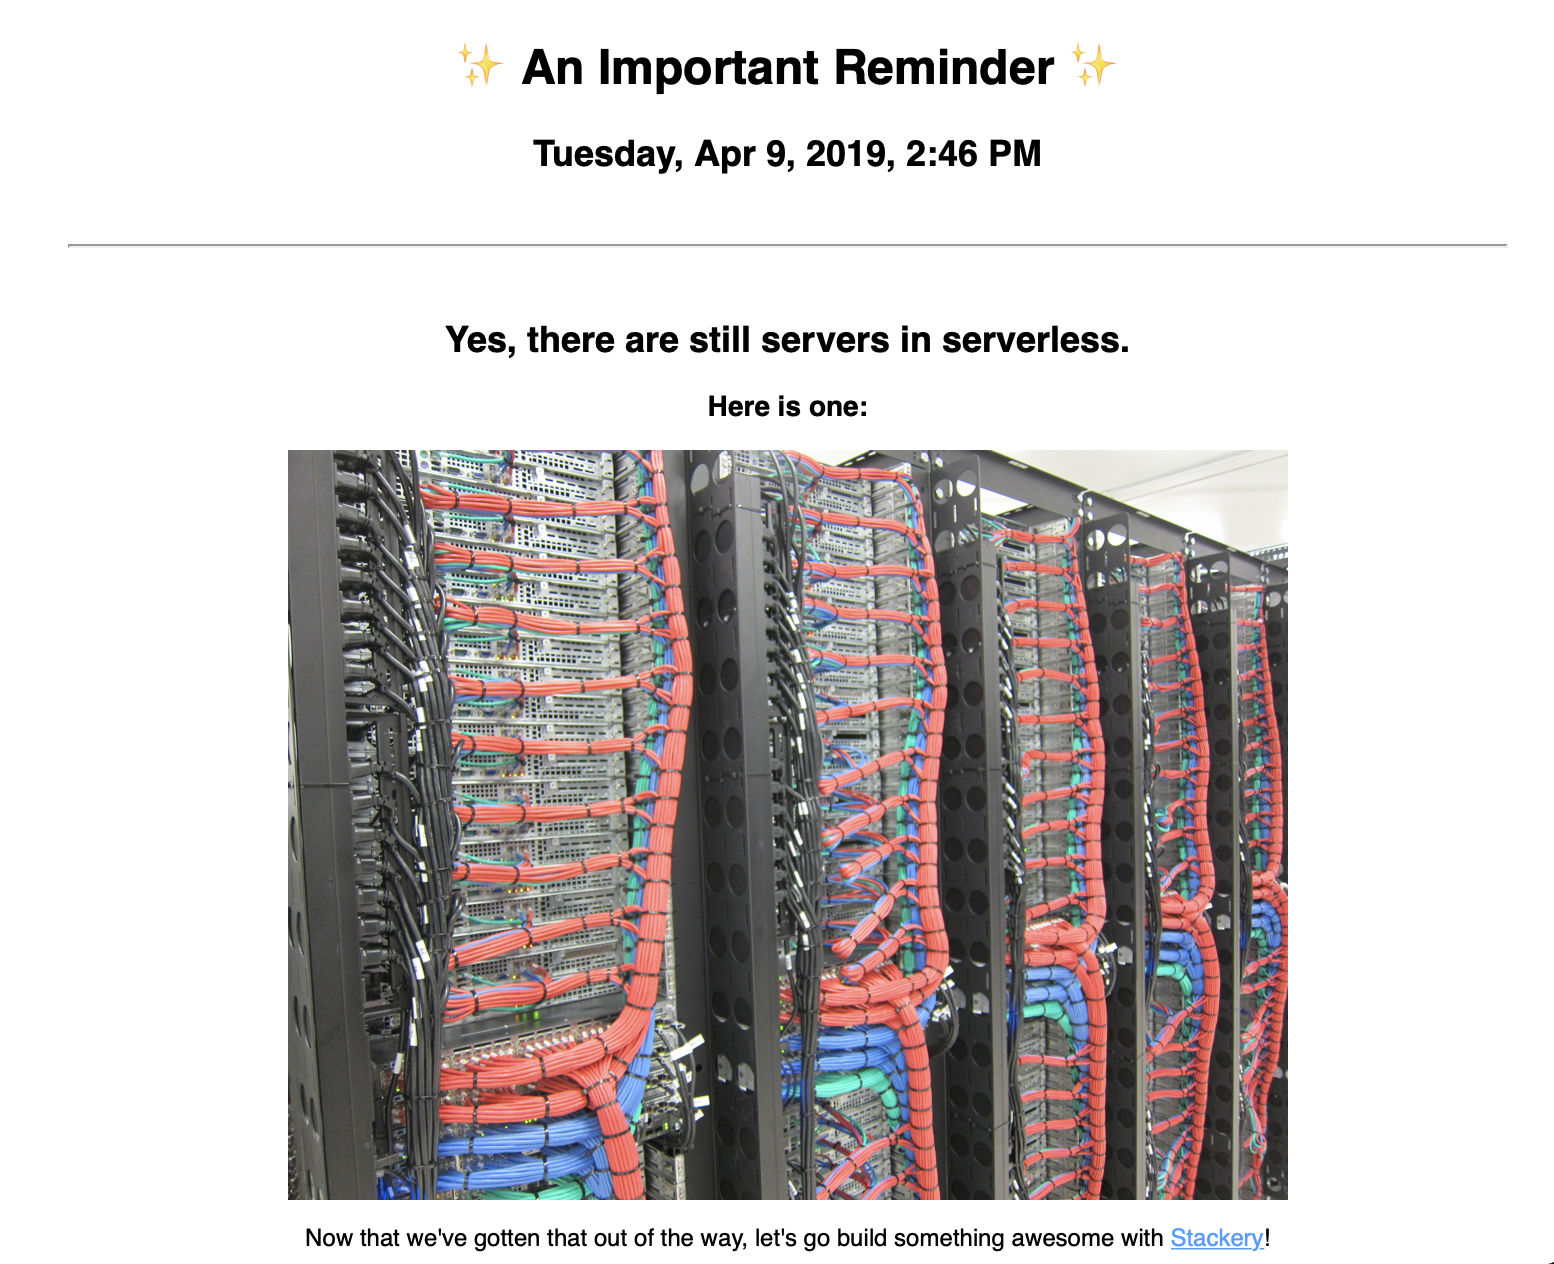
Awesome! You (or whomever you choose to send your email to) will now get a daily reminder that indeed, there are still servers in serverless!
Expanding on this Tutorial
You now have a serverless stack that can write data to a table, get data from that table, and send an email - imagine the possibilities!
Here are some ways of expanding on your dynamodb-to-ses application:
- Use a Git webhook to trigger a function that writes an event to your table every time a designated repository is updated. Then, you can send a daily or weekly email with all the changes made to that repository in that timeframe - instant changelog!
- Use DynamoDB as your CMS for a weekly email. You can use a serverless web form to populate another table with email addresses to send to
- Populate a table with pictures of your kids/cat/dog/ferret, and send an email to family members each time a new item is added
There's a lot more you can do with Stackery, so keep building!
Troubleshooting
Common errors you may come across when following along with this tutorial.
Failure to prepare your stack
If you try to prepare in an environment that is not configured with the correct environment variables, you will see the following error in Stackery:

Follow Step 4 above to correctly configure the environment you plan to deploy into.
The conditional request failed error when writing to DynamoDB
The writeToTable function is set up to not overwrite existing items. If you would prefer to overwrite items in your use case, simply remove the condition
ConditionExpression: 'attribute_not_exists(id)'
from line 44 of the writeToTable function.
See the AWS SDK DynamoDB docs for more options when writing to and reading from DynamoDB tables.
