Serverless Contact Form
This guide explains how to build a serverless contact form for a static site using Stackery.
By the end of the tutorial, you will have deployed into your AWS account:
- A basic HTML contact form hosted using AWS Lambda
- An HTTPS API endpoint to receive form submissions using AWS Lambda and API Gateway
- A DynamoDB Database containing your form submission data
Each step of the tutorial includes:
- A step-by-step video guide
- Transcript of the step-by-step video with code examples
Tutorial Updates
As we continue to develop Stackery, there may be improvements made to the design of the application. You may notice some differences between current versions and versions used to record our video guides. Rest assured, the overall functionality of Stackery remains the same.
For the most up-to-date visuals and instructions, please refer to the transcribed versions of the tutorial available below each video guide.
Setup
Project Repositories
The following repository is referenced throughout this tutorial:
Newsletter Signup Repository (Completed)
Required Installations
The following software is used in this tutorial:
Deploy Sample App
You can deploy the completed example into your own AWS account using these two Stackery CLI commands:
stackery create will initialize a new repo in your GitHub account, initializing it with the contents of the referenced blueprint repository.
stackery create --stack-name 'lambda-contact-form' \
--git-provider 'github' \
--blueprint-git-url 'https://github.com/stackery/newsletter-signup-example.git'
stackery deploy will deploy the newly created stack into your AWS account.
stackery deploy --stack-name 'lambda-contact-form' \
--env-name 'development' \
--git-ref 'master'
What We're Building
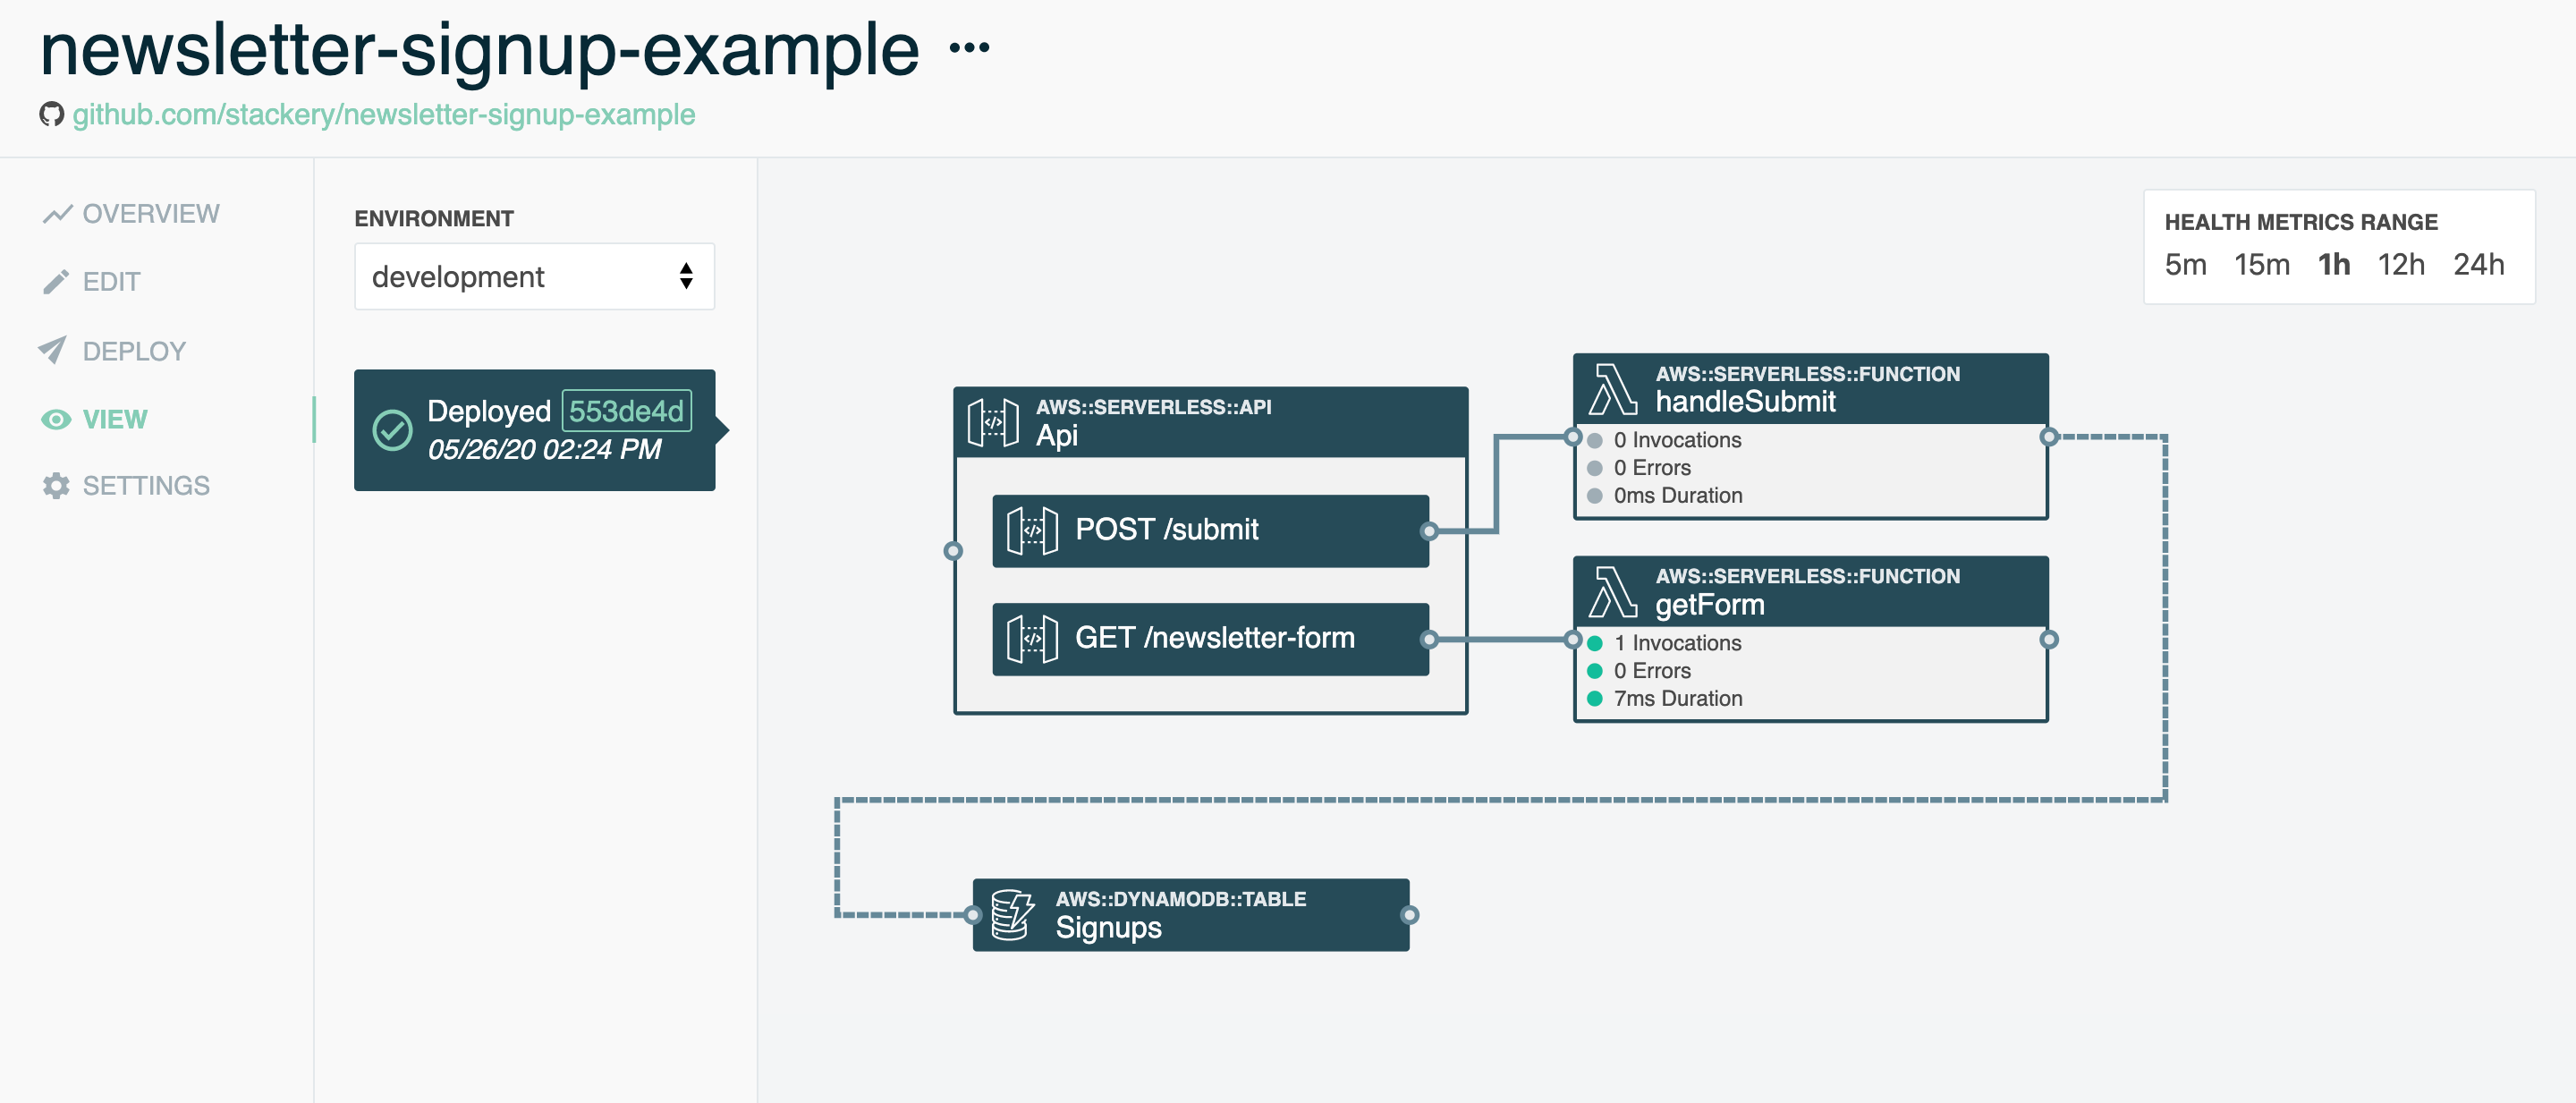
Getting information from a simple HTML form is a great use case for serverless functions. We will be building a stack that takes in an email address from an HTML form and stores it in a table for future retrieval. Such a form can be used for newsletter signups on a website, getting contact information, or a variety of other uses.
This is what the final application will look like in Stackery:
Resources used
The following are descriptions of the Stackery resources we'll be working with:
Function : We will write two functions, one that serves our form, and another that handles the submit event.
Rest API : An API Gateway resource with POST and GET methods will serve as the endpoints for the functions.
DynamoDB Table : A DynamoDB Table will store the list of emails that are submitted.
1. Create a New Stack (3 min)
Create a new stack in the Stackery Dashboard
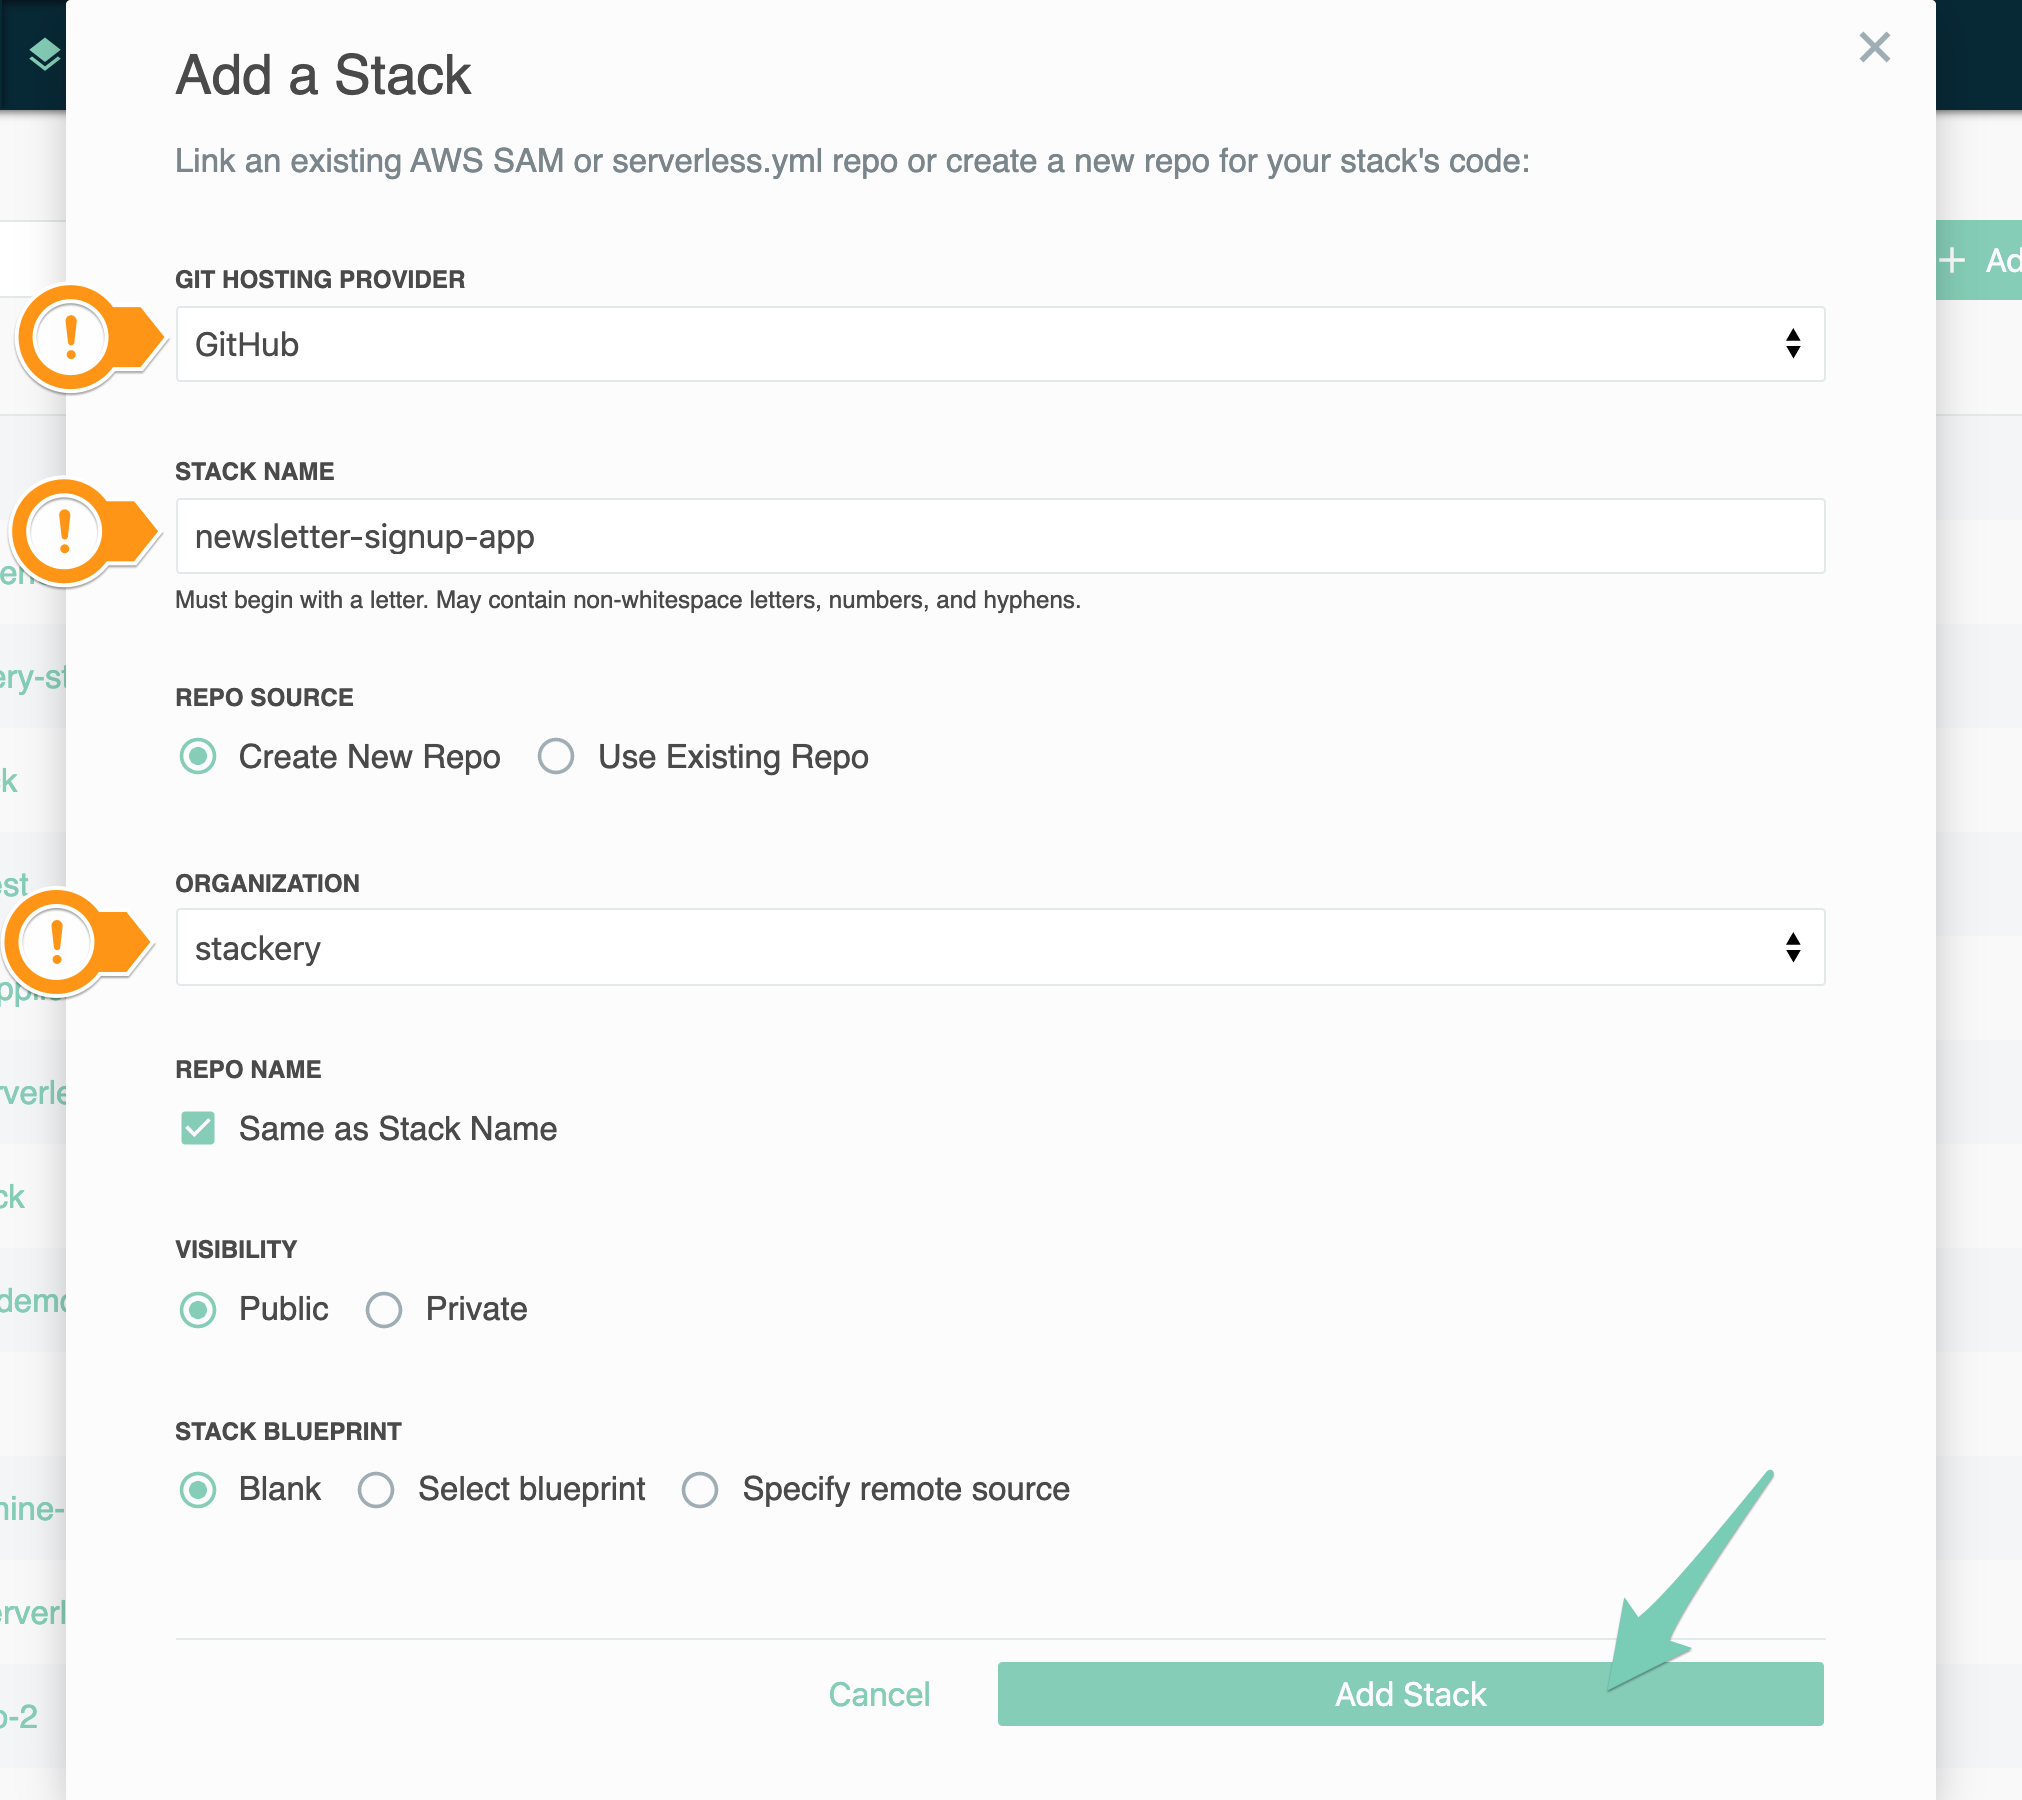
You will start by logging in to Stackery, navigating to Stacks and choosing Add a Stack:

- Navigate to Stacks
- Select Add a Stack in the top right corner
- Select your Git Hosting Provider
- Enter
newsletter-signup-appfor Stack Name - Select Create New Repo for the Repo Source
- For Organization, select the Git account you want this repository in
- Keep the Repo Name the same as Stack Name
- Select Public for your repository's visibility (Private repositories require a paid GitHub account)
- For Stack Blueprint choose 'Blank'
- Click Add Stack to create our empty stack
The configuration for our stack is stored in AWS's Serverless Application Model (SAM) YAML configuration. If you're new to the format, here's a blog post on the subject. If you already use SAM YAMLs to configure AWS, Stackery uses the exact same format AWS uses natively.
When you create a stack with Stackery, all of the code and configuration to create and replicate that stack is available in a code repository that you control. This repository contains the bare minimum for a SAM YAML file - just the heading and an empty object.
template.yaml
AWSTemplateFormatVersion: '2010-09-09'
Transform: 'AWS::Serverless-2016-10-31'
Resources: {}
Once created, your new empty stack will load in the Edit view. The code that Stackery has saved to a repository is available under the Version link at the left.
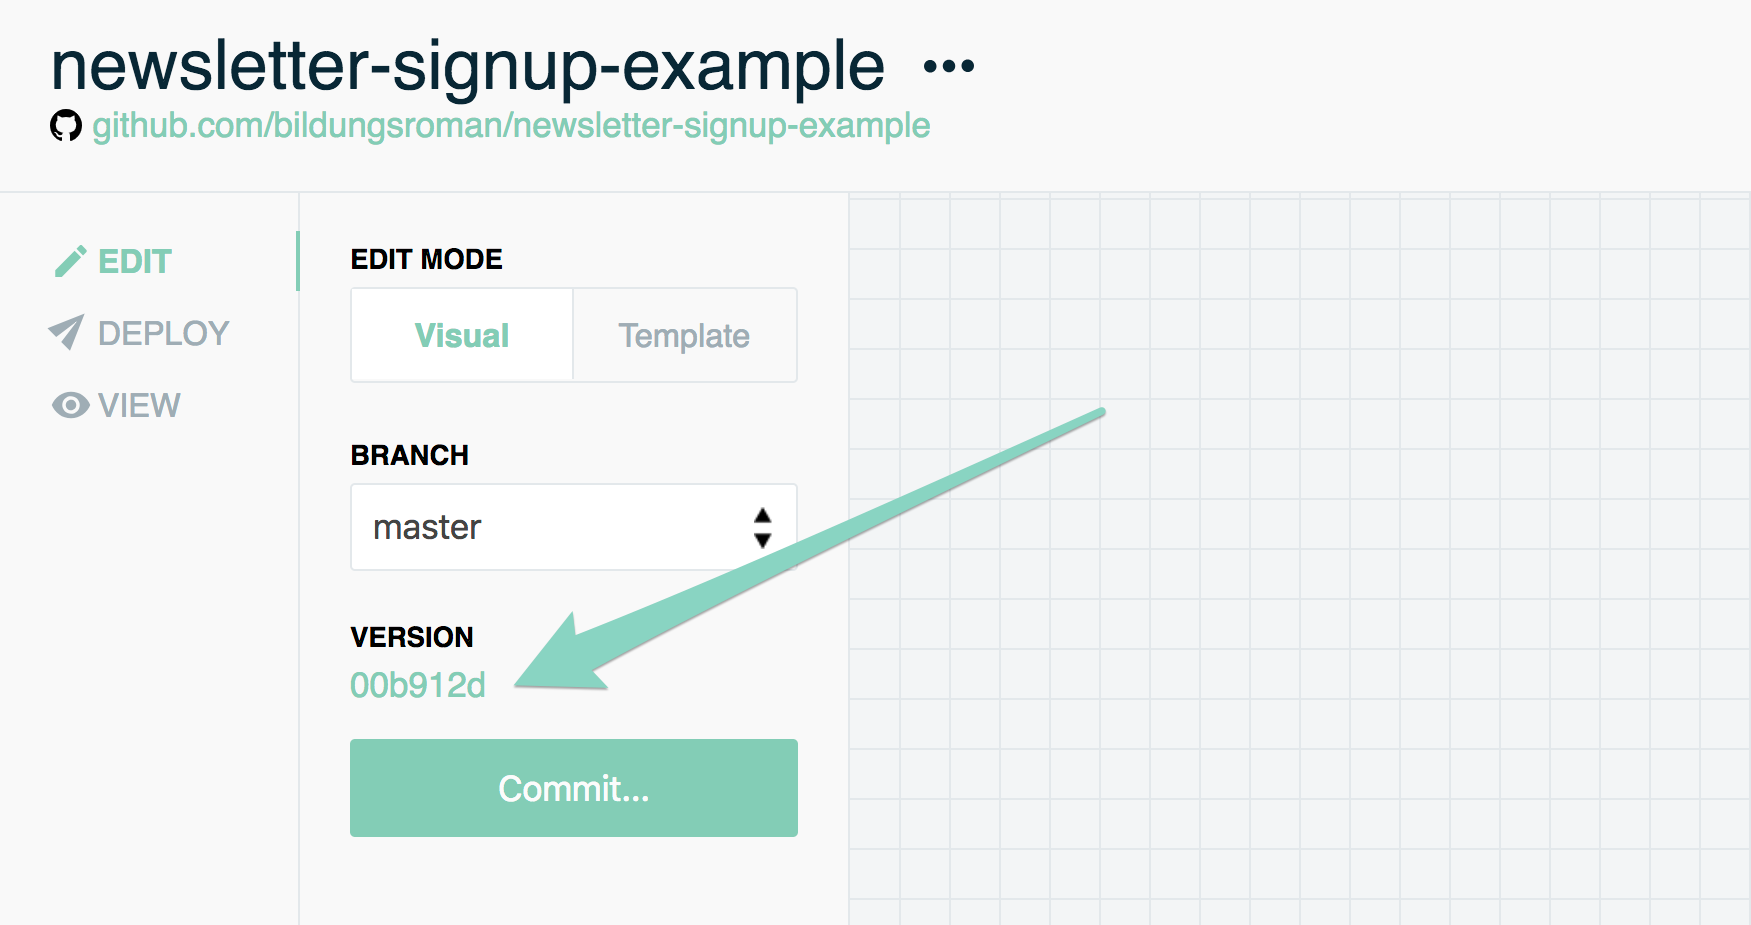
With that blank canvas, we're ready to start adding resources to our app!
UP NEXT: Adding and configuring our Stackery resources.
2. Create Endpoint, Subscribe Function, Commit (4 min)
Create an endpoint
To build a website on AWS, we'll need at least two components:
- An endpoint
- Some dynamic code
Technically, we could put up a static website with just the storage tool S3, but since we're going the serverless route, we'll use:
- An API gateway with at least one GET endpoint
- A Lambda function to compose a response
With our blank stack, all we have to do to deploy these to AWS is to drag in both resource nodes and connect them with a wire.
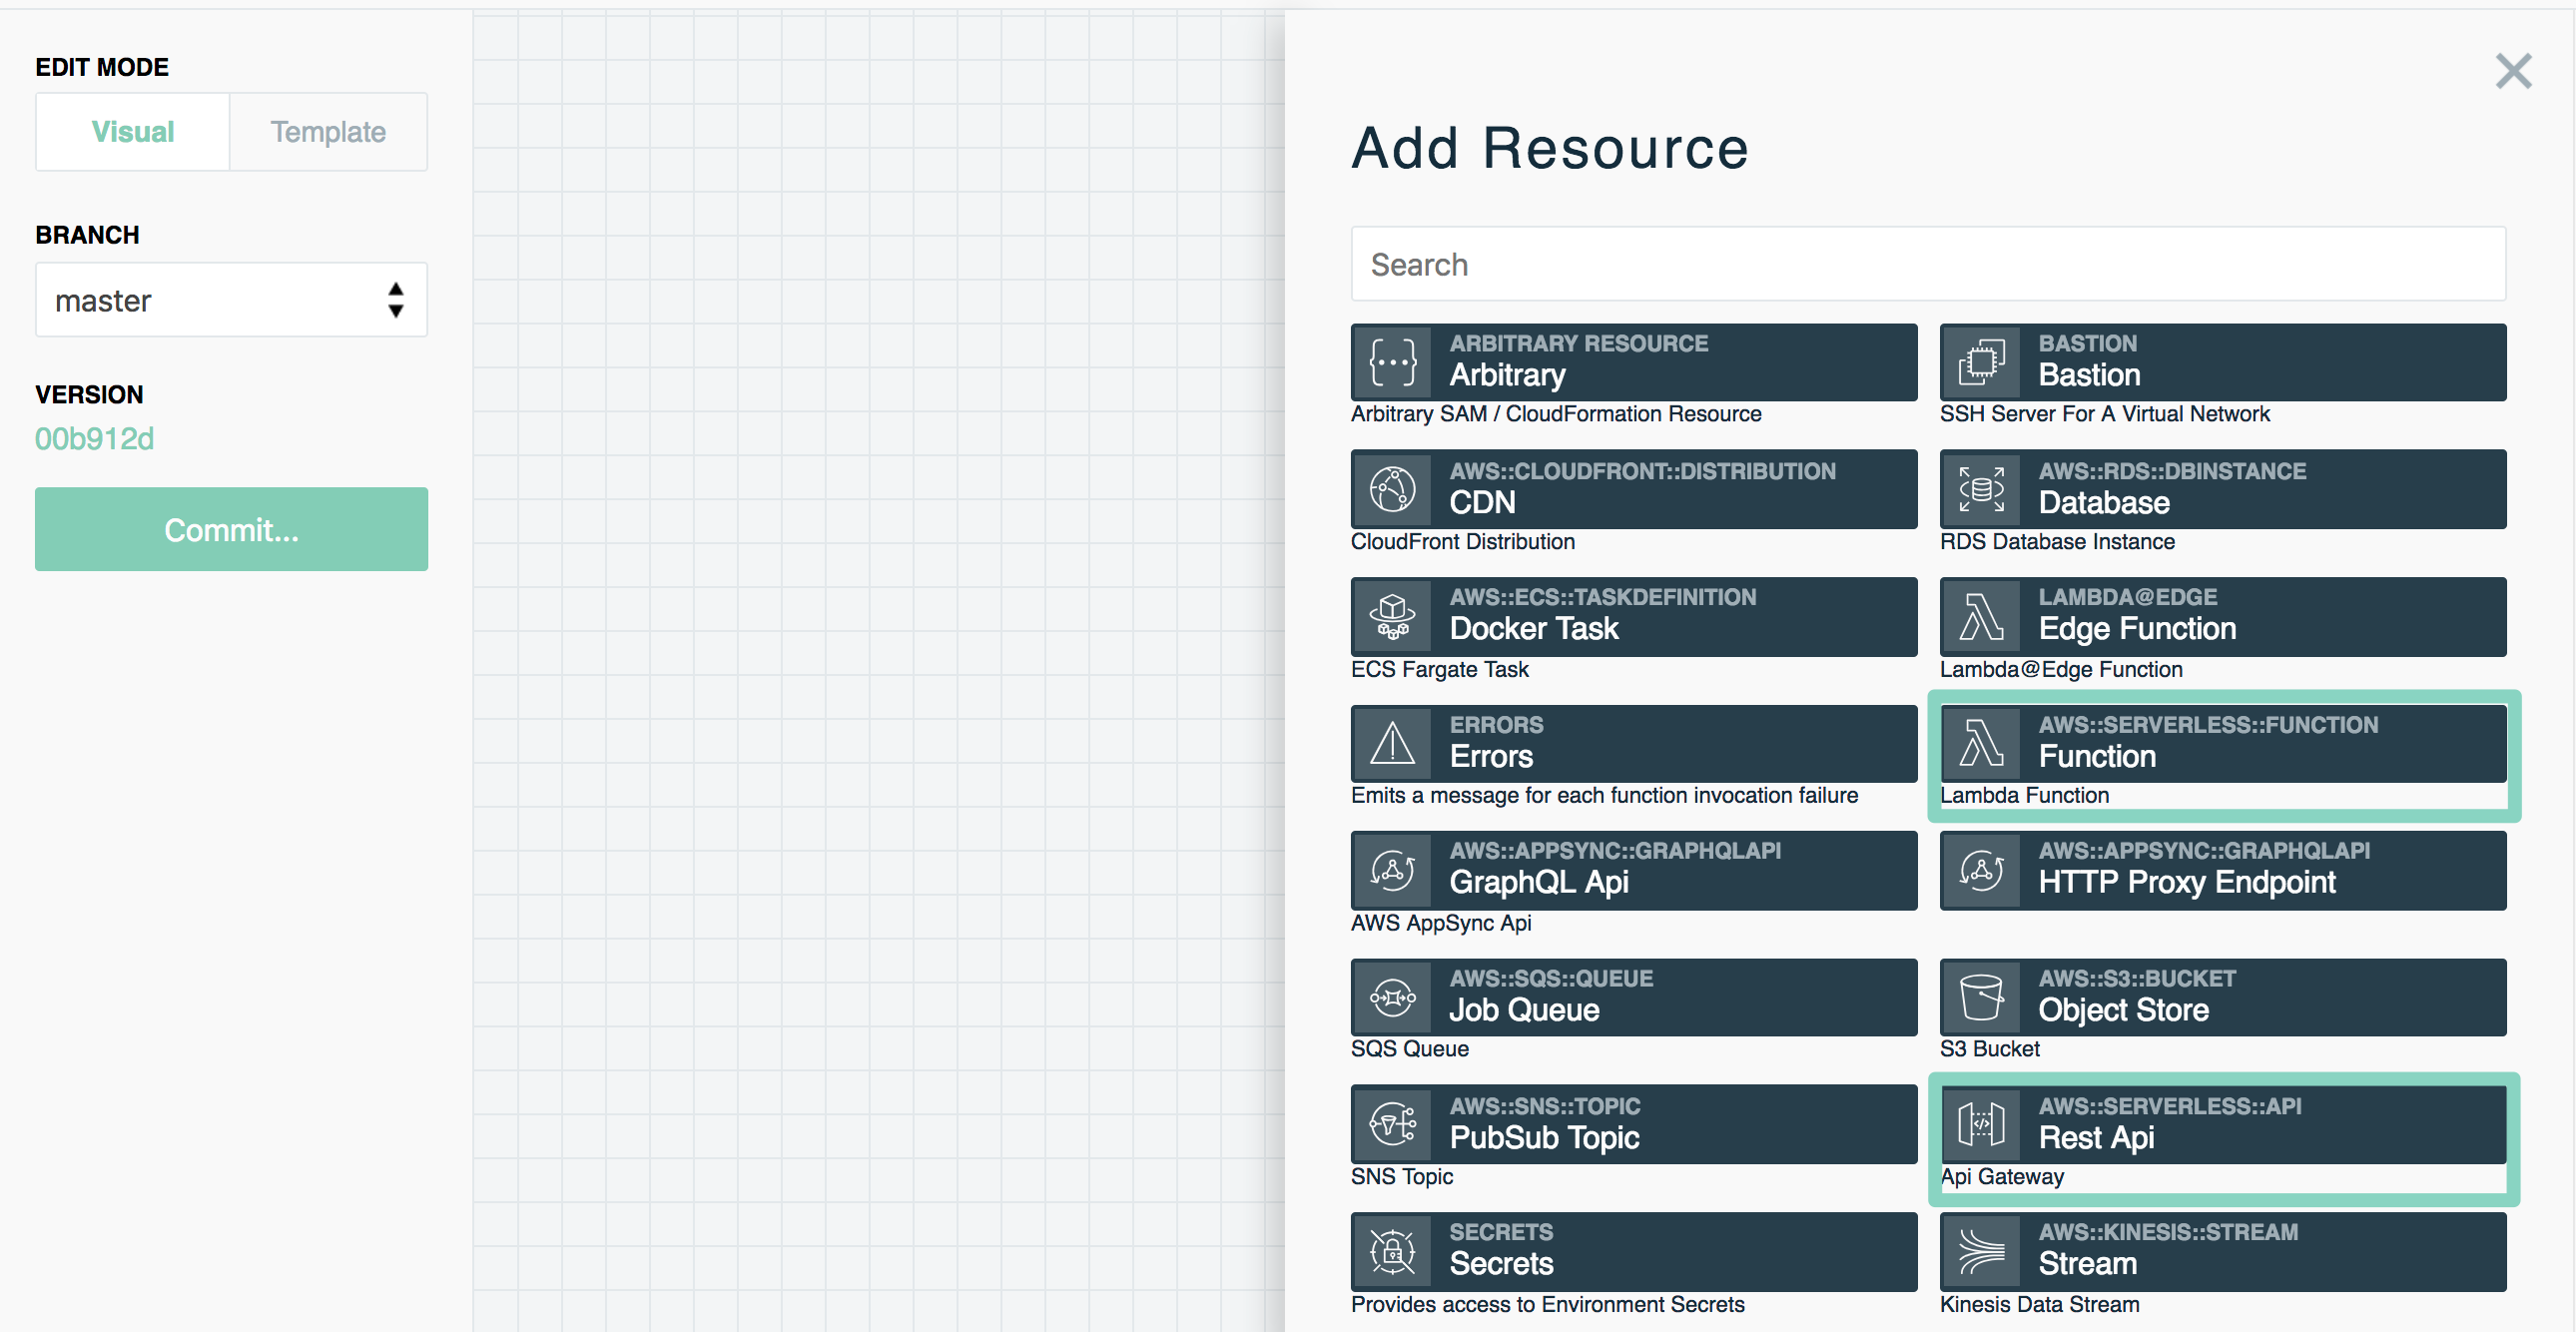
From your blank stack, click the Add Resource button in the top right of the Dashboard:

Click to add a Rest API resource, and then add in a Function.
If you double-click either resource, you'll open a dialogue that lets you configure that resource.
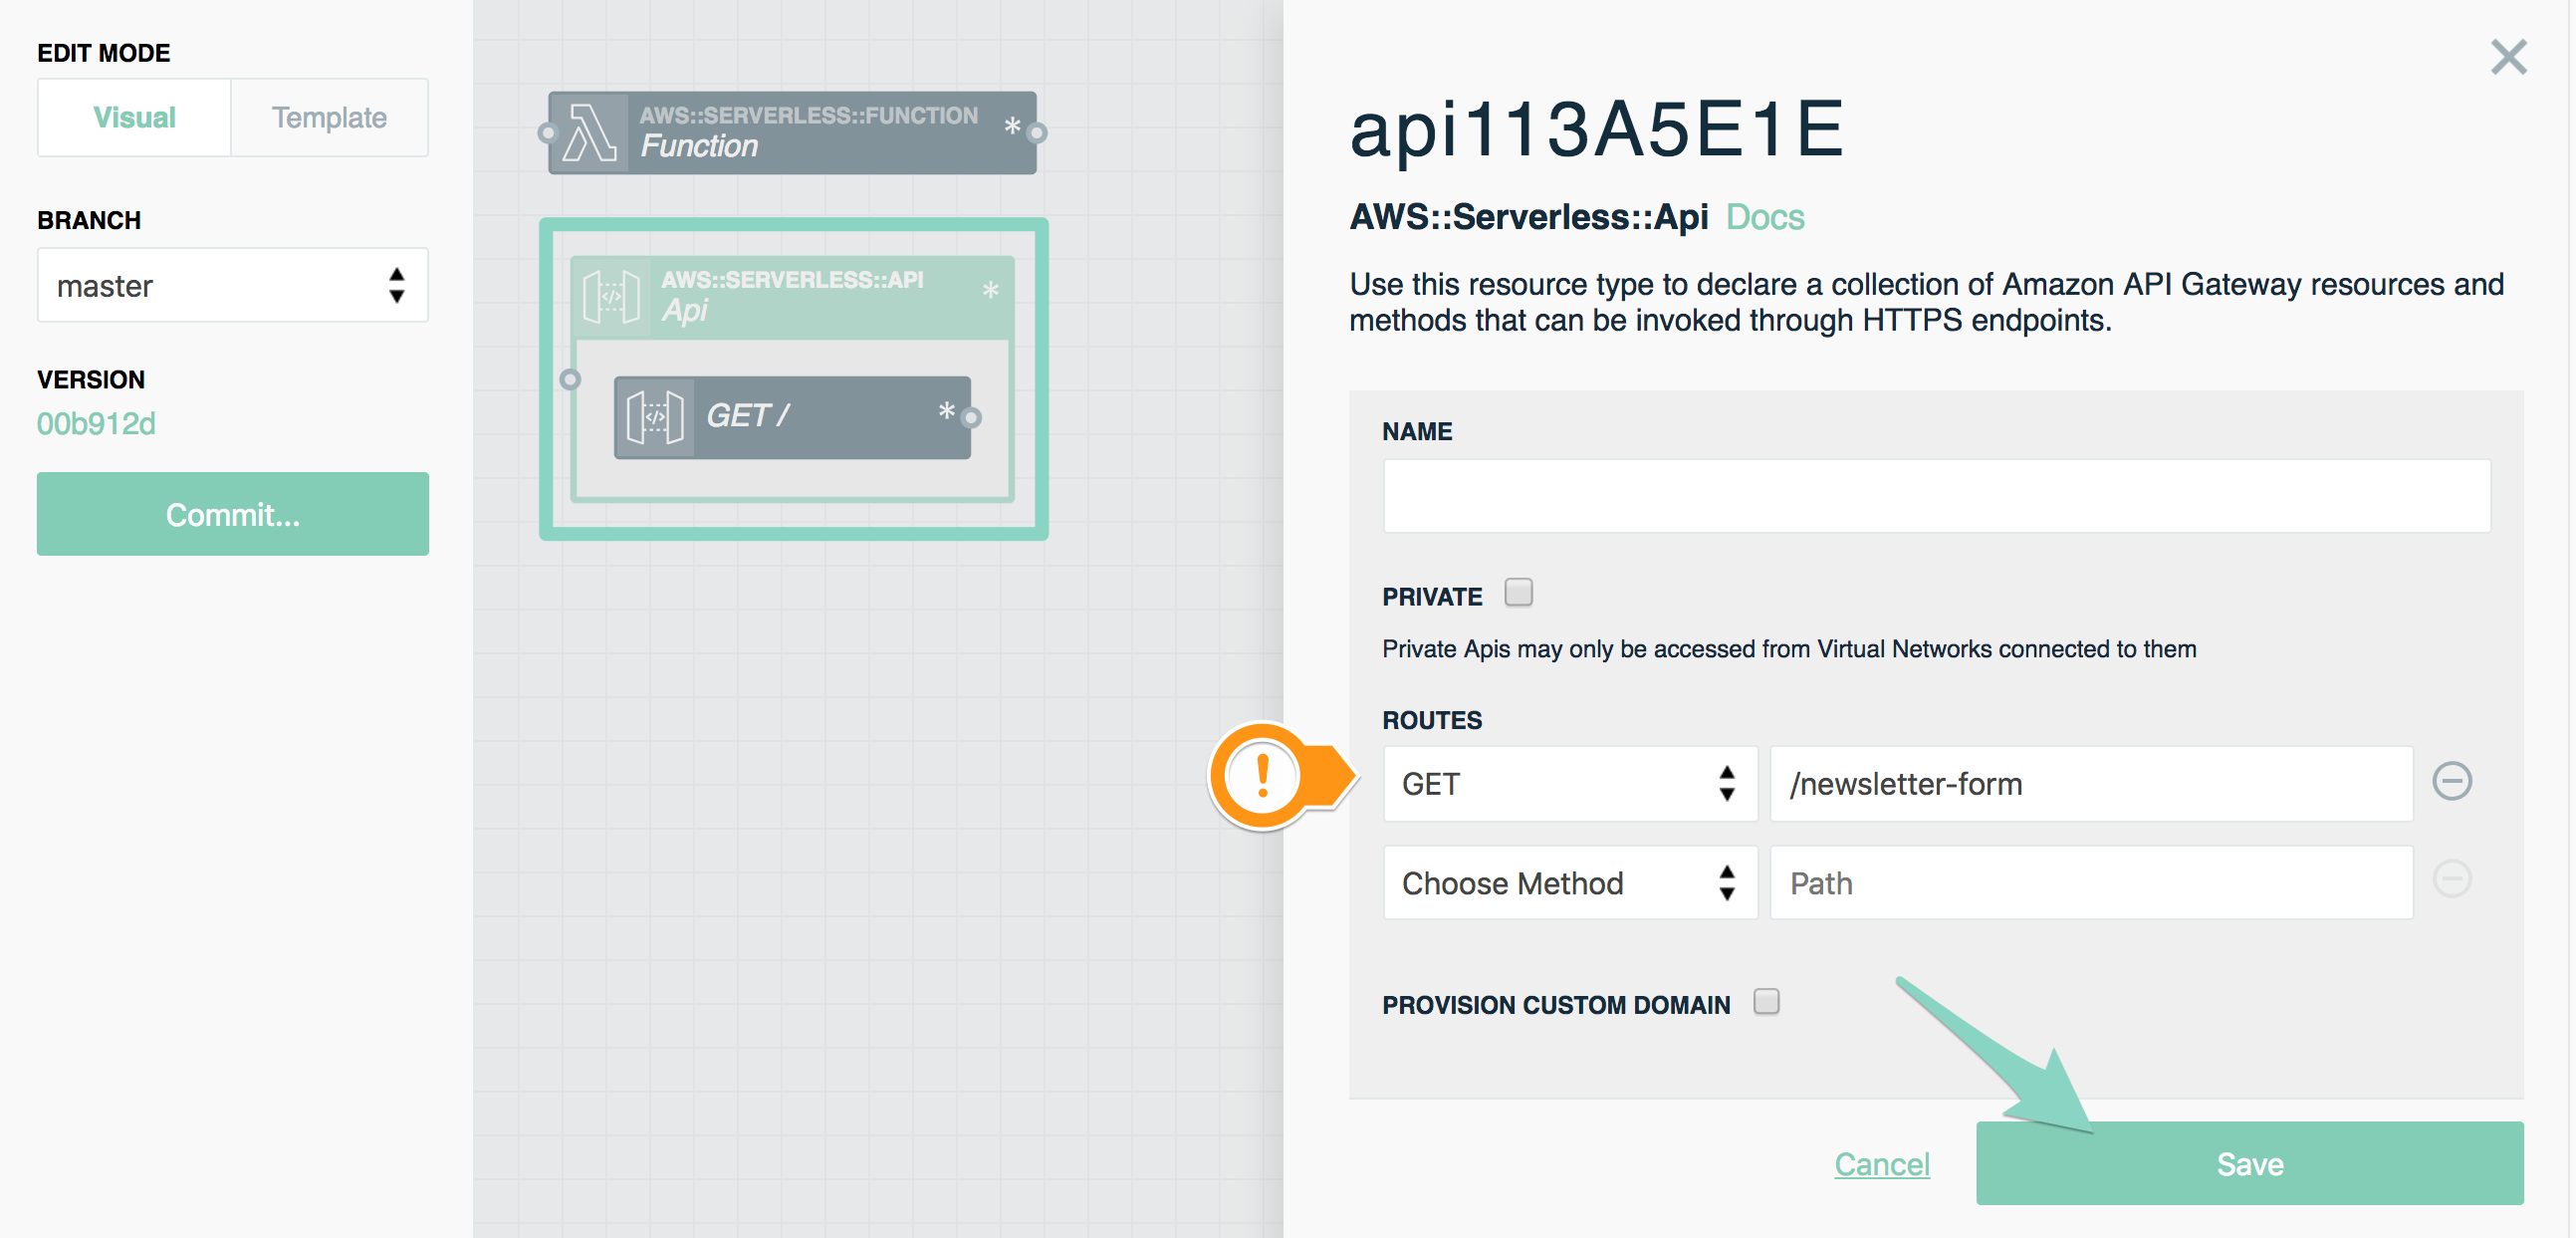
Configure your cloud resources
Configuring API resources
- Double-click the API resource to open the editor panel
- Create the
GETroute, and give it the path/newsletter-form(you can add multiple routes at different paths later)
Stackery lets you configure the API endpoint to use a domain you already have, but by default all API endpoints will get a generated Stackery domain.
Now that the API is configured, you'll see an endpoint node appear inside the API with the route you set. Next we want to hook a wire up to the input of our function. Just click and drag from the endpoint to the left-hand side of the function to make the connection.

Next we'll configure the function.
Configuring Functions a.k.a Lambdas
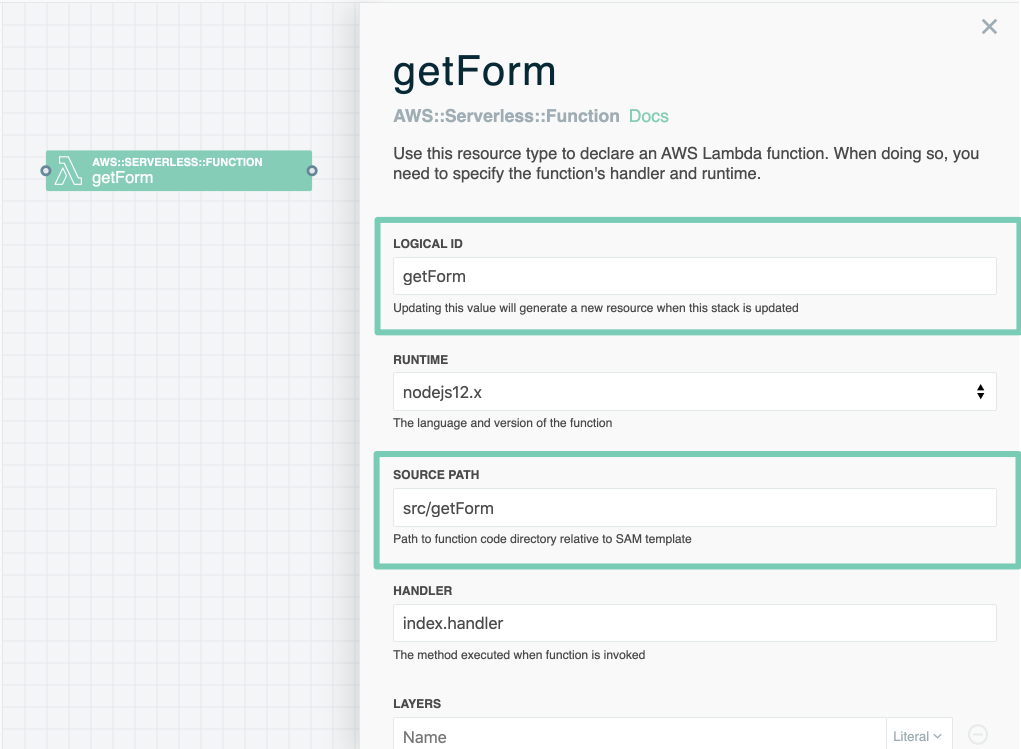
- Double-click your Function resource to open the editor panel
- Name your function (this is good practice since most stacks will have several functions)
- You may want to set the source path to the same name, which names this Lambda's directory in your repository
- If you're familiar with AWS Lambdas you can edit their other settings here
- Scroll down and click Save to save your changes!
Committing changes to your repository
Now that we've made a few changes to our stack, we want to save them to our repository. The location of our repo was configured when we created this stack, so all we need to do is click Commit....

You can set a custom commit message, though I generally find the defaults are fine when I'm adding resources.
Working with our code locally
To write complex functions we need to work with our code on our development machine. To pull down the repository with all our code, click the version ID on the left-hand sidebar, then grab the repository's URL.
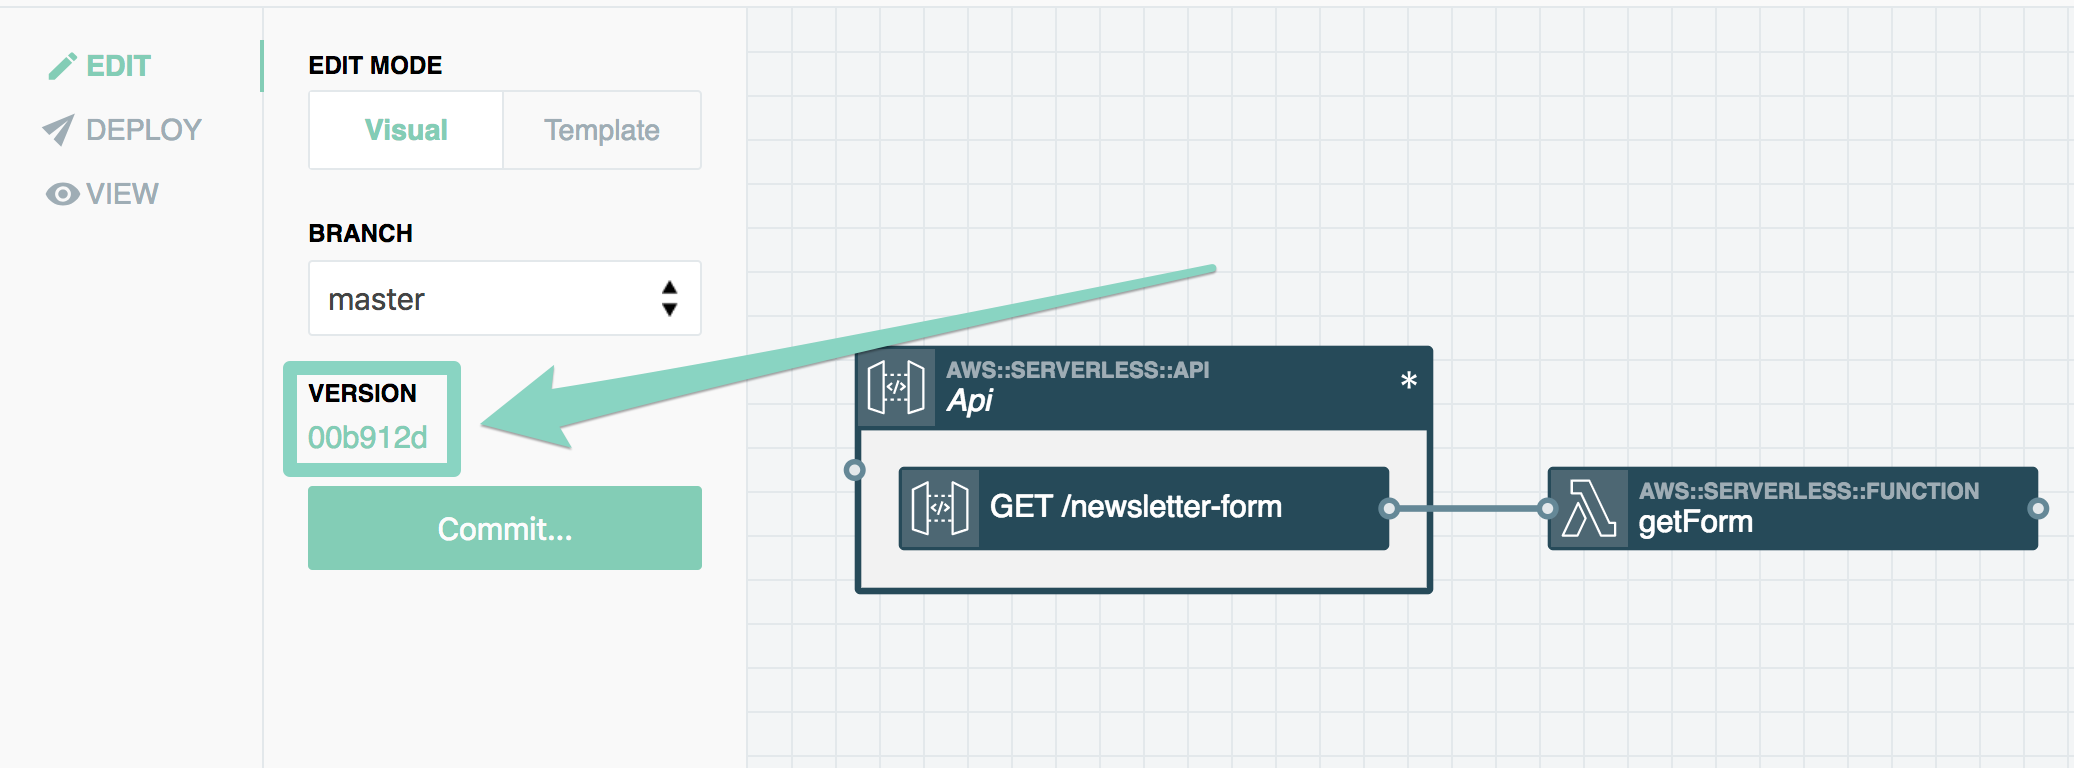
Use git clone to make a local copy. If you cd into this directory and check the git log you'll see the commit we made in the Stackery Dashboard.
With the code copied locally, we're ready to start writing our function code.
UP NEXT: Write the function that will return HTML.
3. Return HTML from Lambda (4.5 min)
Edit your code locally
Examining the template.yaml configuration
At the end of step 1, we had just pulled down our code locally. Now it's time to write a function to return some HTML.
Taking a look at the project with an API endpoint and function, we'll see a /src directory and template.yaml at the root. We'll work with the code in src/ in just a moment, but if you take a look at template.yaml you'll see the configuration file for all the resources in our stack.
This config is stored in Serverless Application Model (SAM) YAML, an open source standard from Amazon.
Our template.yaml contains a lot of information already, which gives you an indication of the complexity of just hooking up an API endpoint to a function, which Stackery handles for you.
AWSTemplateFormatVersion: 2010-09-09
Transform: AWS::Serverless-2016-10-31
Resources:
  Api:
    Type: AWS::Serverless::Api
    Properties:
      Name: !Sub
        - ${ResourceName} From Stack ${StackTagName} Environment ${EnvironmentTagName}
        - ResourceName: Api
      StageName: !Ref EnvironmentAPIGatewayStageName
      DefinitionBody:
        swagger: '2.0'
        info: {}
        paths:
          /newsletter-form:
            get:
              x-amazon-apigateway-integration:
                httpMethod: POST
                type: aws_proxy
                uri: !Sub arn:${AWS::Partition}:apigateway:${AWS::Region}:lambda:path/2015-03-31/functions/${getForm.Arn}/invocations
              responses: {}
      EndpointConfiguration: REGIONAL
      TracingEnabled: true
  getForm:
    Type: AWS::Serverless::Function
    Properties:
        [...]
    Metadata:
      StackeryName: getForm
In this version I hid the Lambda properties since I want to keep it brief, but take a look in your own template to see what configuration you can read from the file. View template.yaml on GitHub.
Writing Lambda function code
The starter code in /src/getForm/index.js is the bare bones of a Node 8 function. Since our function is hooked up to an API endpoint, the return value on our handler will be what that API endpoint returns.
exports.handler = async message => {
  console.log(message);

  return { };
};
To return some HTML we'll need to follow the AWS API standard, which expects an object formatted like an HTTP response. To send back HTML we'll need to reply with something like:
{
    statusCode: 200,
    headers: {'Content-Type': 'text/html'},
    body: // an HTML string that a browser can handle
};
With this object set as our return value, we really just need to make some valid HTML. In anything but a quick demo app, we'd probably require in an outside file, or even grab our HTML from a CDN or Object Store. But in this example, the simplest way to get a string into Javascript is to add a const to the top of a file.
The final version, with our HTML constant and a valid return:
const formHTML = `<!DOCTYPE html>
<html>
  <head>
    <meta charset="UTF-8">
    <title>Newsletter Sign Up</title>
  </head>
  <body>
    <h1>Subscribe to our newsletter</h1>
    <form action="submit" method="post">
        <label>Email
            <input name="email" type="text">
        </label>
        <input type="submit" value="Submit">
    </form>

  </body>
</html>`;
exports.handler = async message => {
  console.log(message);

  return {
    statusCode: 200,
    headers: {'Content-Type': 'text/html'},
    body: formHTML
  };
};
Commit to git
Once this code is in place, we're ready to commit back to our repo. Use whatever process you'd like to get these changes onto your main branch. In my case it would be:
git add index.js
git commit -m "populated index.js, which now returns static HTML"
git push origin master
You could also use a PR process and then merge the changes, but by any route, after master is updated, your Stackery Dashboard will reflect the change. If you've kept the Stackery tab open, it will ask if you want to update the stack with the changes, or switch to a new branch. Click refresh or manually refresh the page if you don't see the message.

Now our code is ready to deploy to AWS.
UP NEXT: Deploying our function.
4. Deploy to Your AWS Account (6.5 min)
Now that you've used Stackery to define what resources you need, and the code for your function, it's time to make these changes in AWS and start running the services we need. In this context, going from a repository to a working AWS-hosted service is called a 'deploy'.

We can deploy our code from the Deploy tab of the Stackery Dashboard, but this guide will use the Command Line Interface (CLI) to do the same thing a bit faster.
Understanding environments
If this is your very first Stackery project, you can skip this section and just use the development environment. If you're going a bit deeper, it's worth taking a moment to refer to the Stackery concept of environments. Environments offer two important functions:
- Each environment has a configuration store, a secure spot to store secrets that won't be committed with any stack's repository
- Environments are tied to a single AWS account ID, making it easier to keep multiple AWS accounts straight
You can create a new environment with the Stackery CLI or by hitting the Add an Environment button in the Environments section of the Stackery Dashboard.
Deploy with the CLI
Run the command line from the root directory of your project (i.e. ~/code/newsletter-signup-app). This ensures you're getting the correct stack name from the .stackery-config.yaml file created in the project root. From the command line, give a deploy command with the required config values:
stackery deploy -e <your-env-name> -r master
The CLI will ask which AWS profile it should use - select the one linked to the environment you're deploying into.
Why not use Stackery's own profile? The Stackery Role only gets the permission to propose changes, so we need to use another profile to actually execute them. This means teams can separate these roles if they'd like.
The Stackery Role will start processing and executing the change set. This process will take a few minutes for a basic stack.
...maybe grab a coffee? It really does take AWS a few minutes to process a new stack.
Once the stack deploys successfully, you'll see a printout of the stack's info, including the URL of the API endpoint.

You can get this information again later with the
stackery describecommand.
Viewing the HTML form
Follow the endpoint URL to see if the function is replying as expected.

Back in the Stackery Dashboard, there are some quite useful links in the View tab. Clicking on a function will give us links to the resource in the AWS Console, and to Xray, as well as logging from the function.
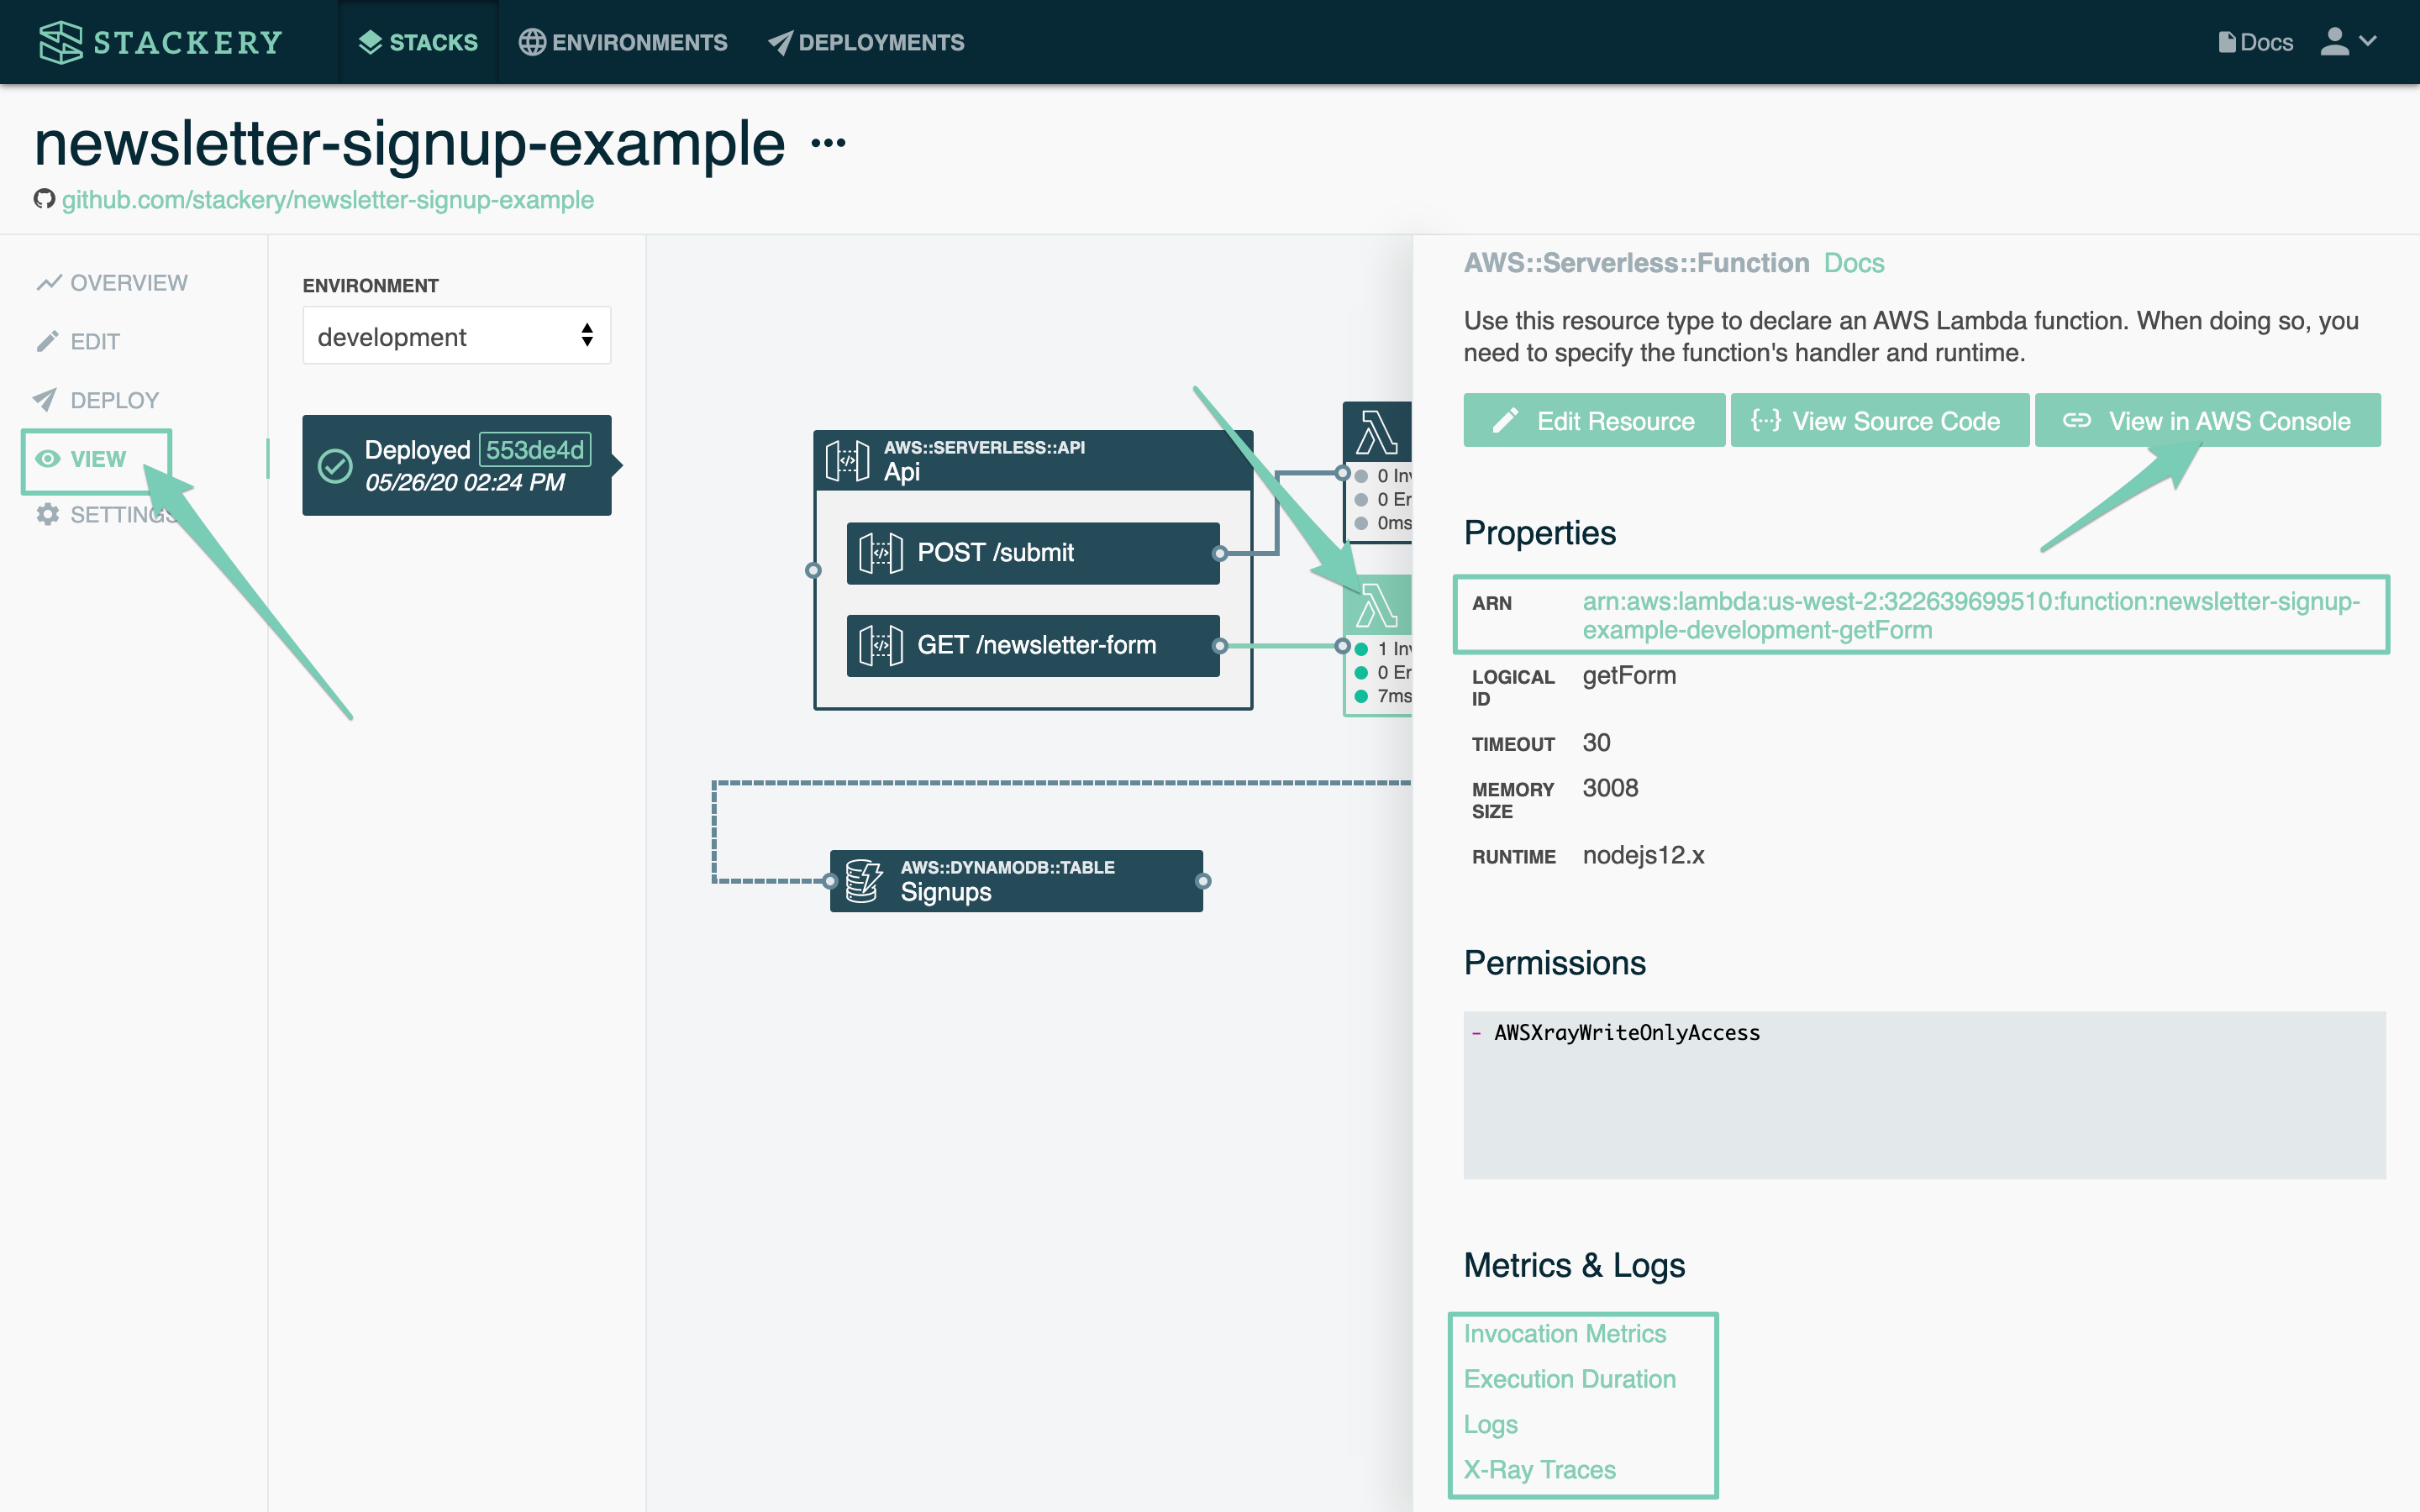
Click the API to get a list of endpoints. Click the /newsletter-form link under the GET route and you'll get to our lovely page again.
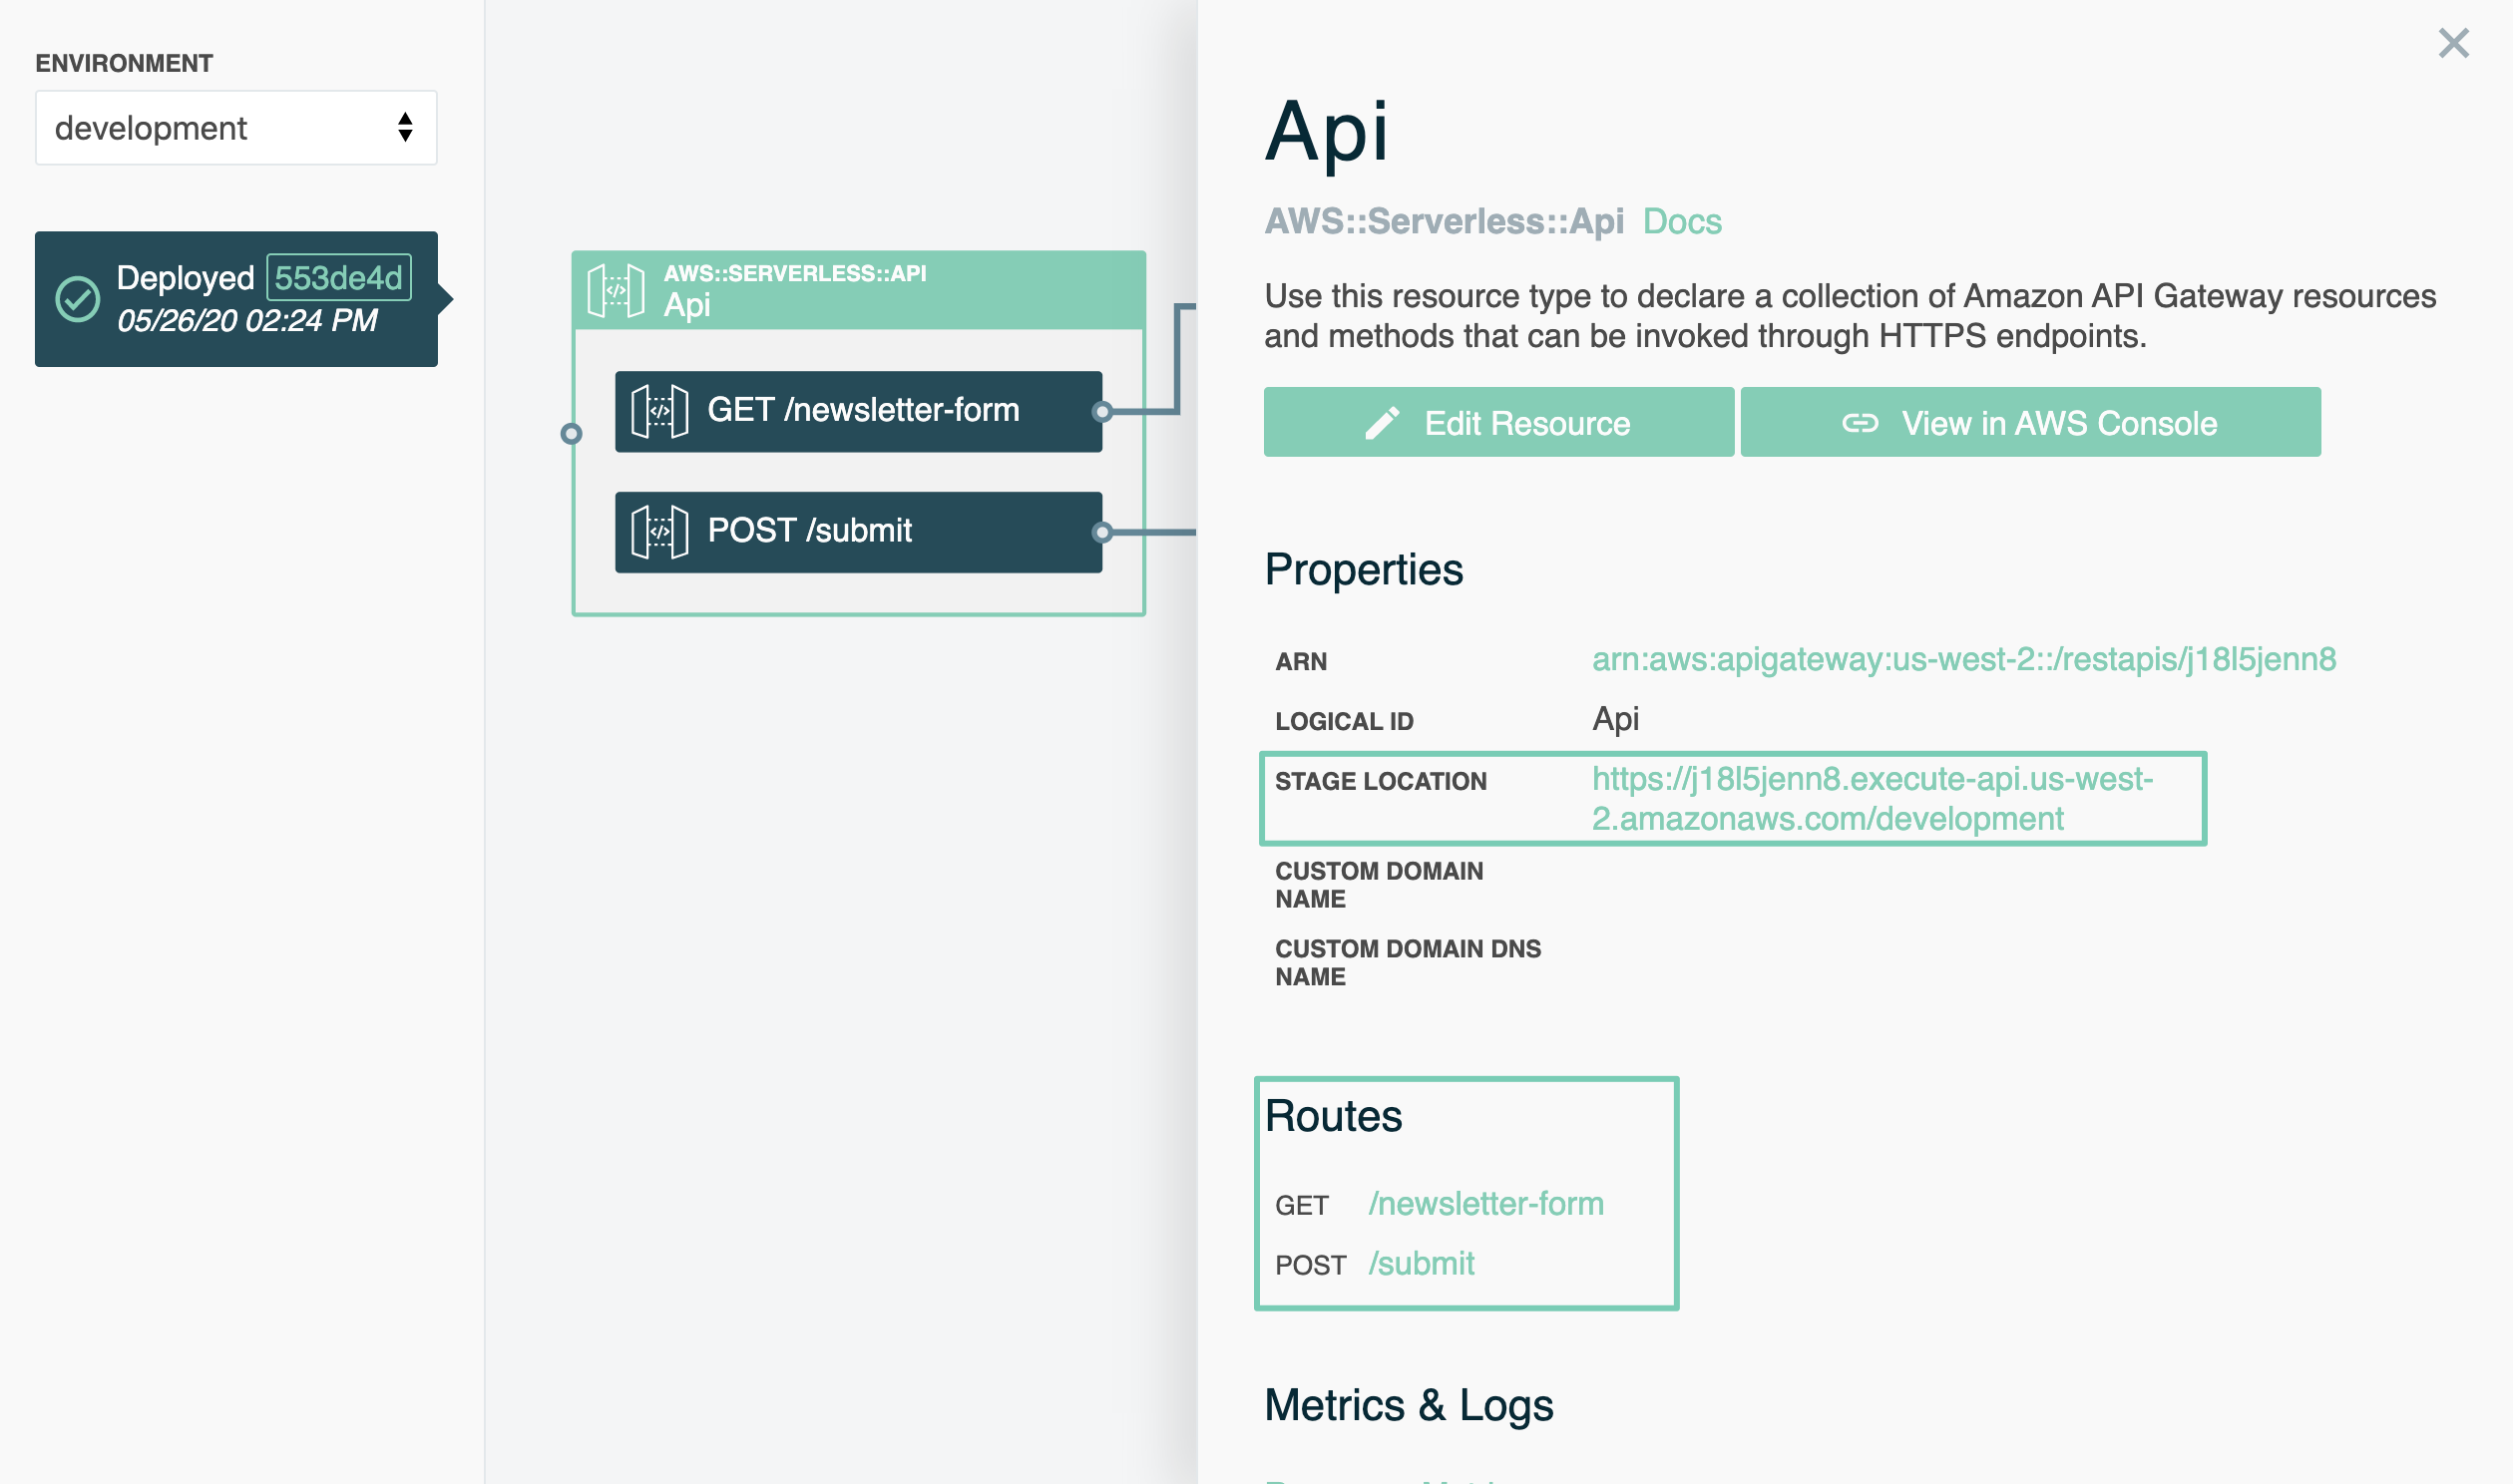
Our code is up and running. Next we'll take a minute to go over a 'best practice' workflow for working with our code locally.
UP NEXT: Learn to run your function locally with the SAM CLI.
5. Local Development (6.5 min)
Run your function locally
We just got our code successfully deployed to AWS, and if we want to make changes to our web service, we can just edit our code, commit to master, and then deploy again. This does raise a concern: if it takes 5 or so minutes to deploy, do I have to wait that long each time I want to try out changes to my code?
Thankfully there's a tool set to run your whole stack locally. Along with the Stackery CLI, Stackery has Cloudlocal tools to run your code locally.
This is another time when Stackery's use of the SAM standard makes it more useful: you can create your stack visually, get a basic configuration, and then run it with AWS's tools.
Before you continue, be sure to follow the Local Development with Stackery guide to set up your local environment if you haven't already, including installing the AWS and AWS SAM CLIs, as well as Docker.
In the root of your project directory, run the following commands:
cd src/getForm
stackery local invoke -e <your-env-name> --aws-profile <your aws profile name>
Your stack will start up in a Docker container, and in the output you will see the URL for your function. Copy and paste it into a browser and you'll see your same form page served!
If you run the same command with the --watch flag, the tool also watches your file: you can update your index.js file and see the page update as soon as you refresh the local URL.
You can also see, in green, the standard logging that every function does when it's invoked, showing you when it starts, when it ends, and the REPORT line showing how much time was billed. I wouldn't put too much stock in this local version's attempt to estimate that time, but for these early tests we shouldn't ever go over the 100ms minimum threshold.

Now that we've got our serverless contact form deployed and we have a nice local copy, we want to accept our form data somewhere.
UP NEXT: Configure another API endpoint.
6. Another Endpoint and a DynamoDB Table (5 min)
Add a Table resource
Now that our form is up we need to accept form data and persist that data in a store somewhere. That means adding at the very least another API endpoint and a database table.
- In the Stackery Dashboard, double-click on the API to add a new
POSTroute called/submit - Click Save to save the changes to the API

- Click Add Resource and drag in a new function to handle this input, and a Table resource to store data
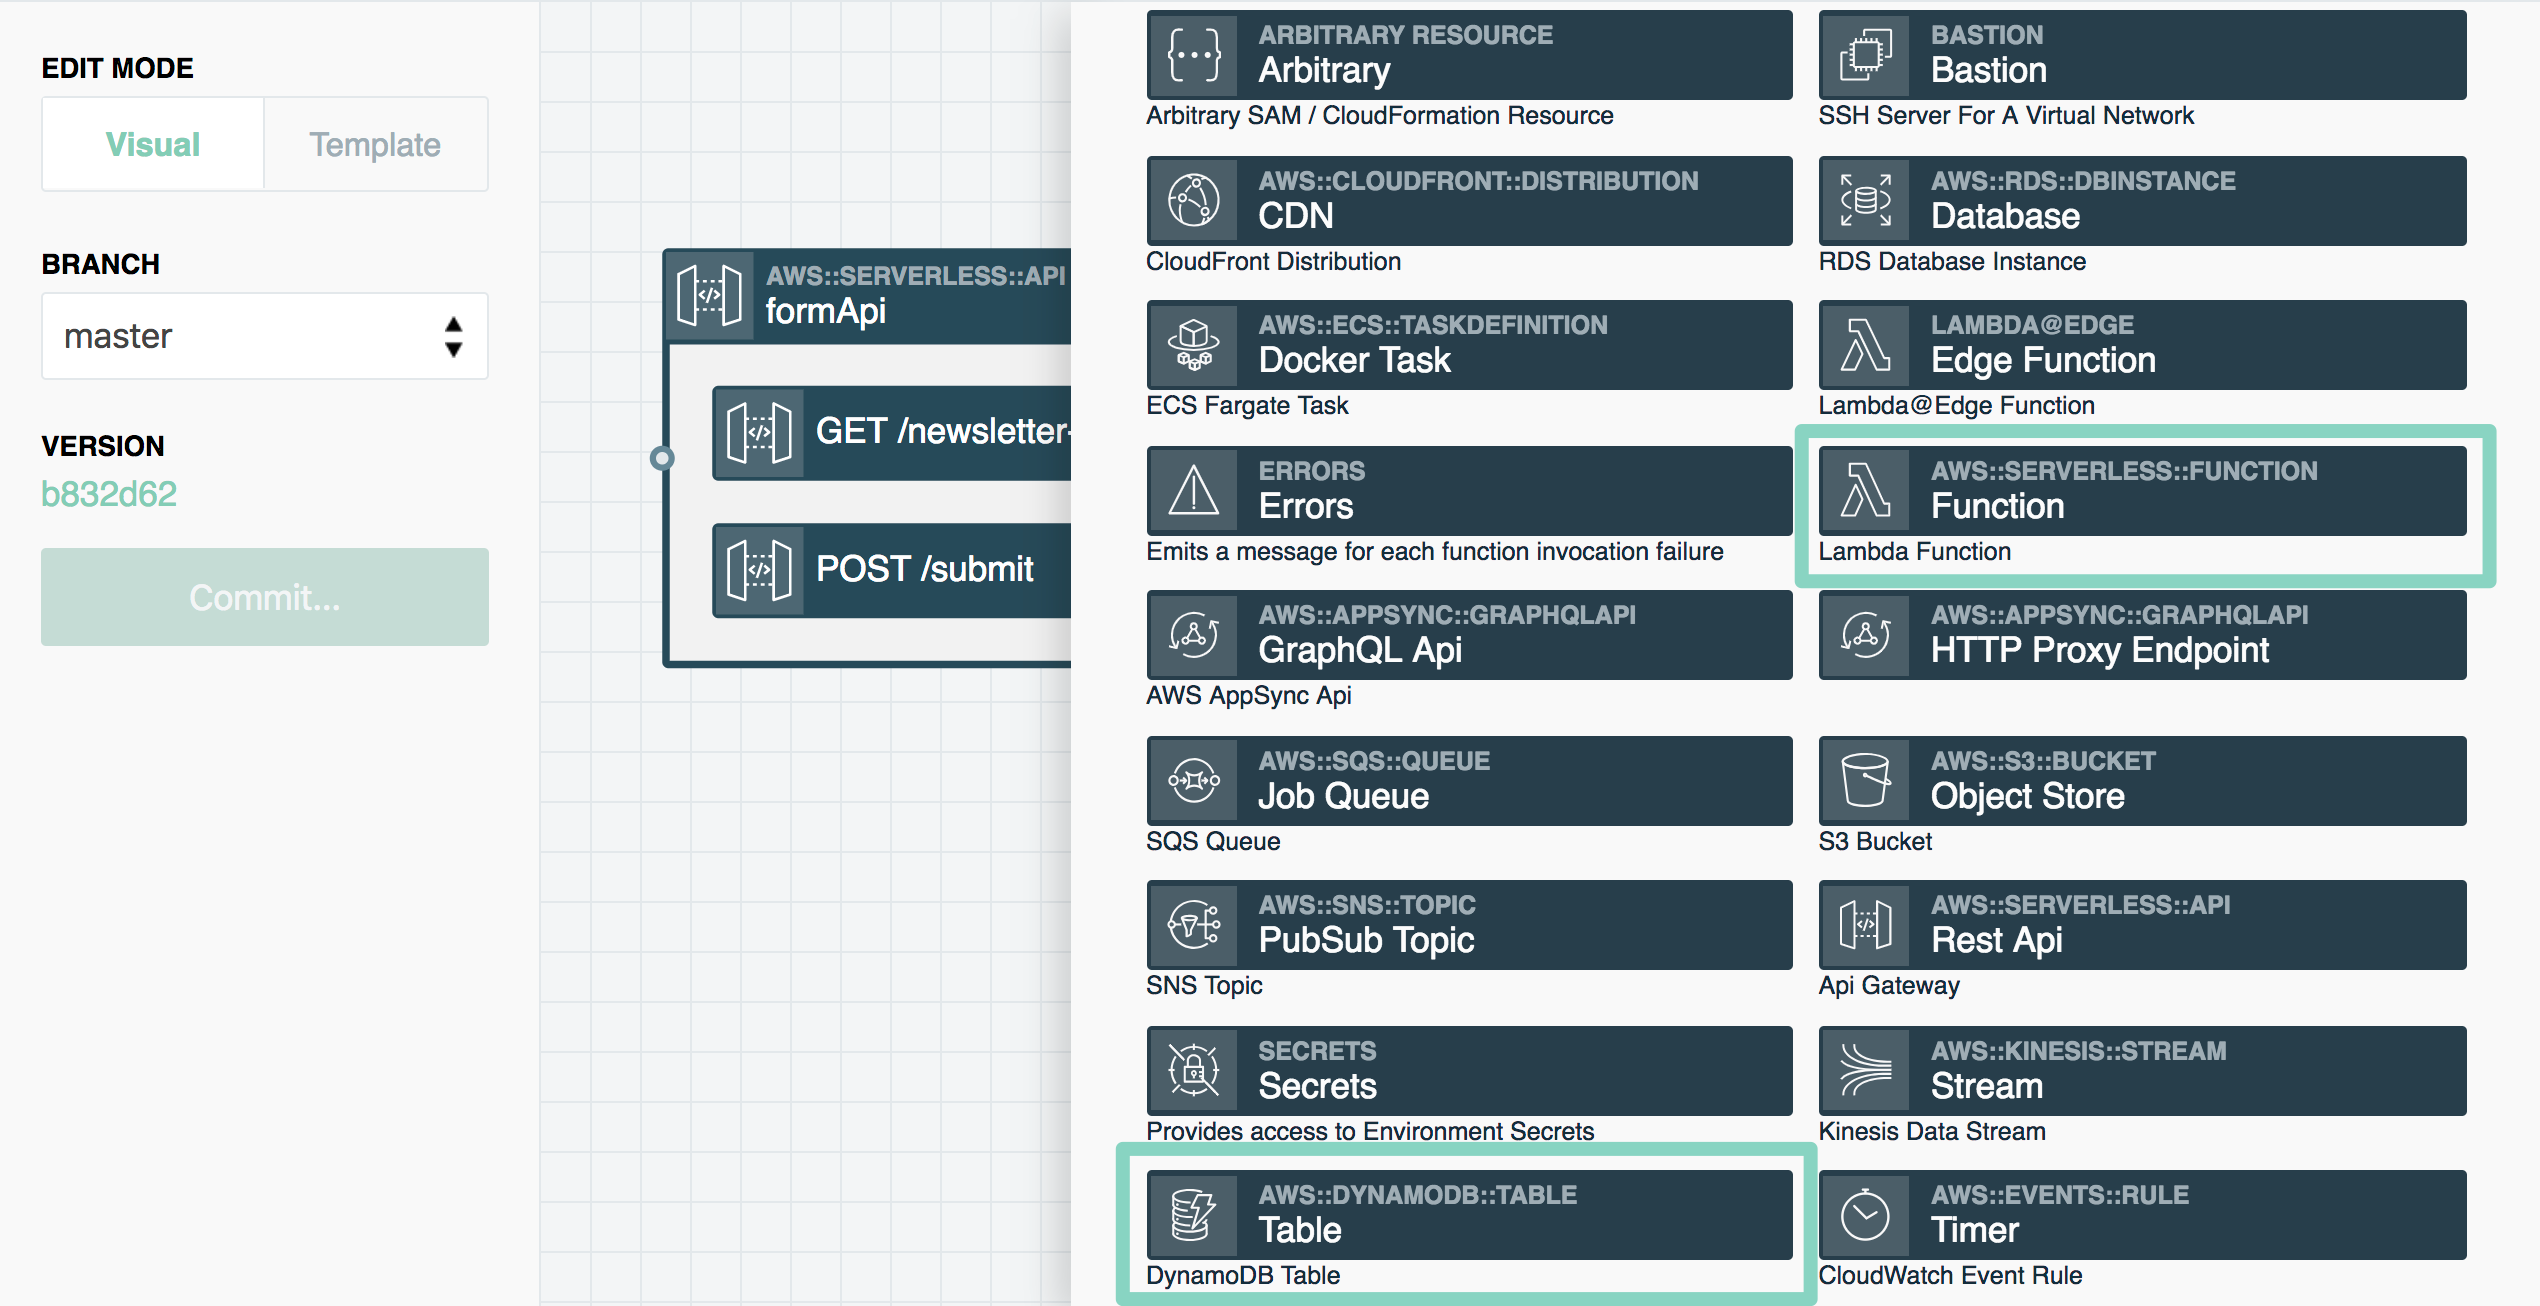
Technically we could use a single function to handle our traffic, but that would mean inspecting the 'message' each time to figure out what to do with it, and that sort of breaks the 'serverless' pattern, so we'll use a function for almost every API endpoint.
- Connect the endpoint to the function, then connect the function to the DB table.

Connecting the function to your DB table adds a dotted wire to the graph, and automatically sets some configuration options on the function that are worth noting.

The function gets new permissions to access this table (and only this table - it can't look up anything else we have stored in DynamoDB) and it sets two environment variables that point to our DB table. Our function code can refer to these values in the next step.
The table requires a bit of configuration. Make three changes:
- Name the table
- Change hash key name to
email- we know every entry will have one, and they should be unique - Change the hash key type to
String- emails aren't numbers :)

With these settings made in the Dashboard, it's time to commit our changes. Click Commit... in the sidebar and again in the modal.
If you're still coming to grips with the SAM standard for describing your stacks, it might be instructive to look at the diff for this commit, which shows you what has changed in your template.yaml.
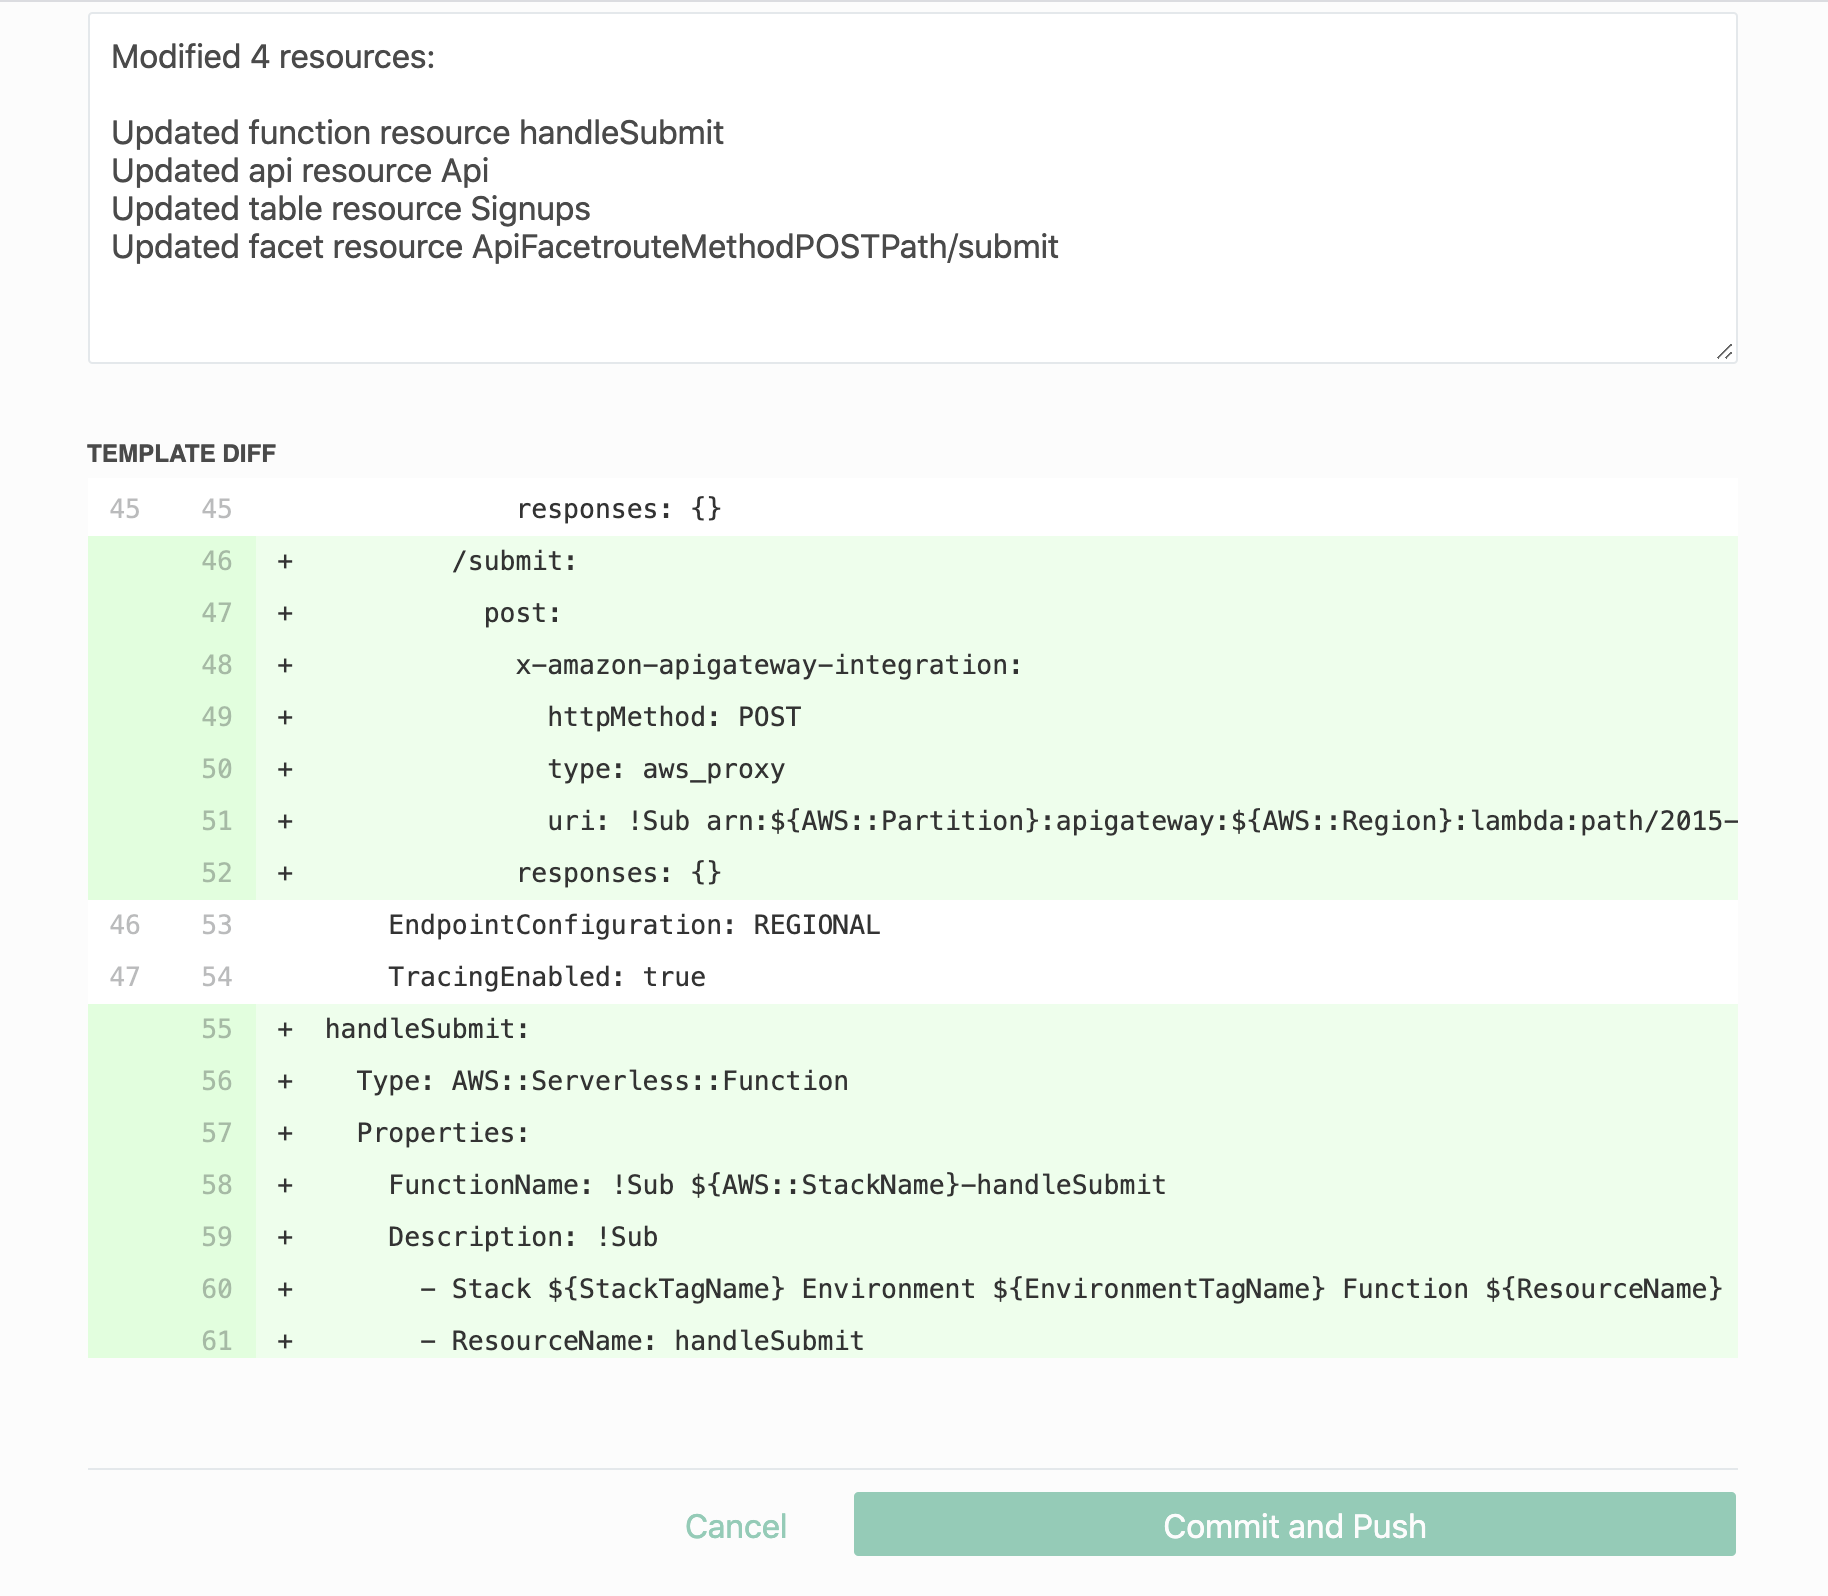
You don't need to be able to interpret a template.yaml yourself to use Stackery or AWS, but watching yours change gradually can teach you a lot!
UP NEXT: Next you'll write the code for your new function to store form submissions.
7. Writing to DynamoDB from Lambda (8 min)
Using npm packages
Serverless is often associated with teeny tiny snippets of code doing simple things, but our next task will be a lot easier if we have access to an npm package. Here's how to require a library for use in a function.
Specifically, we want the npm package qs, to interpret the query string that comes back from the API.
To add a dependency, we just need to add it to the package.json file for that function.
- Navigate to your function folder
- If you haven't already since step 5, run
git pull - Grab the package from npm with
npm install qs --save - Add a
.gitignorefile to keep us from committing the actual code innode_modulesup to our repo. The simplest way (from the function directory) isecho 'node_modules' >> .gitignore - Commit your changes and push to your repository! Do this however you're most comfortable, but you could run:
git add . && git commit -m "added qs dependency" && git push origin master
Writing form submissions to the DB
Let's write the code for our Lambda to handle the form data we receive.
Here's the code, with copious comments:
const qs = require('qs'); // query string interpreter
const AWS = require('aws-sdk'); // we didn't have to add this like qs this since it's standard on all functions
exports.handler = async message => {
  console.log(message);
  const formData = qs.parse(message.body); // the 'message' is everything we got from the api endpoint. QS makes it easy to parse out the form data from the body
  console.log(formData); // you can delete this in production

  const dynamodb = new AWS.DynamoDB(); // because of our permissions setup, we don't have to specify *which* DB
  const params = {
    Item: {
      'email': {
        S: formData.email // S: indicates to DynamoDB this will be a string
      }
    },
    ReturnConsumedCapacity: 'TOTAL',
    TableName: process.env.TABLE_NAME // uses the env variable that Stackery defined
  };
  await dynamodb.putItem(params).promise(); // save to the DB (with a node 8-style await)

  // we need to return a response or the browser will show an error
  return {
    statusCode: 302,
    headers: {'Location': 'https://stackery.io'}
  };
};
Once you've committed your changes to master, you're ready to deploy your complete service!
UP NEXT: Deploying your serverless app.
8. Deploying a working web service (4.5 min)
Deploying in the Stackery Dashboard
Earlier we used the CLI to deploy a stack. Now let's deploy the final stack using the Stackery Dashboard. You should have committed your local changes at the end of the last step. The Stackery Dashboard, if you left it open, will prompt you to refresh. Refresh and navigate to the Deploy tab.

- Click
Prepare new deployment, then Prepare Deployment to check consistency and send your stack to AWS Cloudfront (this will take a minute or two)

- Once the prepare is finished, click
Deploy, which will open a new tab and direct you to your AWS Console

- Inside the AWS interface, click
Executeand confirm in the popup
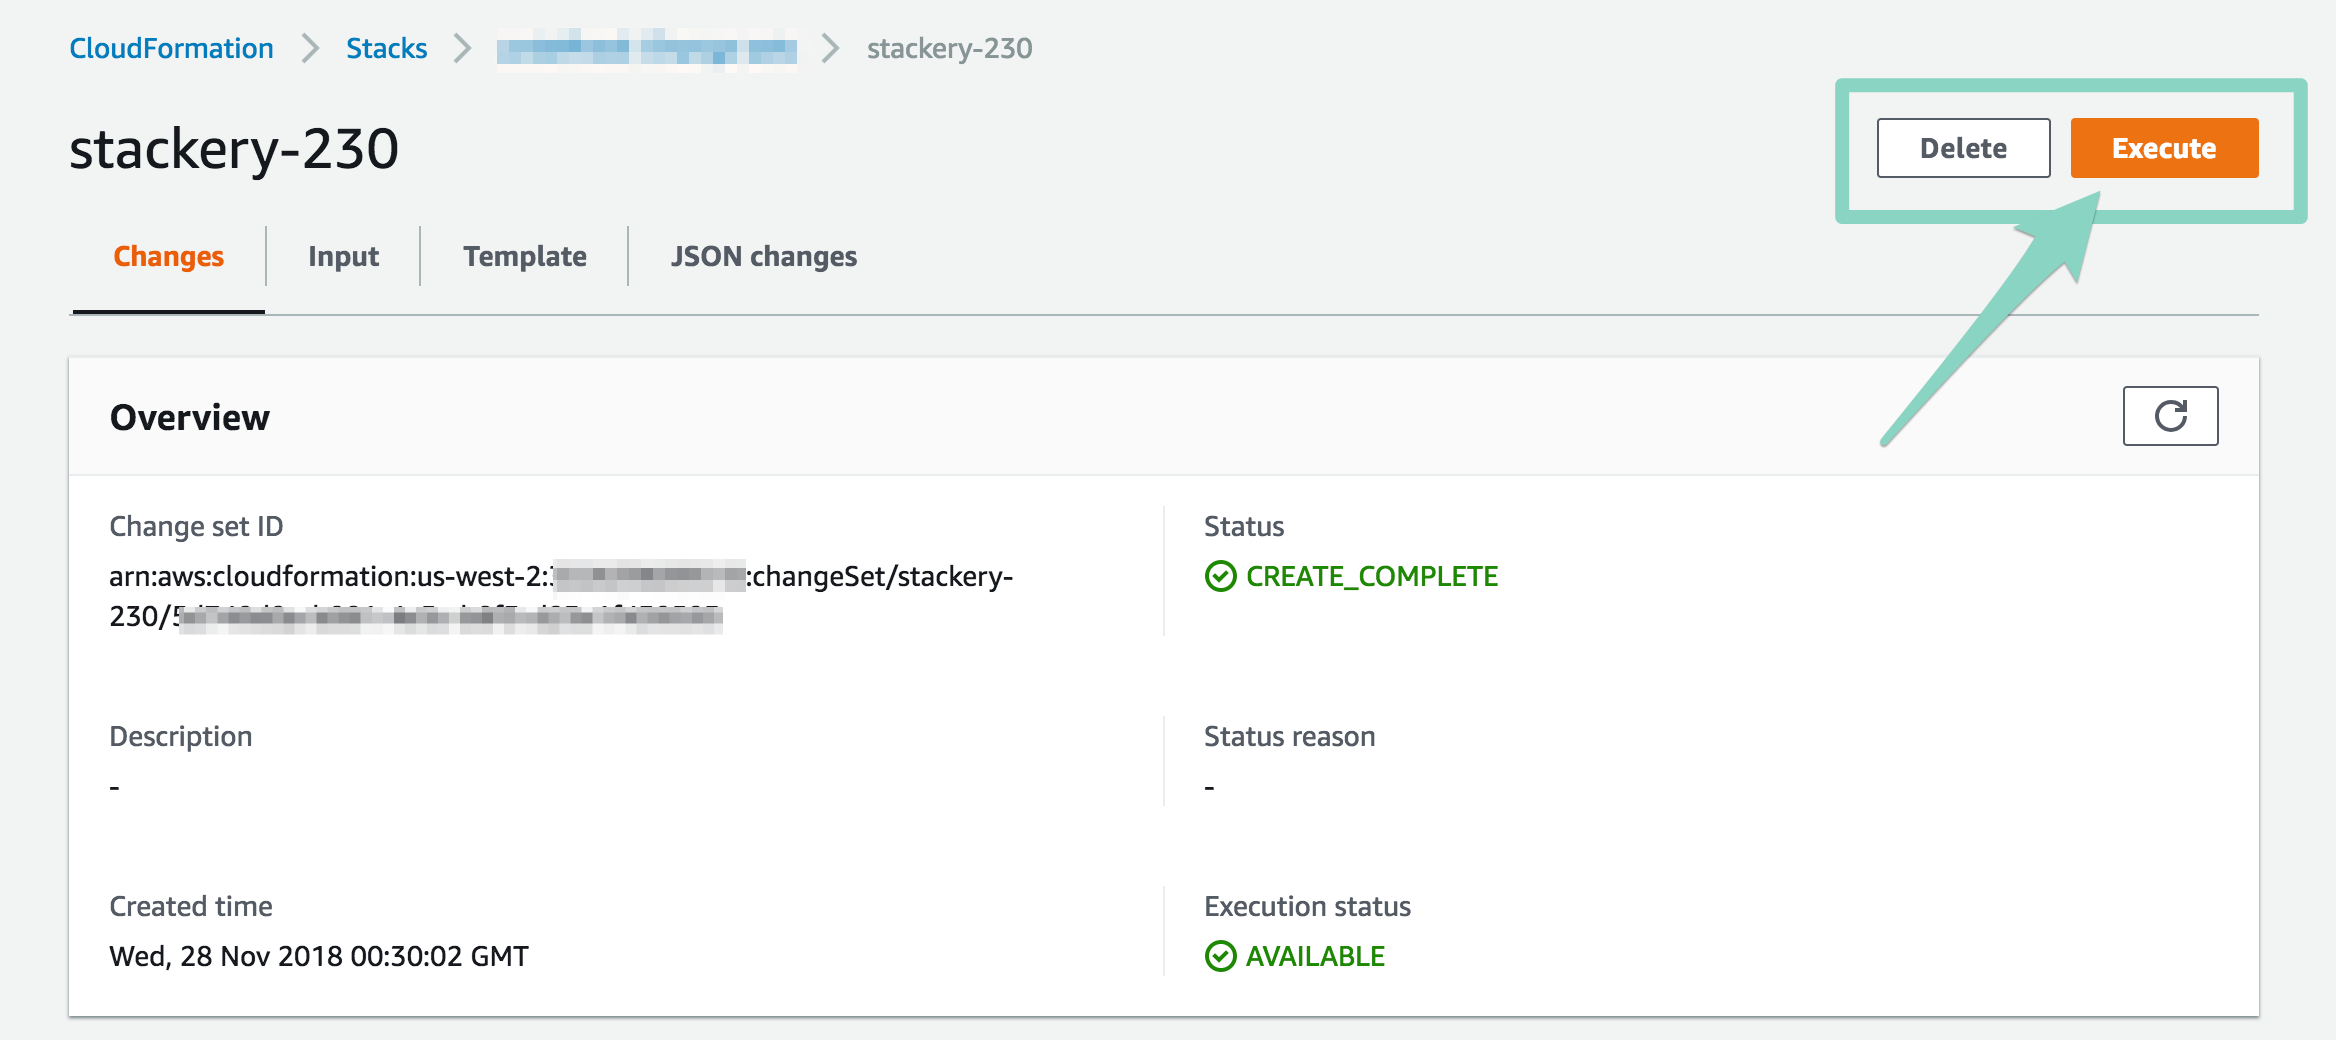
Why do we need to go into AWS to deploy? By design, Stackery is useable by developers who shouldn't have access to deploy to production. In that case, they could prepare and deploy to a development or staging environment in Stackery, then get someone with permissions to do the final deploy. This keeps the app secure when it's part of a team workflow.
The CloudFormation queue will display on the AWS page. Back on Stackery you'll see a 'Deploying' animation for the next few minutes.

Once this stack is deployed, the View tab has a lot of useful information: functions display the number of times they were invoked and whether they've hit errors.
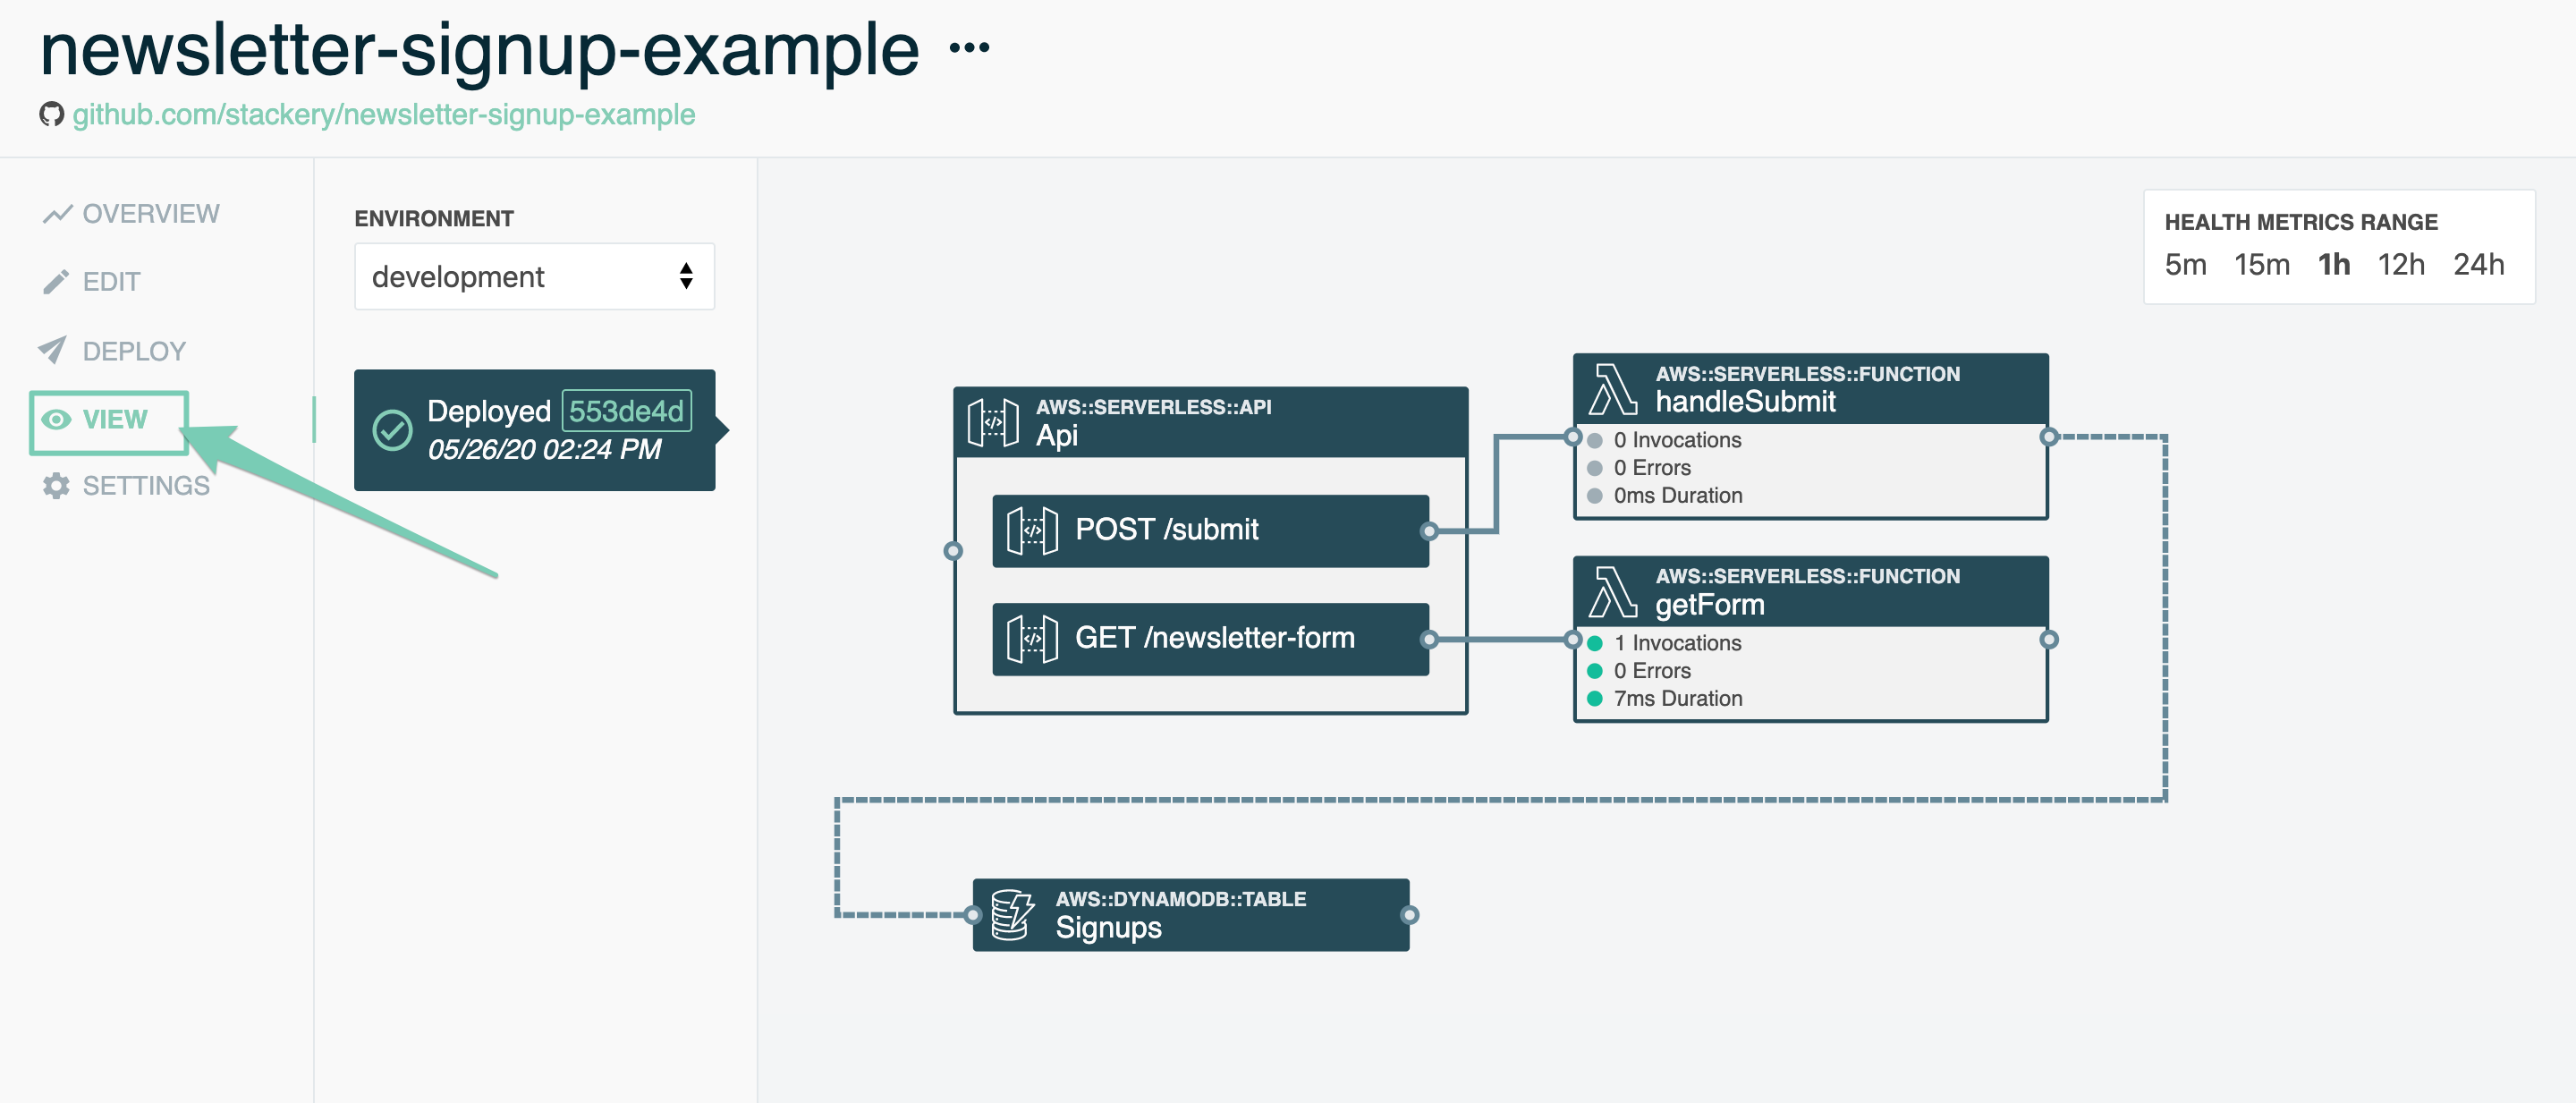
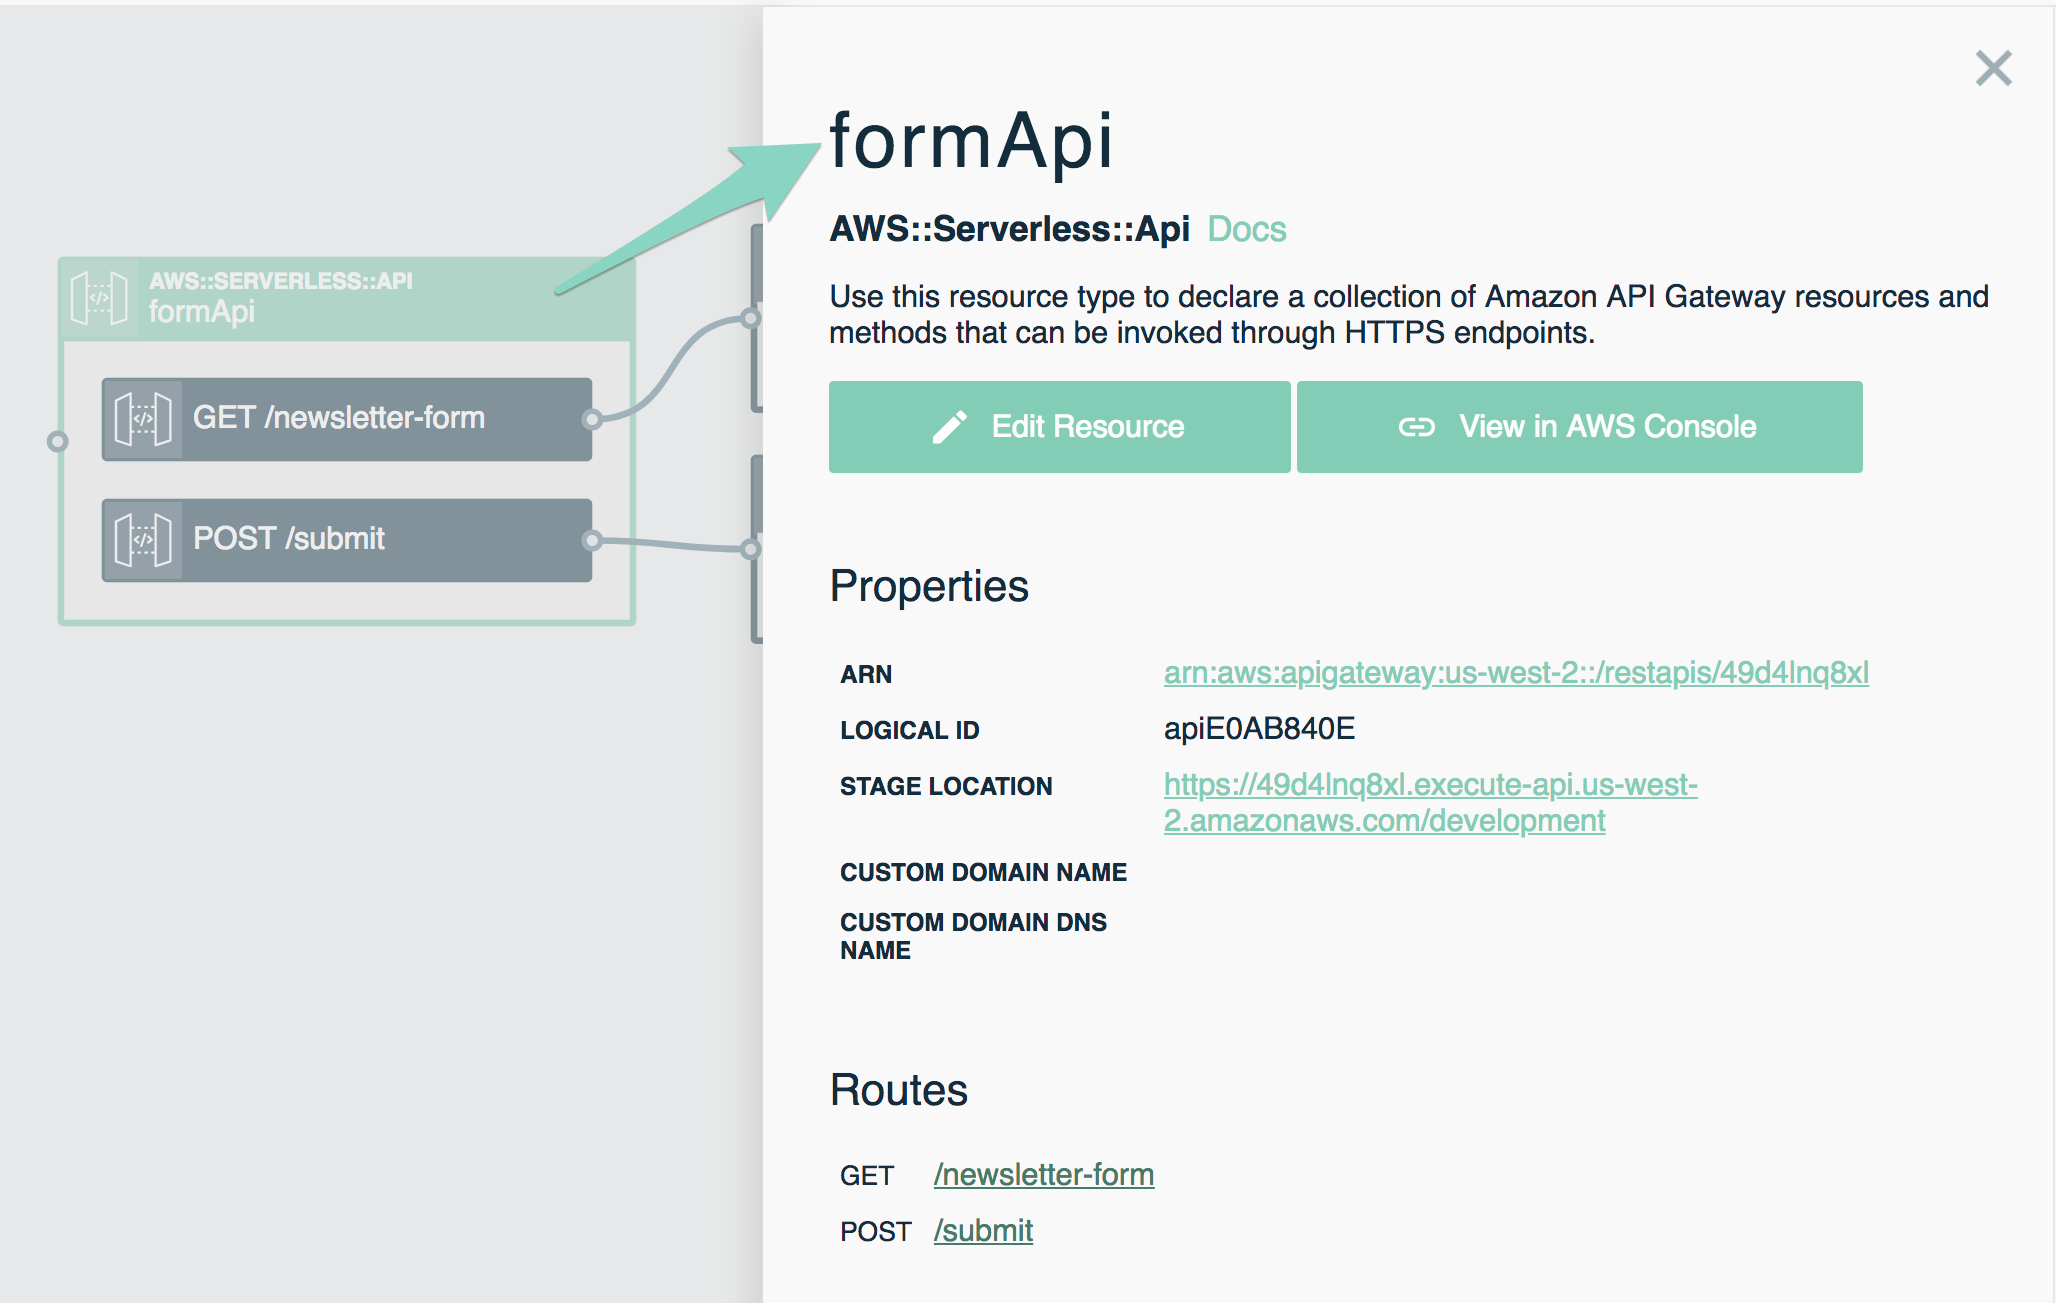
You can double-click on any resource to find links to the AWS Console, to logs, and for the API endpoints, their URLs.
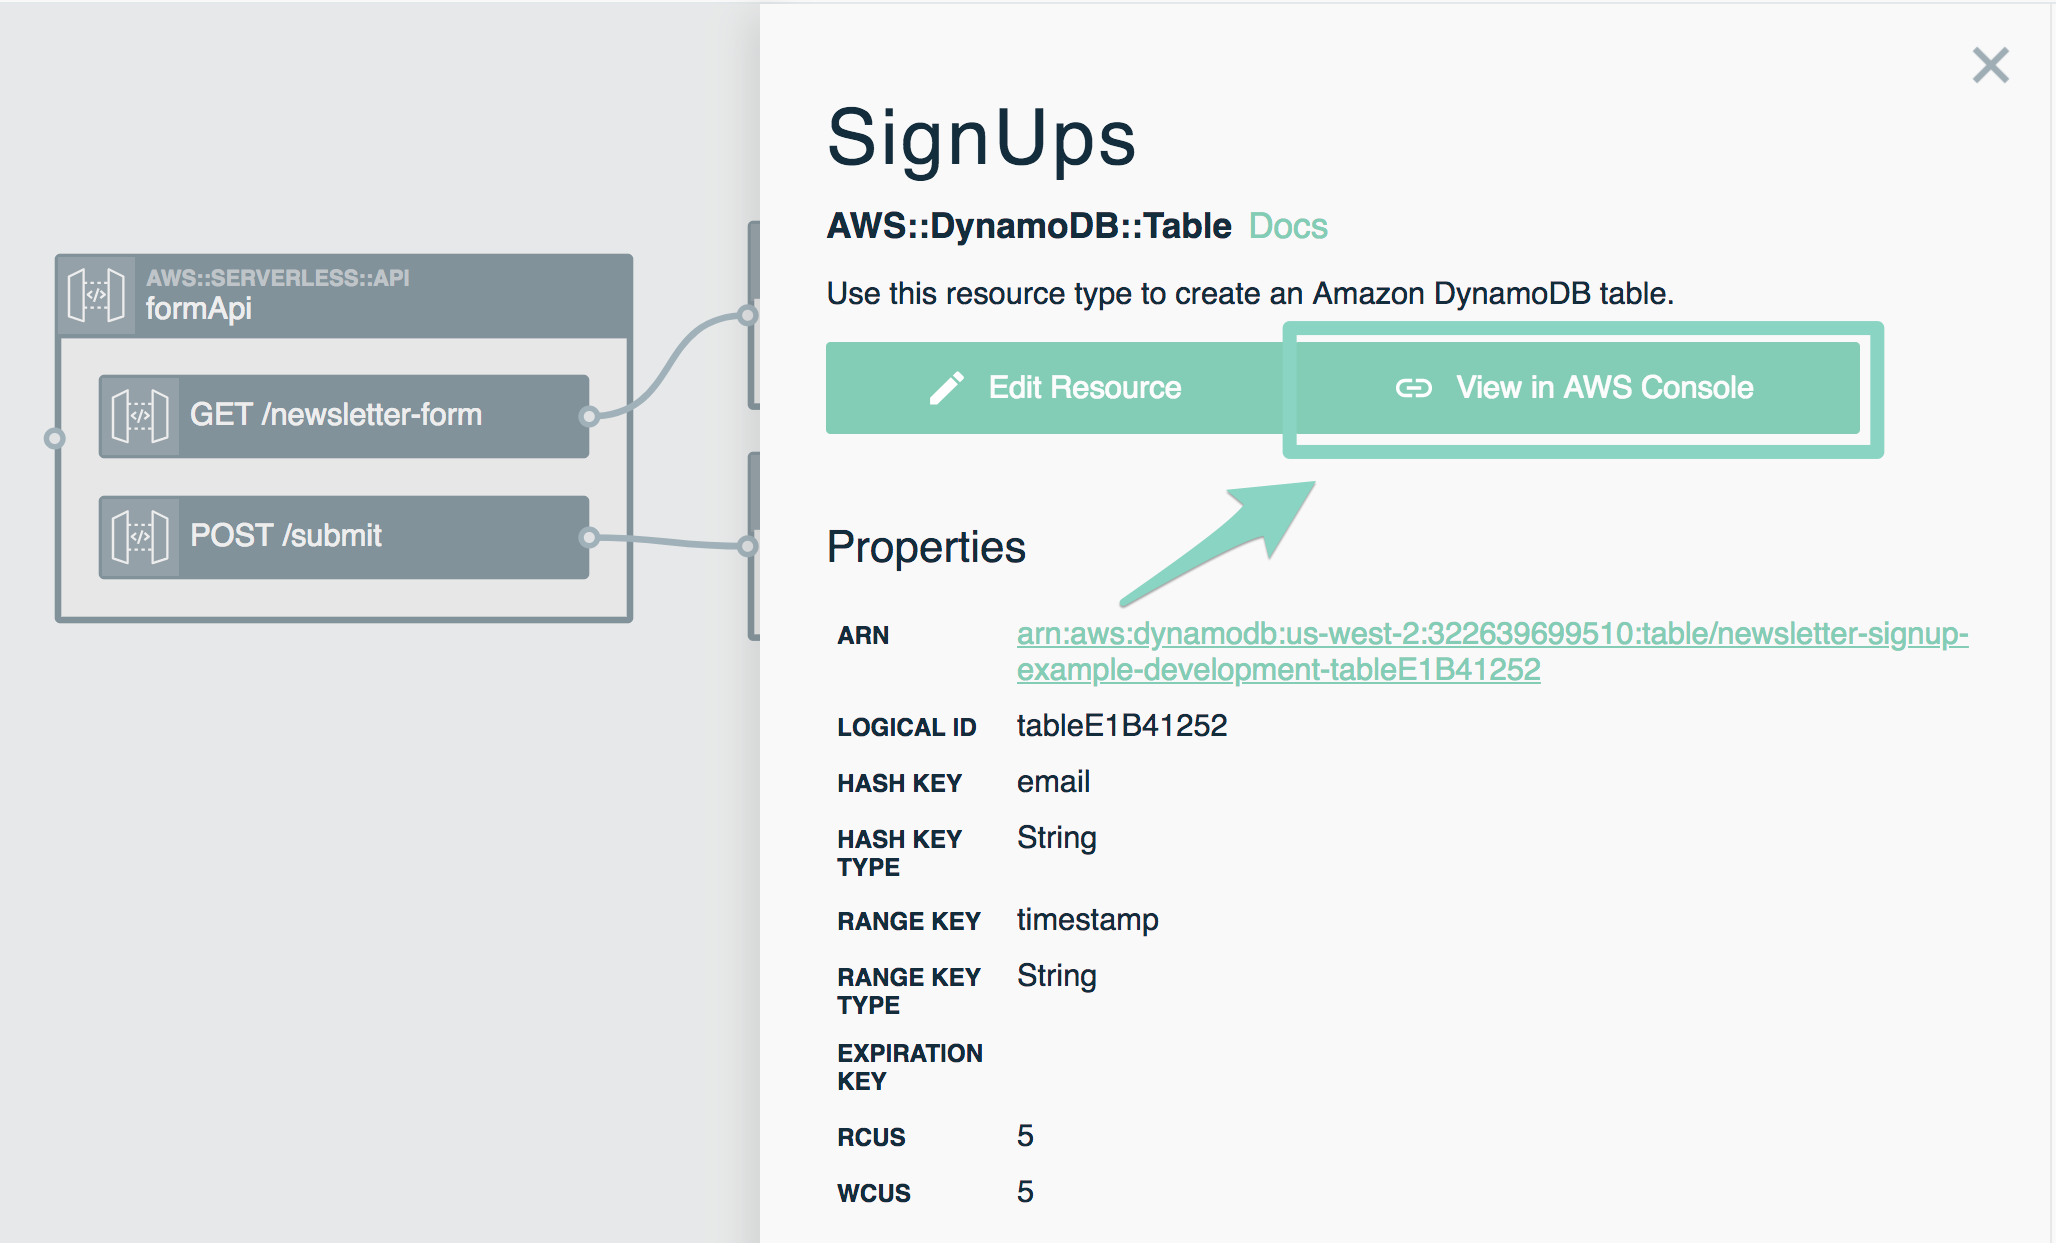
Go ahead and submit a few responses to our form, then click the table in our Deployments tab and then View in AWS Console.
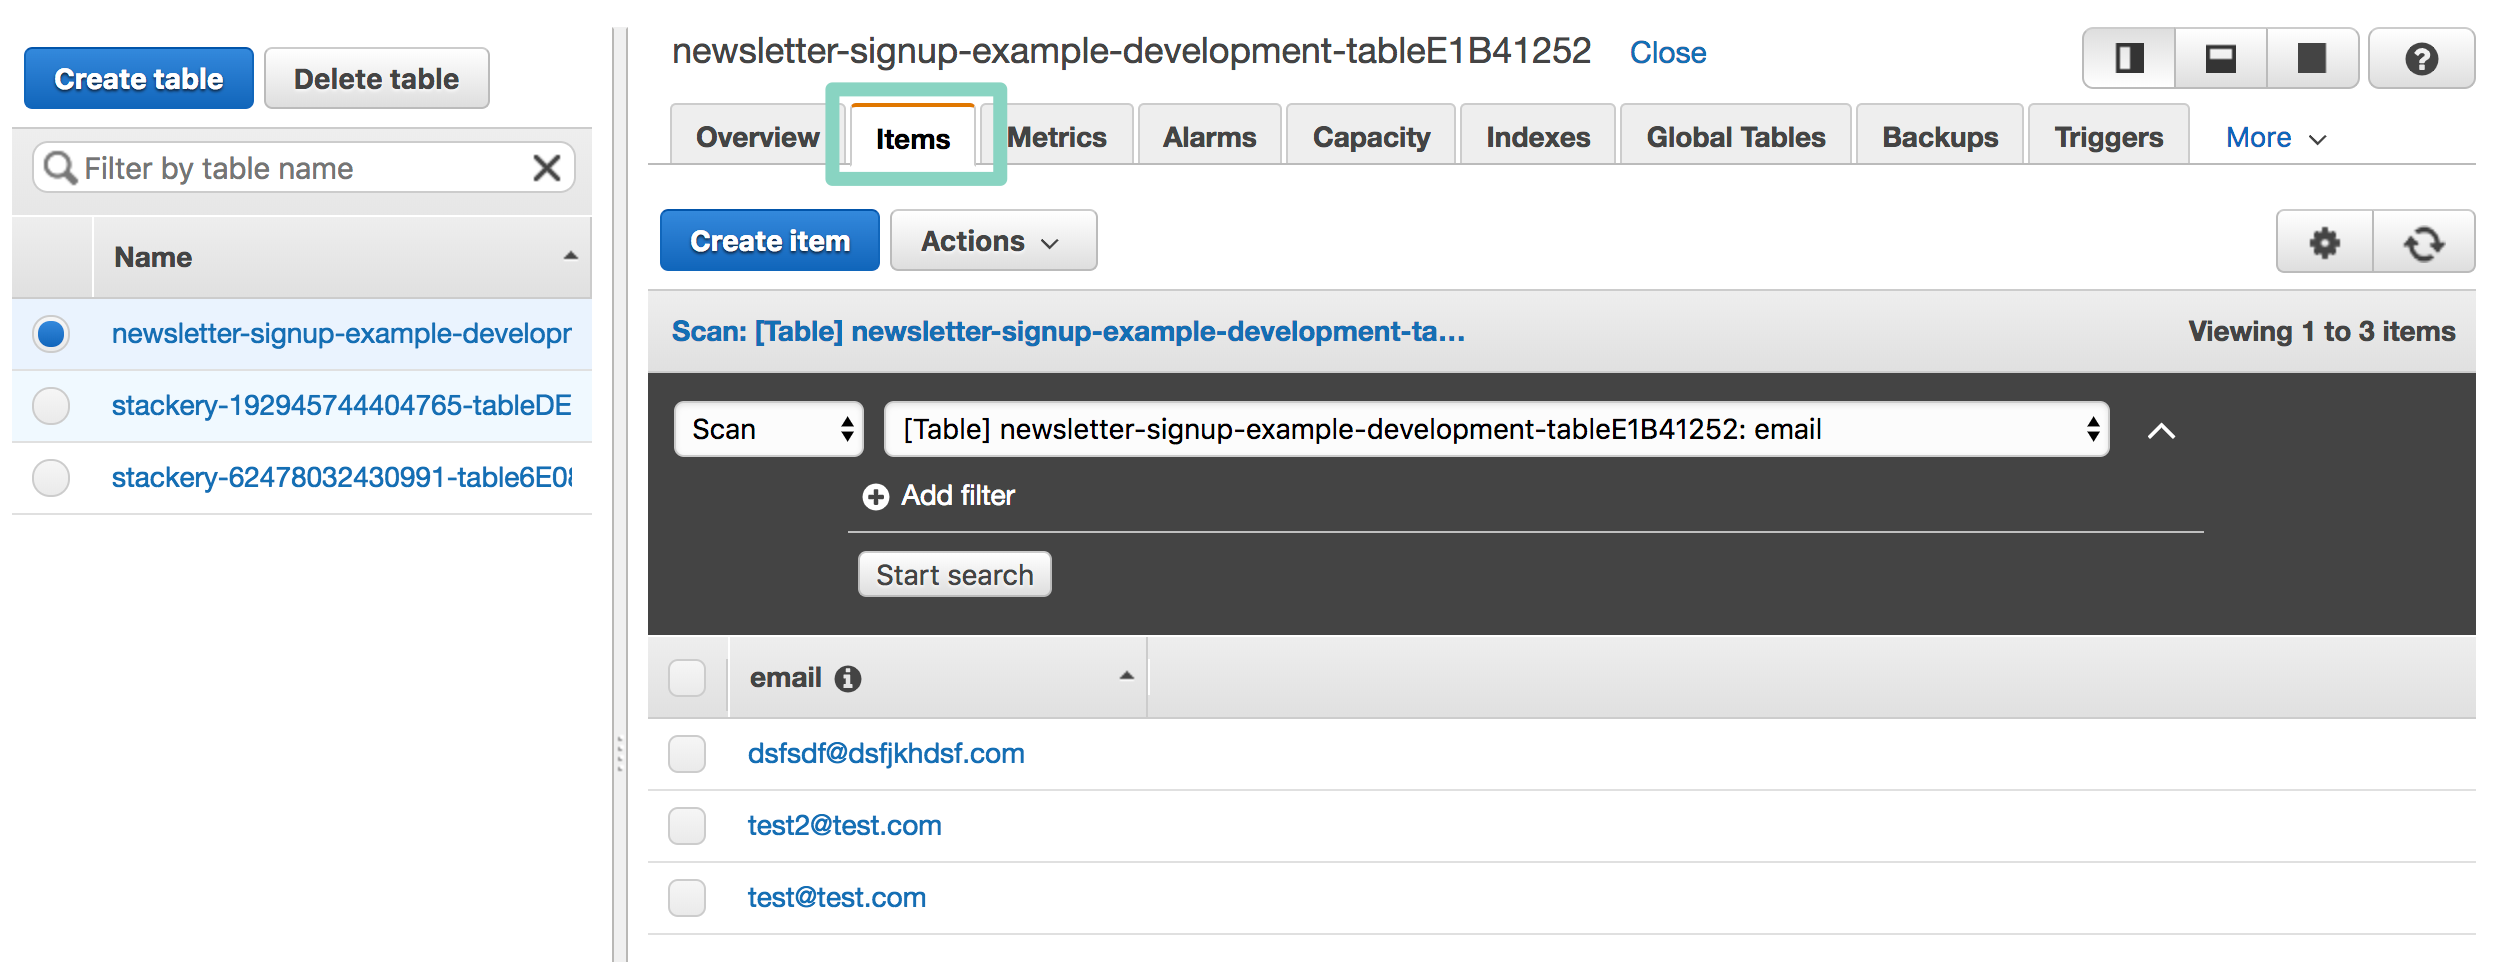
In the Items tab you'll see the email addresses you entered!
Next steps
You can read more about Functions, REST APIs, DynamoDB Tables and the CLI Reference.
