Working with Existing VPCs
Overview
Stackery provides a way to reference shared infrastructure components which can be used by multiple services. Using existing resources can be useful in the following scenarios:
- Separating application and data layers into their own stacks which reference one VPC
- Adding new subscriber functions/tasks to an existing SQS Queue
- Building onto an existing application that requires the use of an existing RDS database
- Avoiding the 200 resource per stack limit for AWS CloudFormation
This walkthrough covers a common use case: incorporating the use of an existing Virtual Private Cloud (VPC) and Relational Database Service (RDS) database.
Creating a VPC
If your team already has an existing VPC deployed and running in AWS, feel free to skip this section and continue on from Retrieving + storing VPC configurations.
This section will cover configuring and deploying the following resources with Stackery:
- Virtual Network (Amazon Virtual Private Cloud)
- Database (Amazon Aurura Serverless DB Cluster)
In the Adding resources to an existing VPC section, they'll be referenced as existing resources.
We're going to create a stack named shared-vpc-1. You can use the completed repository to create a stack blueprint or by specifying the repository URL as a remote source
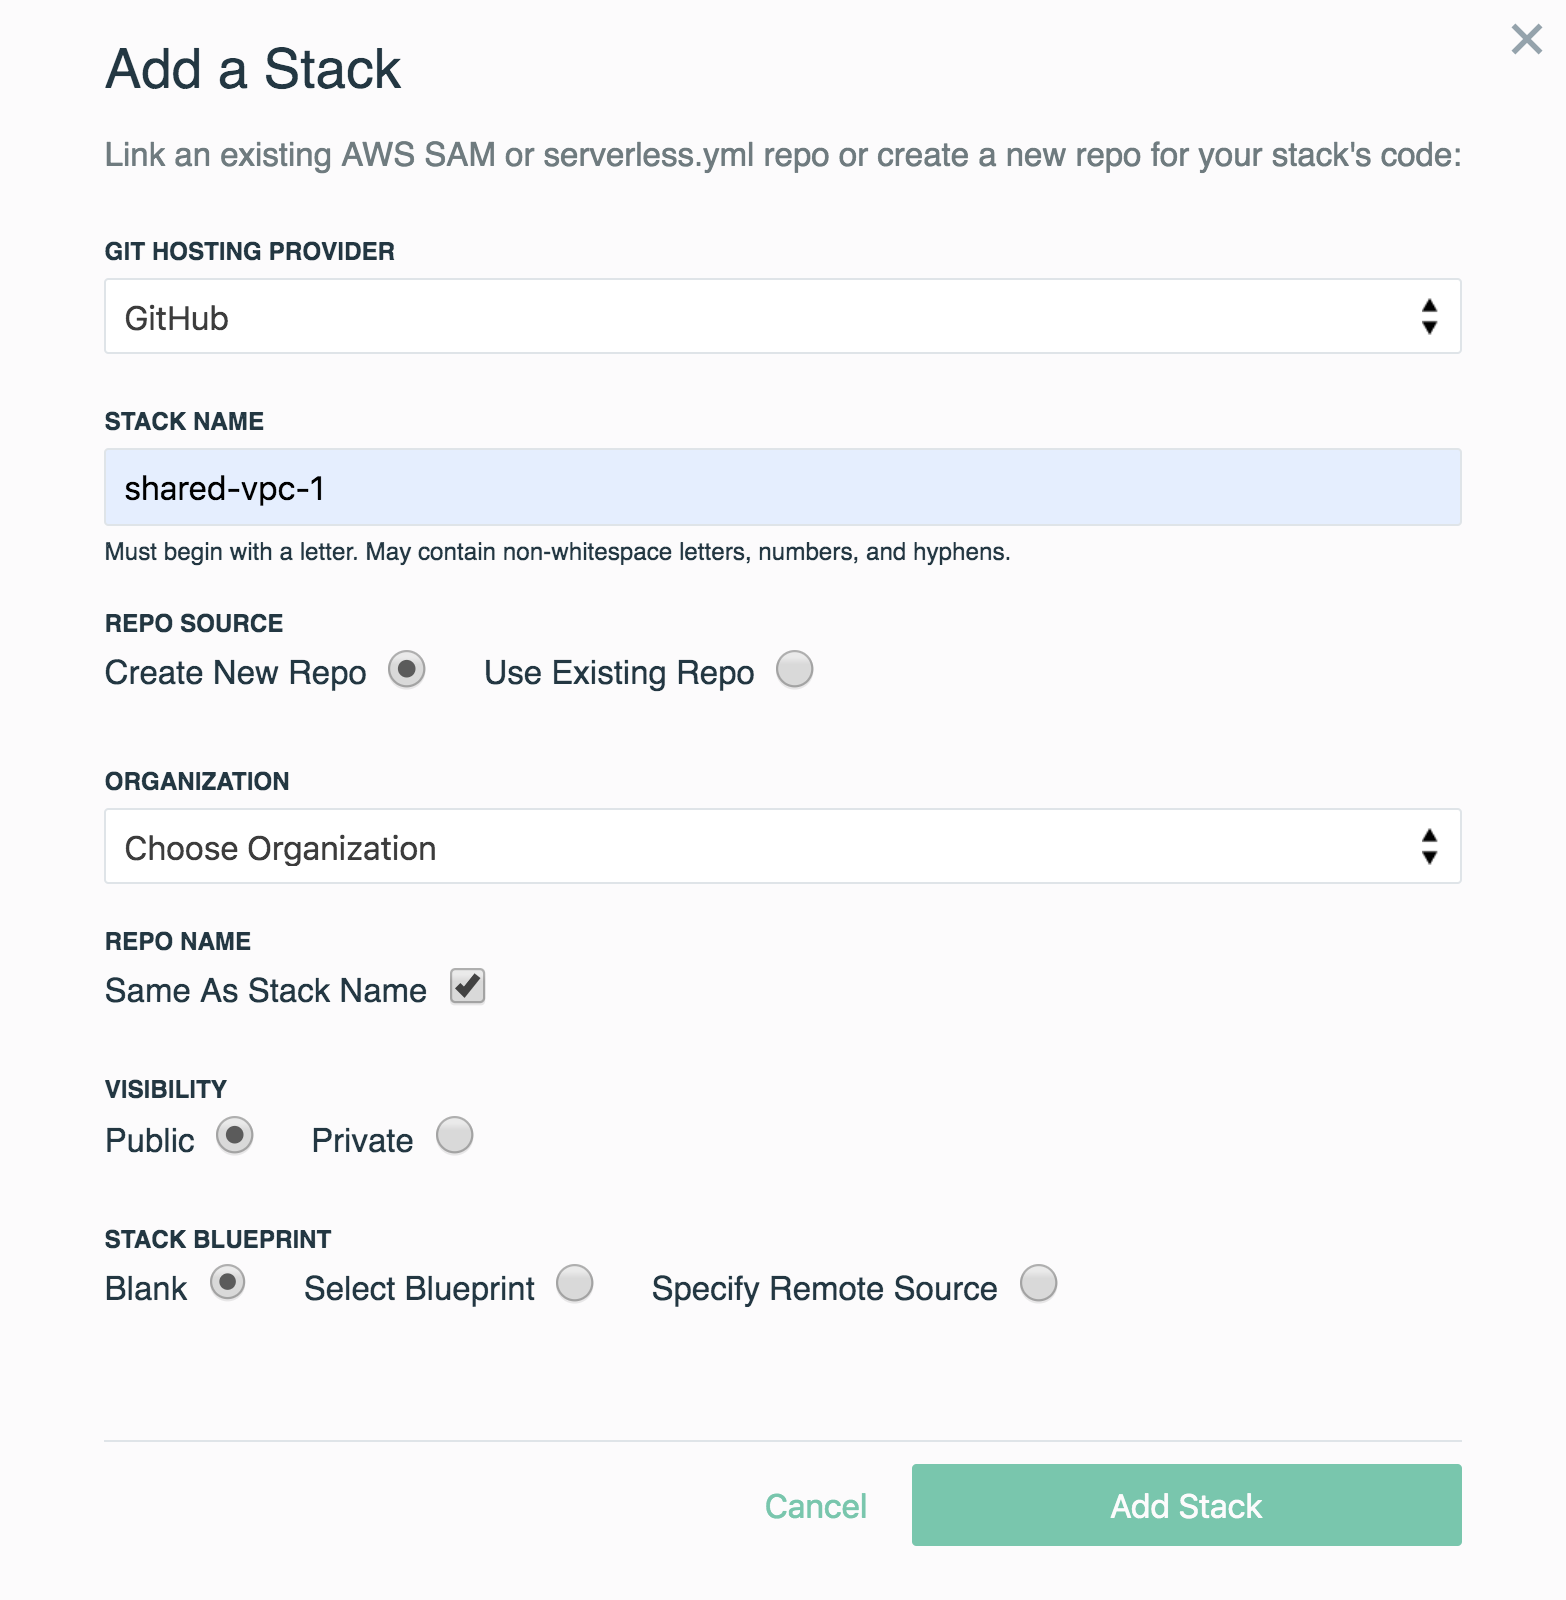
Quick recap of how this stack was created.
We performed the following in the stack editor:
- Add a Virtual Network resource to the canvas
- Update its Logical ID to
mainVPC - Add a Database to the canvas, and placed inside of
mainVPC - Update its Logical ID to
mainRDS - Set Root Password to
password
By placing the Database inside of the Virtual Network, we've assigned both VPC private subnets to the Database's subnet group. Stackery does this by default to follow the AWS best practice of ensuring a RDS database is restricted access to only resources within the same VPC.

This walkthrough won't cover the provisioning of a bastion host to access the database, and will focus on the ability to use existing cloud resources with Stackery.
With the stackery-existing-resources stack configured, we'll deploy the stack into a Stackery environment named development. We've chosen the us-west-2 (Oregon) AWS Region for this environment.
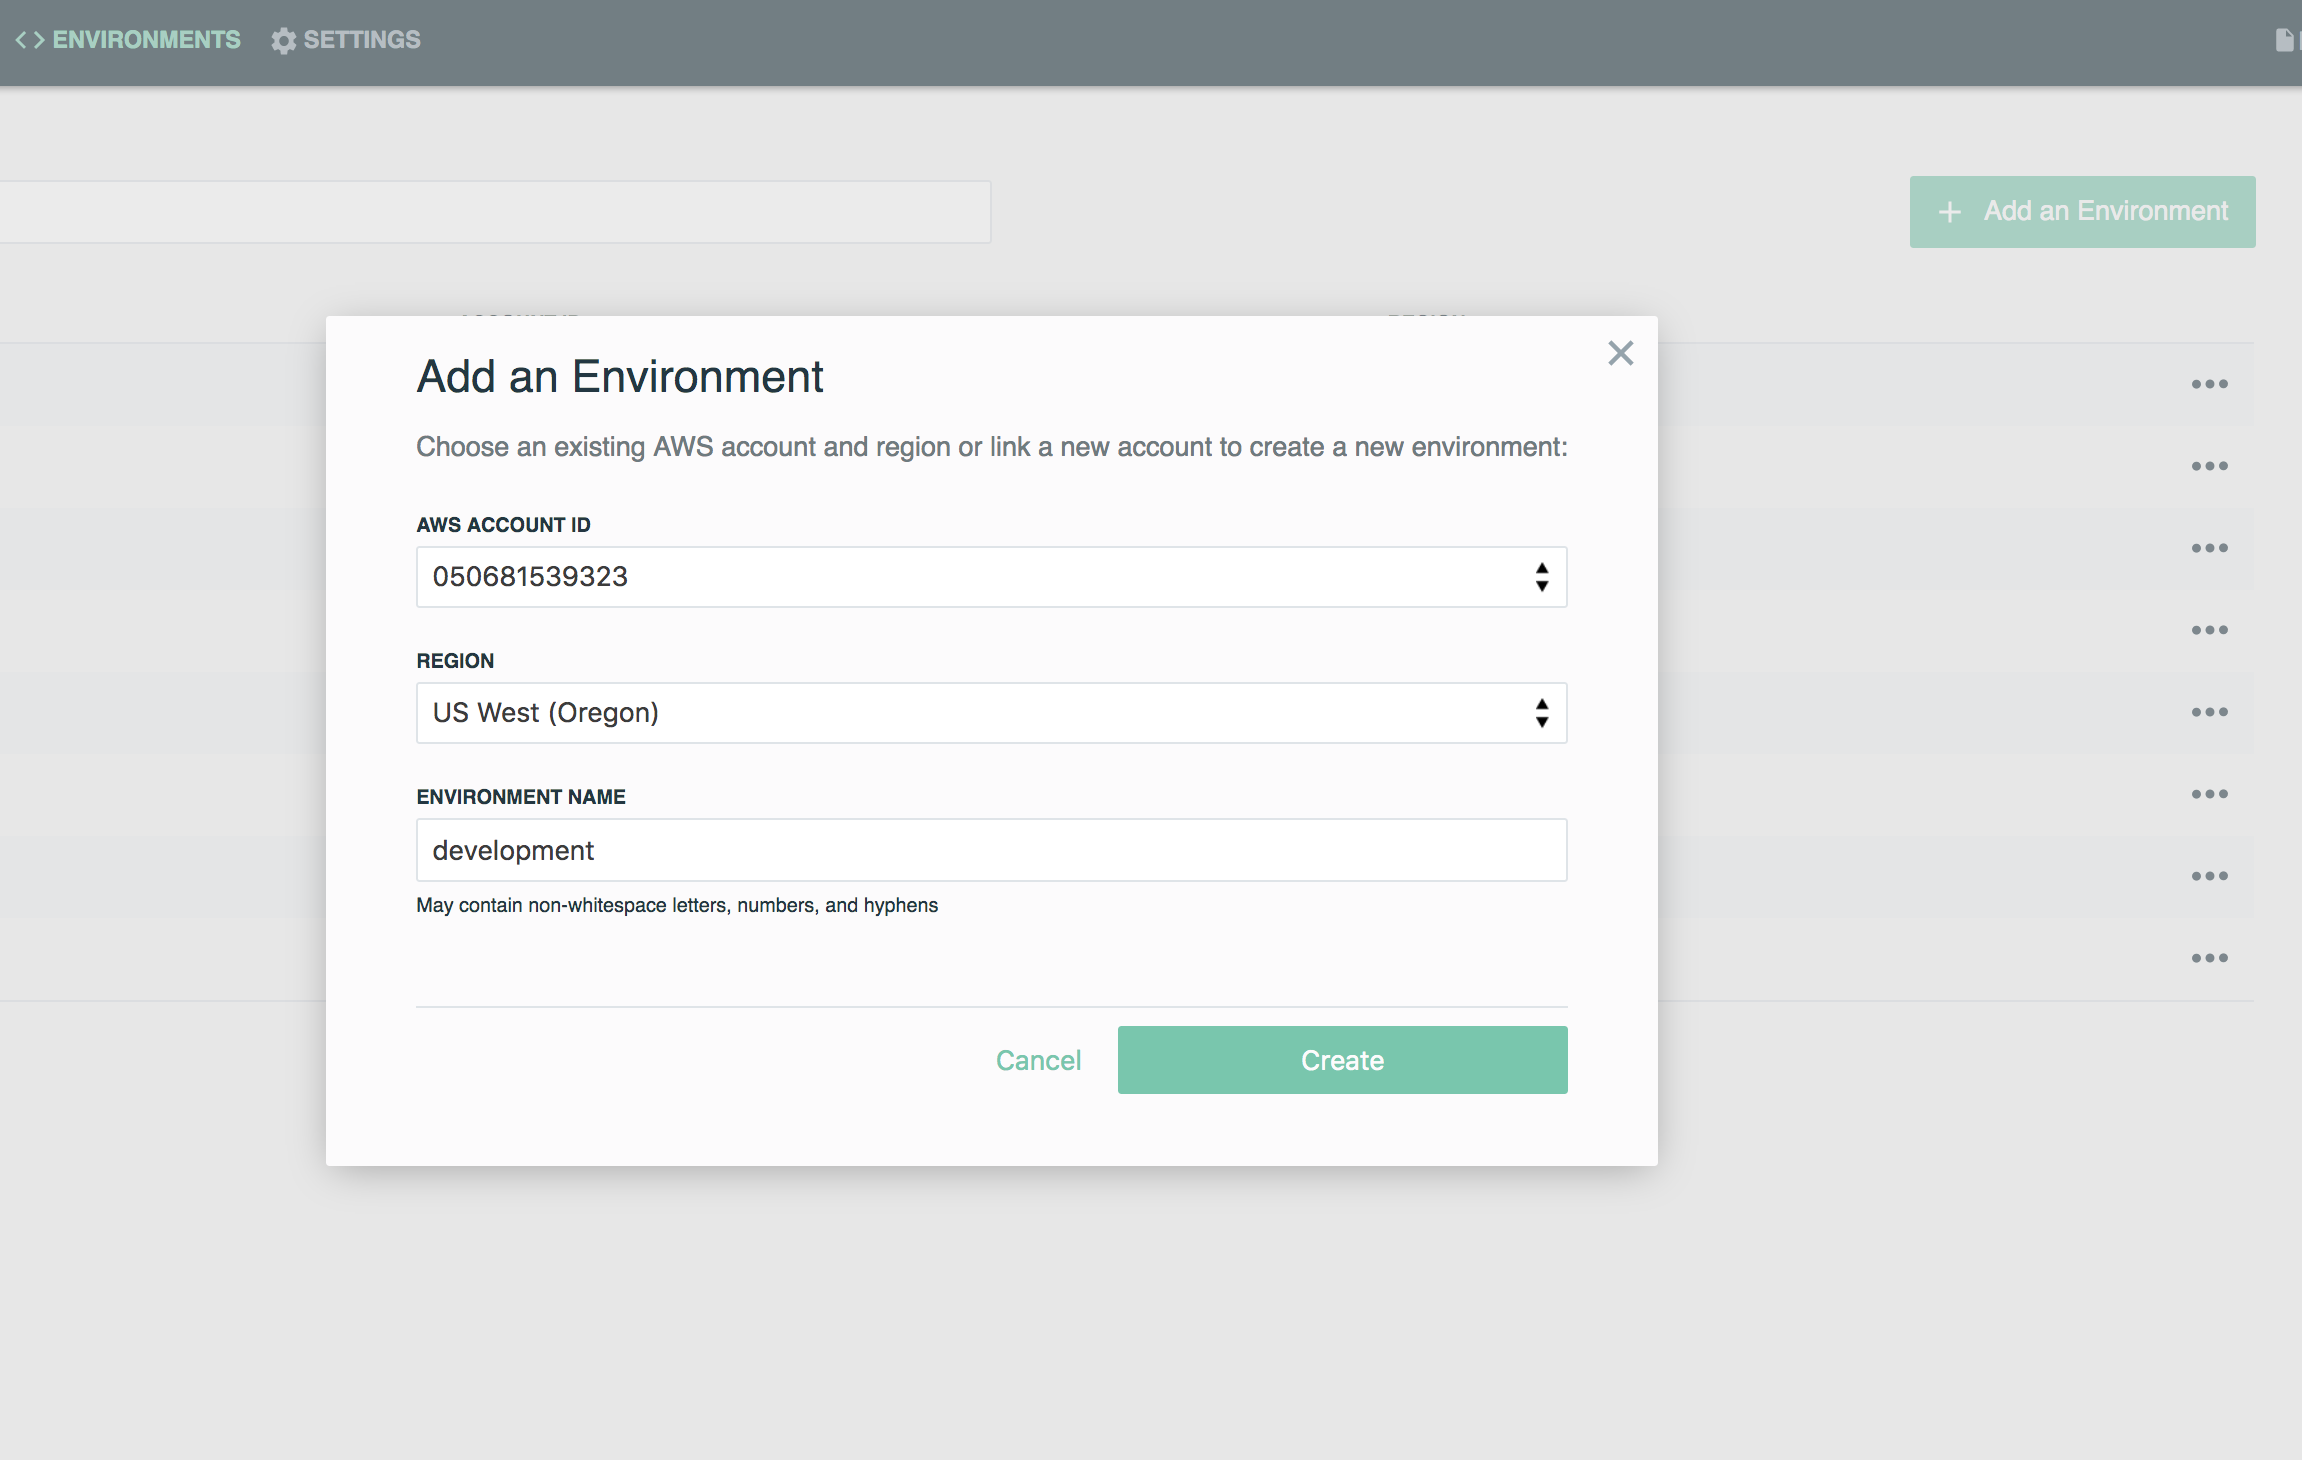
This environment will be used in the next section to store the VPC and RDS properties needed to reference them in other stacks. You can leave the default JSON for this environment as-is for now.
To kick off a deployment, you can either run the stackery deploy command below, or initiate one through the Stackery deploy dashboard.

Retrieving + storing VPC configurations
In order to reference an existing resource in another stack, we'll require the following values from each resource:
Virtual Network
- VPC ID
- Private Subnet ID(s)
- Public Subnet ID(s)
Database
- Database Amazon Resource Name (ARN)
- Database root password
Rather than providing these values each time we want to reference these resources, we'll store them in the development environment. These parameters are stored in AWS Systems Manager Parameter Store and are region based (our development environment is based in us-west-2).
We'll need these values to construct the following JSON object stored in our environment:
{
  "VPC_CONFIG": {
    "VpcId": "<VPC ID>",
    "DefaultPublicSubnetIds": [
      "<Public Subnet ID 1>",
      "<Public Subnet ID 2>"
    ],
    "DefaultPrivateSubnetIds": [
      "<Private Subnet ID 1>",
      "<Private Subnet ID 2>"
    ]
  },
  "DB_ARN": "<RDS DB ARN",
  "DB_ROOT_PASSWORD": "<Root DB Password>"
}
DB_ARN + DB_ROOT_PASSWORD
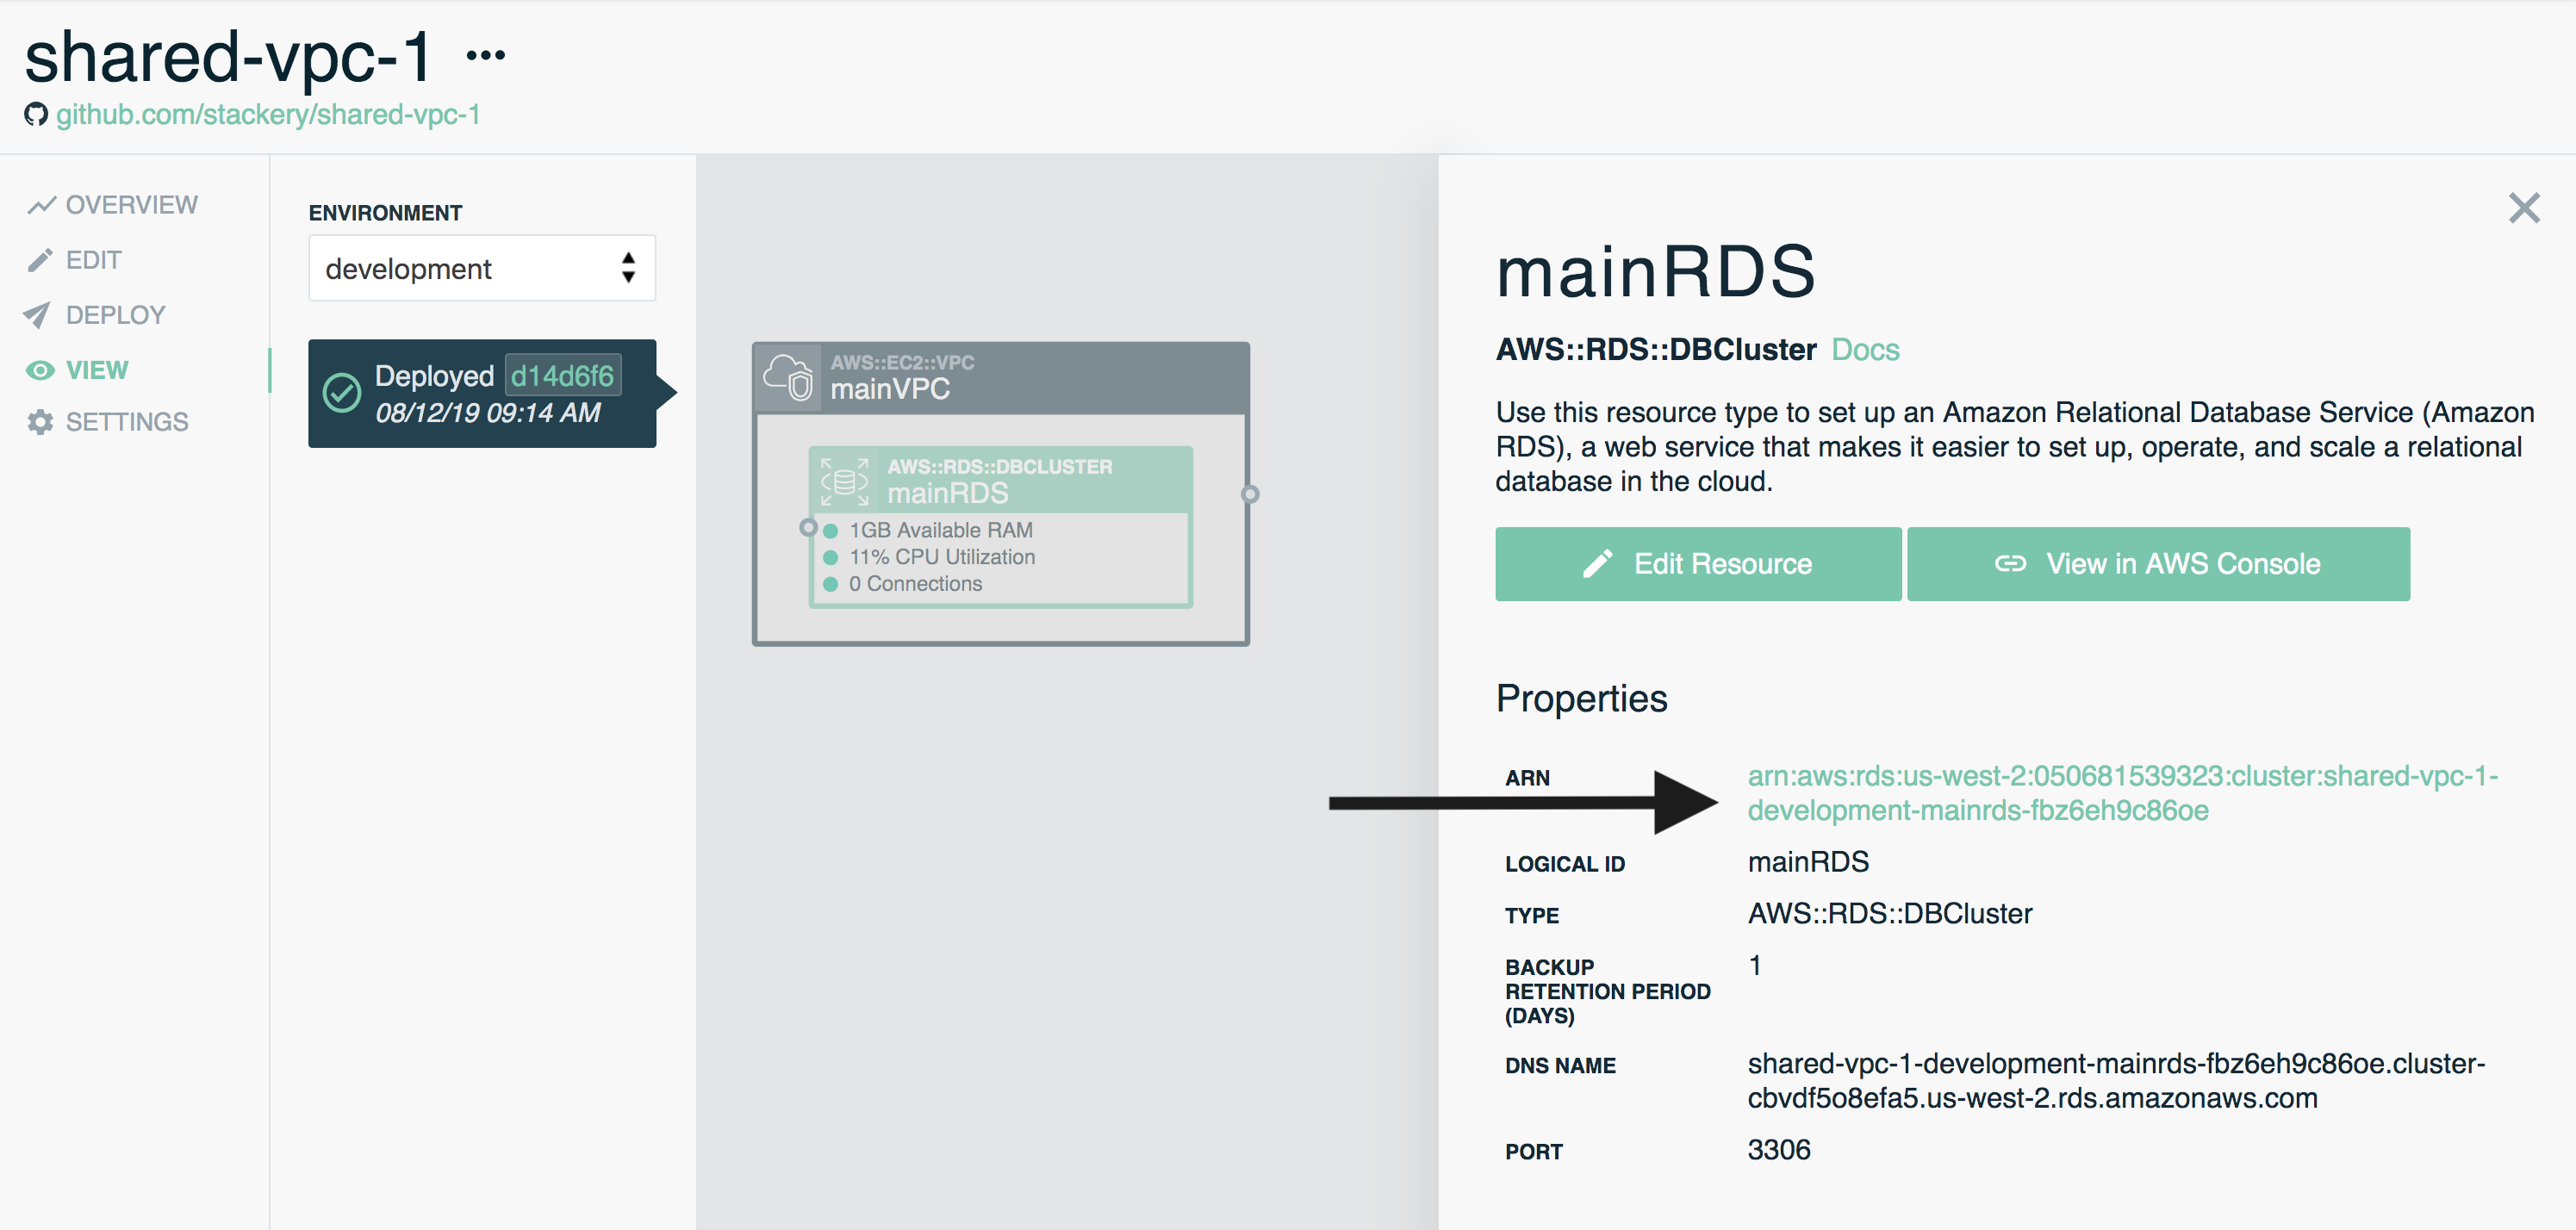
We'll start with our Database configurations. We already know our DB root password, which is decided on when we created the database, so we only require the ARN that was generated when it was deployed. If you've used Stackery to deploy this stack, head over to the stack's View page.

Double-click mainRDS to open it's deployment panel. The ARN is the first deployment setting and is also a link to the database in the AWS Console. Copy this ARN and store it as the value for DB_ARN.
For RDS instances/clusters created without Stackery, navigate to the AWS RDS console and locate the ARN of the RDS database you plan to use.
VPC_CONFIG
Back in the stack View page, double-click mainVPC and select View in AWS Console, a new tab should open the AWS VPC console.
- Copy the VPC ID from the Your VPCs table to set VpcId

- On the left side panel navigate to Subnets
- Locate the subnets associated with the existing VPC (Stackery stacks will begin with
Stack <stack name> Environment ...) - Copy the private and public Subnet IDs to set DefaultPrivateSubnetIds & DefaultPrivateSubnetIds

Our environment parameters should look like this:
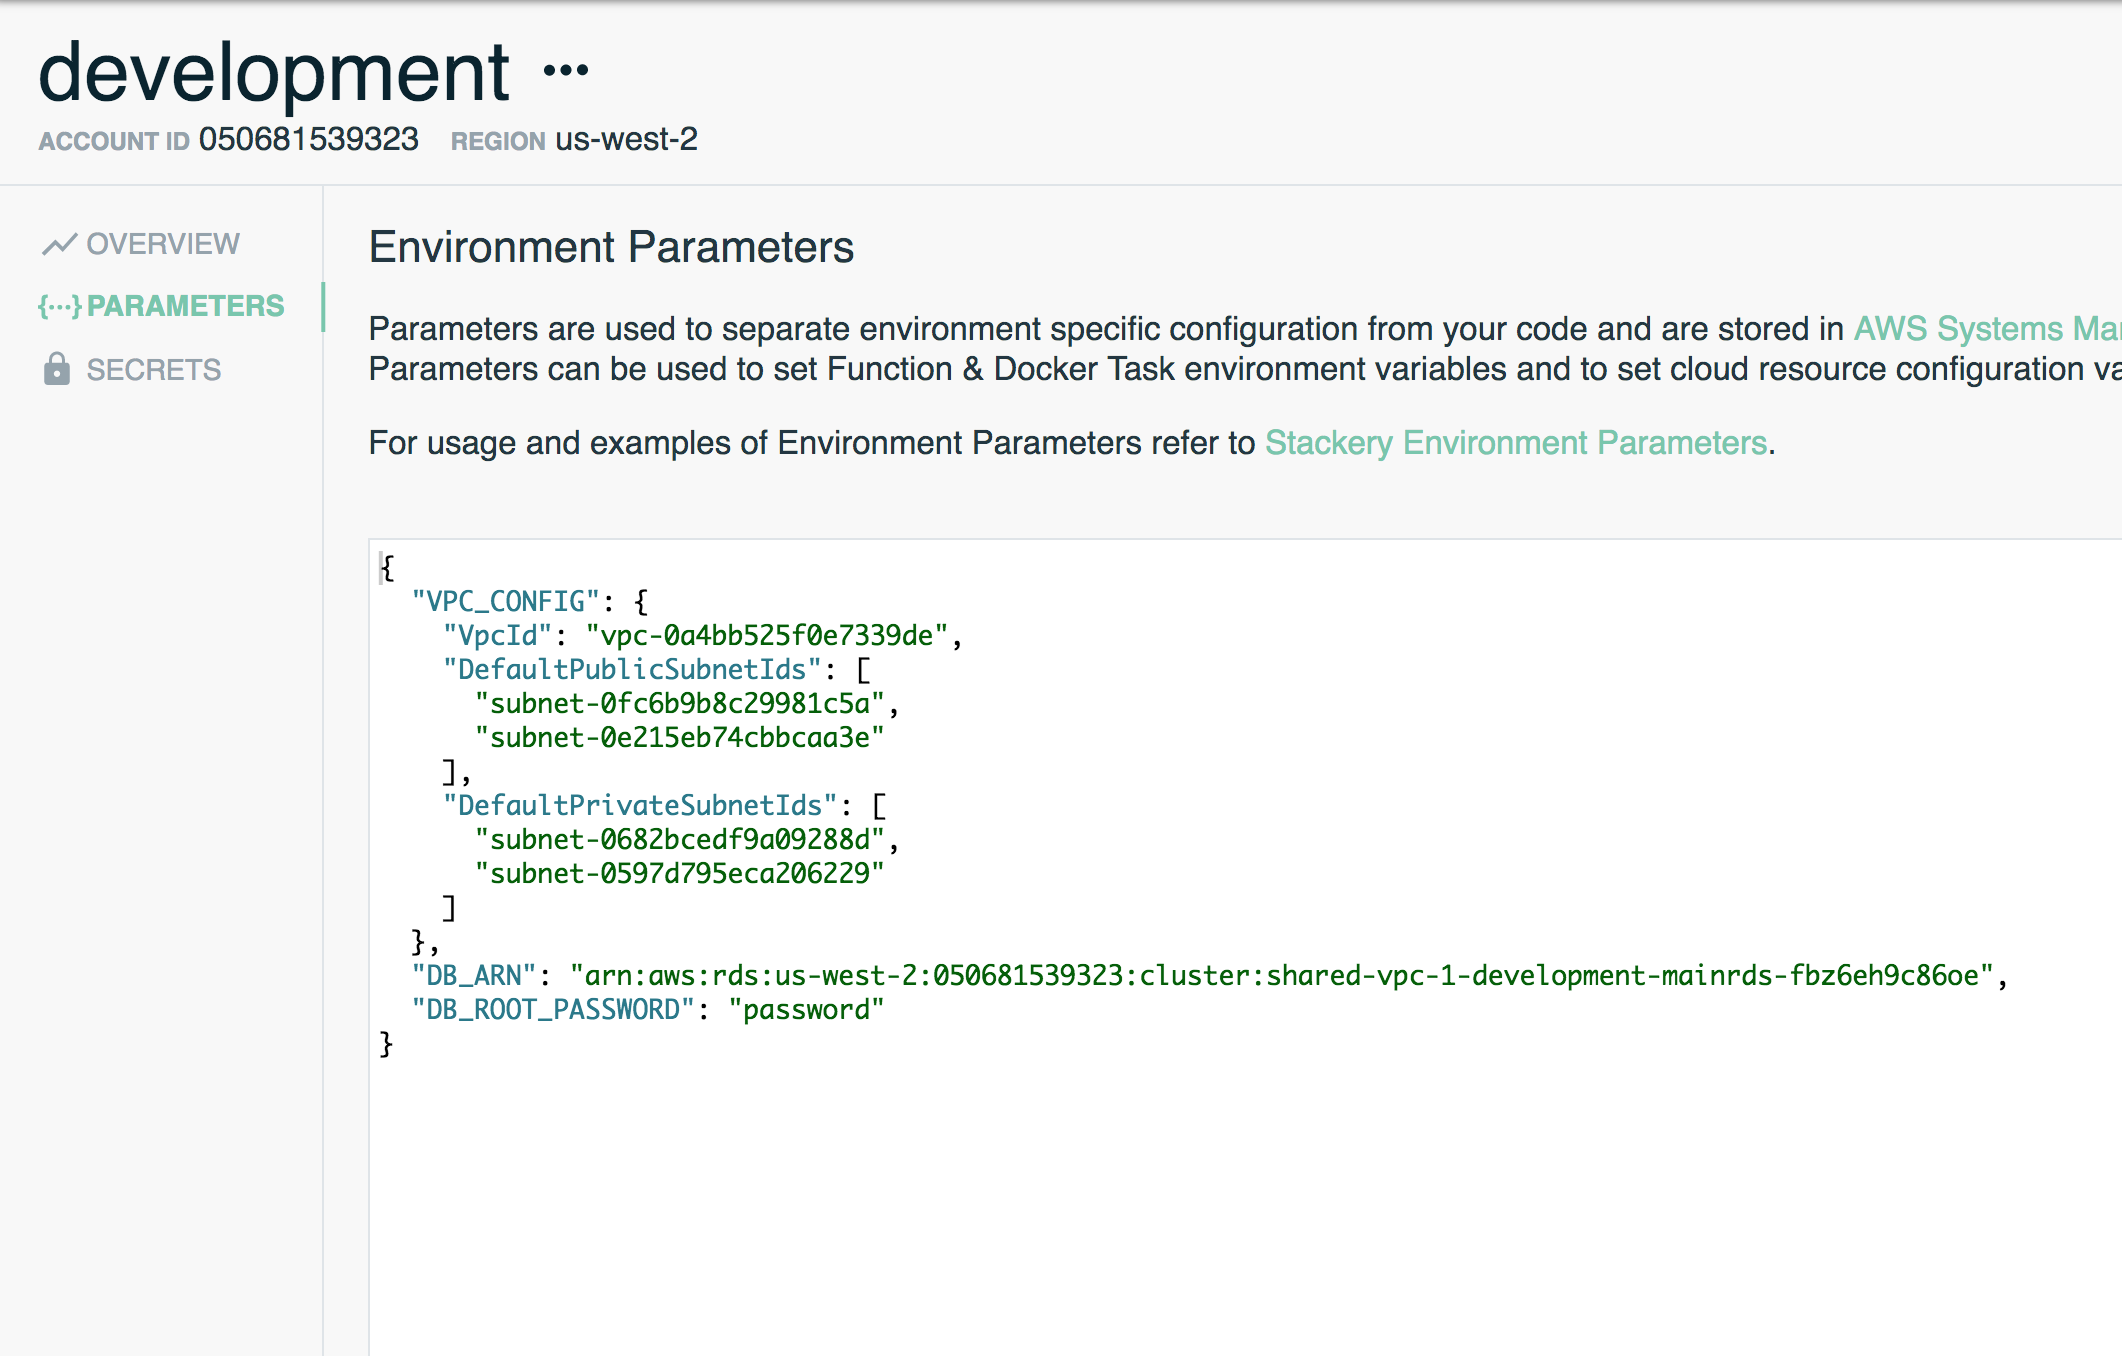
Now we can use the parameters stored in this environment to reference our VPC and Database resources in another stack.
Referencing existing resources
This section will cover how to reference environment variables and the Use Existing option for Virtual Network and Database resources.
We've created the new stack shared-vpc-2 for this section and have the same two resource types on the canvas (sharedVPC + sharedRDS).
Use Existing VPC
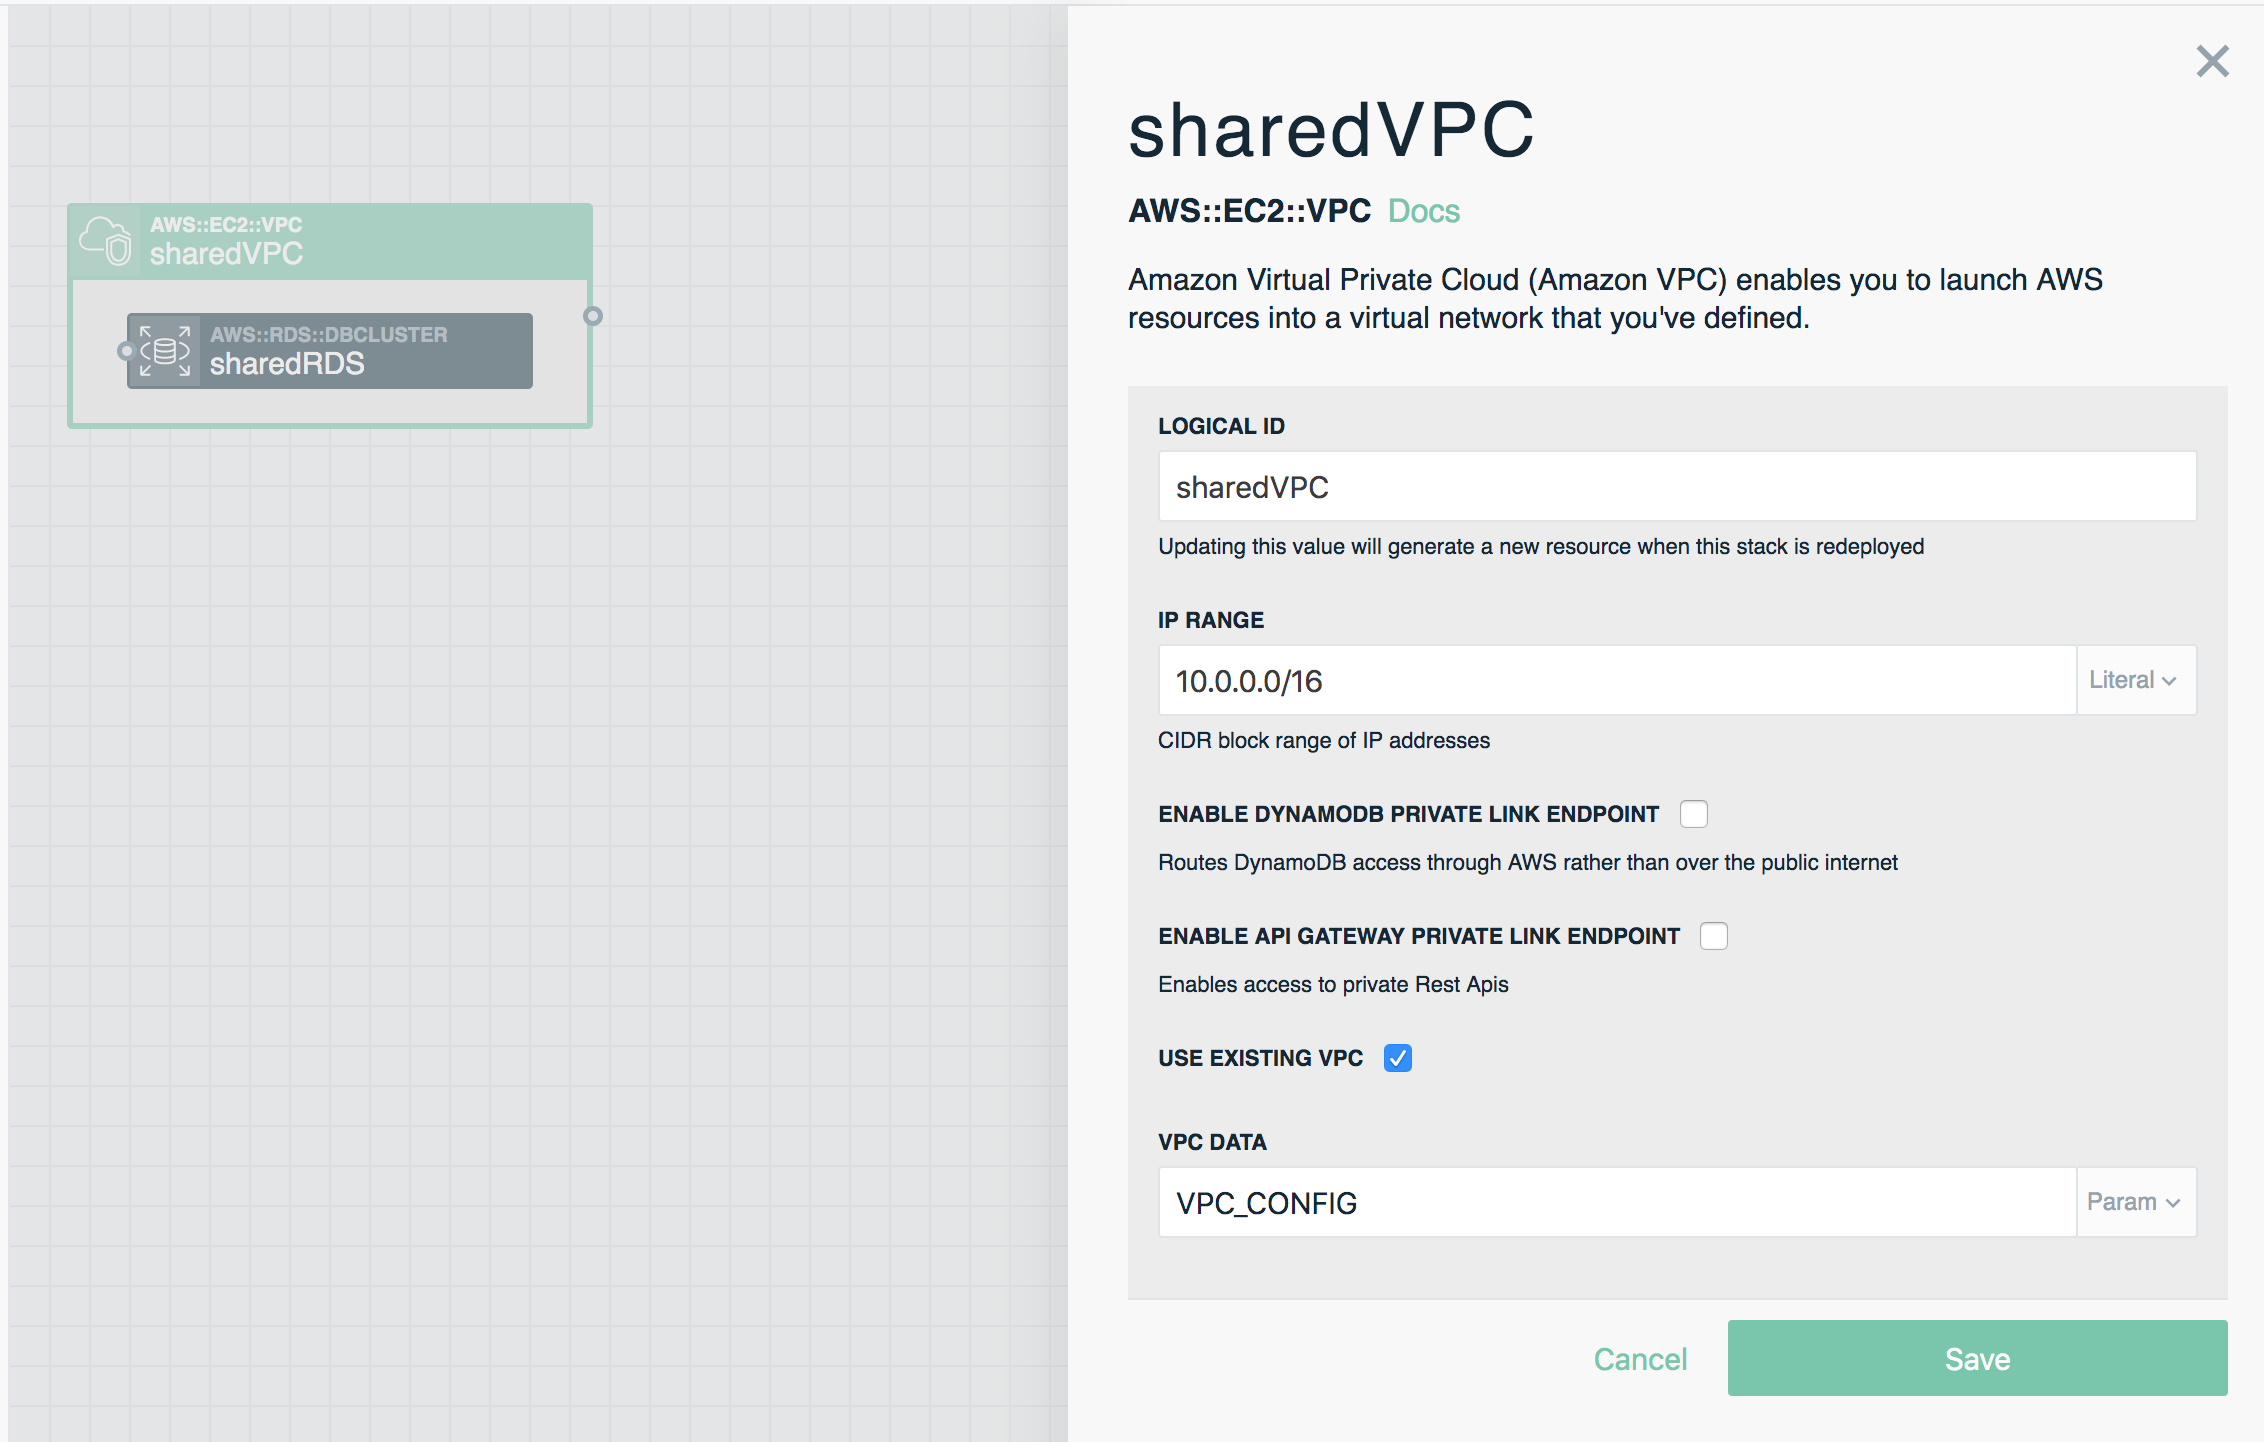
Open up the resource settings panel for sharedVPC. For this walkthrough we're going to keep the default settings.
- Select the Use Existing VPC checkbox at the bottom of the settings
This opens up a YAML editor labeled VPC Data with VPC ID and Subnet ID placeholders that should look famiiliar. We could add the ID's in now, but we're going to reference the environment parameters we set earlier
- On the right, select
Paramfrom the input drop down - Start typing out VPC_CONFIG (or the key name you defined in your environment) and notice Stackery provides auto complete options
- Save your settings
Use Existing RDS Database
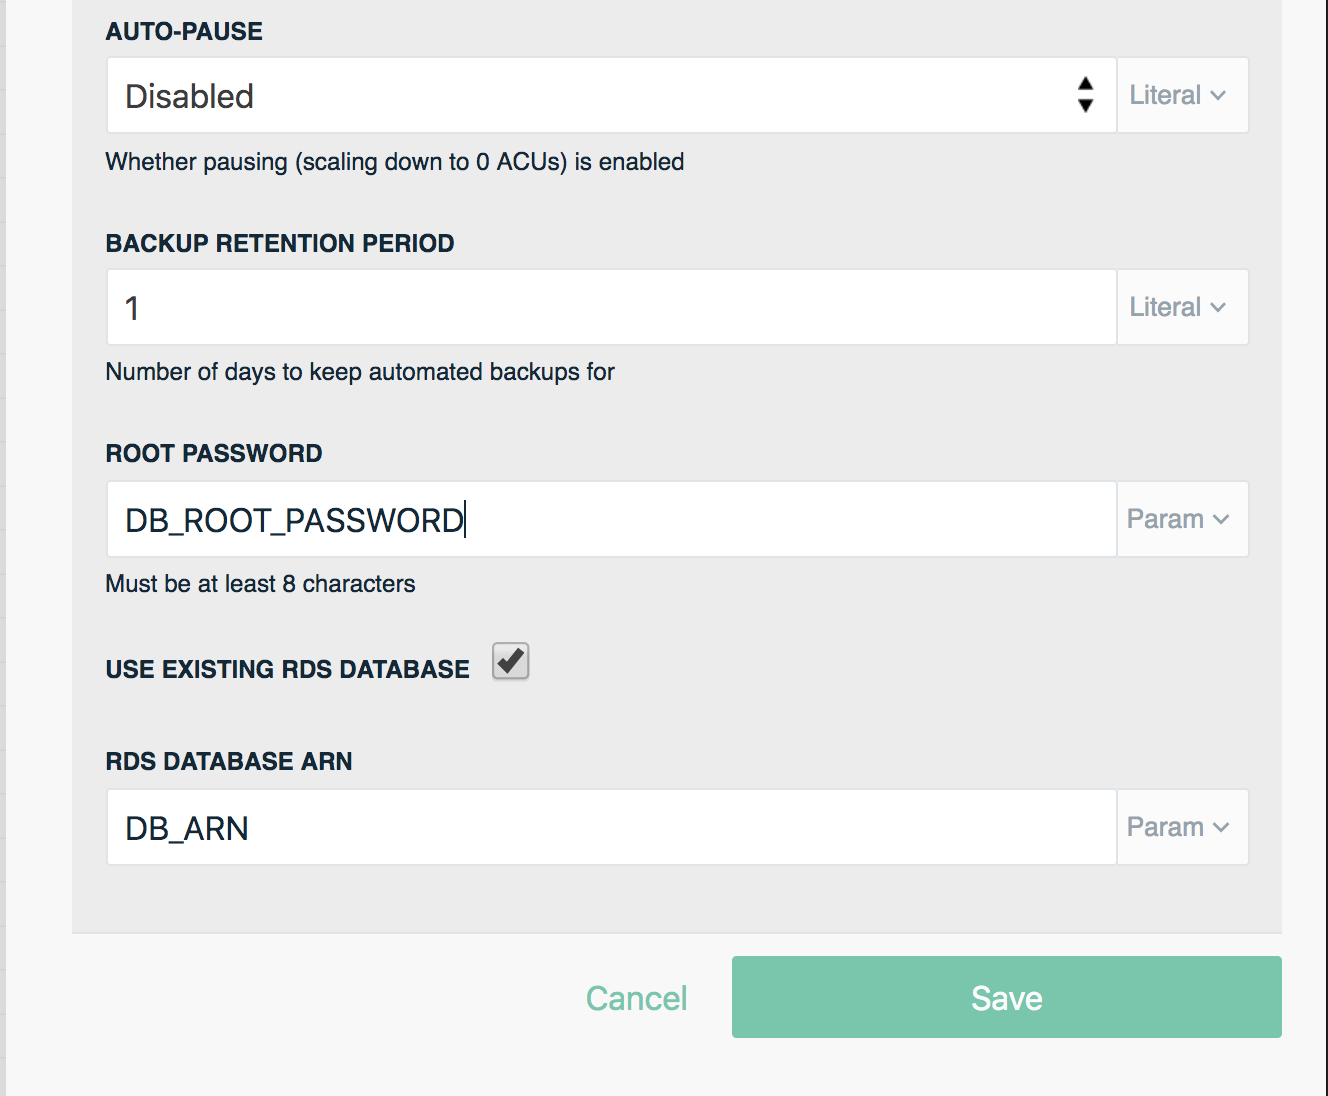
Open up the resource settings panel for sharedRDS.
- For the Root Password setting, select
Paramfrom the input drop down, and enter DB_ROOT_PASSWORD - Select Use Existing RDS Database
- Select
Paramfrom the input drop down of the ARN field, and enter DB_ARN - Save your settings
Deploying a stack with existing resources
To deploy, run the Stackery CLI command locally, in the shared-vpc-2 directory, or deploy it from the Stackery deploy dashboard.
One thing you'll notice is because this stack is referencing an existing VPC and RDS cluster, you're not actually instantiating new resources in AWS, and the deployment is a lot faster.
To confirm you're using the existing VPC and RDS cluster, navigate to the stack View page to view the shared-vpc-2 deployment.
- Open sharedRDS and you'll see it shares the same ARN as the mainRDS database from the shared-vpc-1 stack
- Open sharedVPC and follow the link to View in AWS Console. This will send you to the AWS console for mainVPC, the VPC we're referencing from the shared-vpc-1 stack
Both stacks are now referencing shared VPC and RDS Database resources.
